Inflight Fitness CT-ILPC Assembly Instructions Manual Download Page 11

CT-ILPC ASSEMBLY INSTRUCTIONS 
 

CABLE ASSEMBLY (continued) 
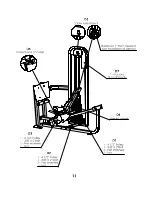
 

D1. 

Route the cable down between the plates welded to the base of the Loop Upright.  


and 1   


D2. 

welded on the base of the Seat Frame near the Base Tube.  Fasten the pulley using 
1   

, 2   

s, and 1 -3/8  nut. 


D3. 

front of the Seat Frame.  Attach the pulley using 1   


washers, and 1   


D4. 

Route the cable back to the chrome Selector Tube and thread the cable into the 

threaded hole. 


D5. 

Adjust the cable tension first by rotating the cam washer higher in its slot.  If the 

tension is still not enough then loosen the jam nut on the threaded end of the cable 
at the top weight and thread in the cable to increase tension.  Re-tighten the jam nut.  


D6. 

Attach the Weight Labels to the recess in the weight plates. 


If you are installing shrouds skip D7 and proceed to Step E1. 


D7. 

Remove the backing from the adhesive tape on the placard and attach on the upper 

right hand corner of the Main Upright.  Remove the protective cover from the 
placard. 


10


Summary of Contents for CT-ILPC

Page 1: ......

Page 2: ...ce schedule provided on the equipment It is strongly recommended that a qualified dealer assemble this CT ILPC Incline Leg Press Calf Raise Should there be any question during assembly contact your au...

Page 3: ...ndle Ass y PLATINUM FRAME PARTS Footplate CUSHION FRAME PARTS Back Pad Bottom Pad CABLES AND PULLEYS ILPC Cable 4 Pulleys 5 MISCELLANEOUS Guide Rods 2 Lube Weight Stack Cushions 2 Instruction Placard...

Page 4: ...CT ILPC PARTS AND HARDWARE HARDWARE DESCRIPTION QUANTITY Bolts 4 3 2 2 2 2 4 1 2 2 Washers Flat Washers 32 4 Cam Washer 1 Nuts and Miscellaneous 17 Flat Head Screws 4 3...

Page 5: ...at washers and 4 3 8 nuts Do not fully tighten the bolts at this time A2 Assemble the longer side of the Bent Support Tube to the Main Upright using 1 Plate 2 3 8 x 3 bolts 4 flat washers and 2 3 8 nu...

Page 6: ......

Page 7: ...nuts B2 Assemble the Handle Assembly to the sliding Seat Sled Assembly using 2 3 8 x 1 bolts 4 flat washers and 2 3 8 nuts B3 Assemble the Bottom Pad to the Seat Sled Assembly using 2 3 8 x 1 1 4 bolt...

Page 8: ......

Page 9: ...n the Guide Rods with the drilled hole facing the machine and slide down to the stack C2 Before proceeding with the cable installation slide the loop of the weight pin lanyard over the end of the ILPC...

Page 10: ......

Page 11: ...cable into the threaded hole D5 Adjust the cable tension first by rotating the cam washer higher in its slot If the tension is still not enough then loosen the jam nut on the threaded end of the cable...

Page 12: ......

Page 13: ...einstalled button head screws and washers E2 Attach the one single side shroud bracket to the Main Upright behind the lower pulley using the pre installed button head screw and washer E3 Attach the fr...

Page 14: ......

Reviews: