background image

C H A P T E R   2  

Installation Procedures

This chapter describes how to install the ICE 4000 terminal. The available ports on the ICE 4000 
are described and identified for you, along with instructions for operating the ICE 4000 terminal. 

Installing the Battery Pack

The ICE 4000 uses a Lithium Ion battery. The ICE 4000 has built-in circuit protection and battery 
charger. If using the ICE 4000 as a mobile unit, plug the terminal in and let it charge for up to six 
hours. Use the following procedures to access the battery pack. 

Step-by-Step

To access the battery pack on the ICE 4000 terminal:

1.

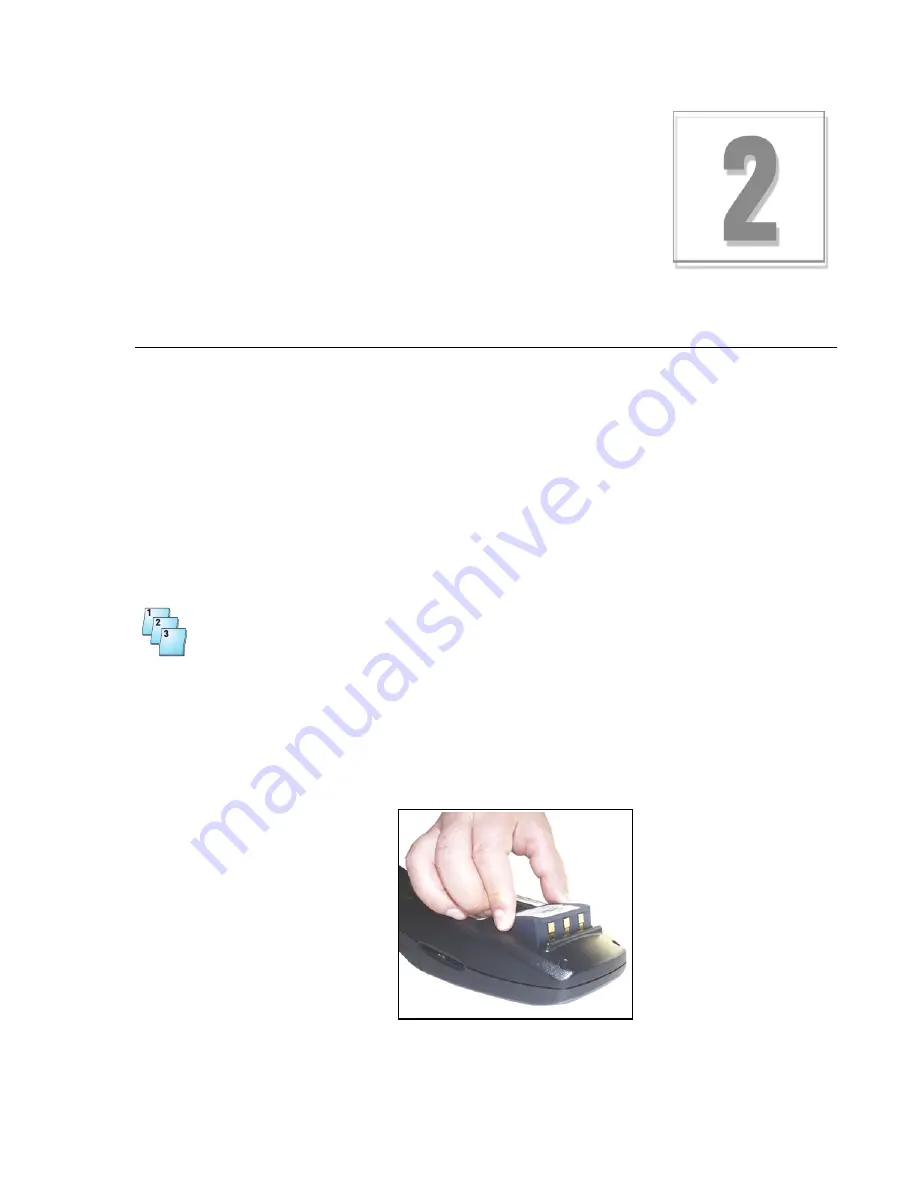
Remove the battery cover by placing your finger in the battery access panel groove. Press in 
and lift the panel away from the ICE 4000.

2.

Insert the battery with the label-side up, and be sure that the three metal connectors are 
facing the front of the terminal.

Figure 2-3. Installing the ICE 4000 Battery Pack

Summary of Contents for ICE4000

Page 1: ... by Switch to Infinity Data Corp for your processing needs Infinity offers great rates excellent customer support and a wide range of payment processing solutions http www infinitydata com Call Today Sales 1 800 393 6665 ...

Page 2: ...ICE 4000 Hardware and Installation Manual Version 1 0_SPOS_05D September 4 2001 ...

Page 3: ......

Page 4: ...The information Hypercom furnishes in this publication is believed to be accurate and reliable However the corporation assumes no responsibility for its use and reserves the right to make changes to the publication at any time without notice Trademarks Hypercom and the Hypercom logo are registered trademarks of Hypercom Corporation Integrated Enterprise Network is a trademark of Hypercom Corporati...

Page 5: ...number of devices you may connect to your line contact your local telephone company to determine the maximum REN for your calling area NOTE REN is associated with loop start and ground start ports Do not use for E M or digital ports If your telephone equipment causes harm to the telephone network the telephone company may discontinue your service temporarily If possible they will notify you in adv...

Page 6: ...quipment Any repairs or alterations to this equipment or any equipment malfunctions may cause the telephone communications company to request that the user disconnect the equipment Users should ensure for their own protection that the electrical ground connections of the power utility telephone lines and internal metallic water pipe system if present are connected together This precaution may be p...

Page 7: ......

Page 8: ...pplication Program Changes 1 4 Financial Integrity 1 4 Fast Response Times 1 4 Reduced Communications Costs 1 5 Networking Efficiency 1 5 Term Master 1 5 Chapter 2 Installation Procedures Installing the Battery Pack 2 1 Powering up the Terminal 2 2 Using the Stylus 2 3 Adjusting the Display Contrast 2 4 Loading Paper into the ICE 4000 2 5 Connecting the Telephone Line 2 6 Connectors 2 7 Self Test ...

Page 9: ...Table of Contents viii ICE 4000 Hardware and Installation Manual 940265 001 rev D ...

Page 10: ...CE 4000 terminal 1 2 Chapter 2 Installation Procedures Figure 2 3 Installing the ICE 4000 Battery Pack 2 1 Figure 2 4 The ICE 4000 Stylus 2 3 Figure 2 5 Contrast Control Dial 2 4 Figure 2 6 Loading the paper roll 2 5 Figure 2 7 Loading the paper roll 2 5 Figure 2 8 ICE 4000 under panel connectors 2 7 ...

Page 11: ...List of Figures x ICE 4000 Hardware and Installation Manual 940265 001 rev D ...

Page 12: ...List of Tables 940265 001 rev D Hypercom Corporation xi List of Tables Chapter 2 Installation Procedures Table 2 1 Self test and diagnostics when software is not loaded 2 8 ...

Page 13: ...List of Tables xii ICE 4000 Hardware and Installation Manual 940265 001 rev D ...

Page 14: ...des information to help you understand the procedures and concepts presented in this guide The following special terms and style conventions are used throughout this document Component names Special bold text highlights certain items including the names of window and dialog box components This text appears in instructions for specific actions such as clicking buttons typing in text boxes and selec...

Page 15: ...edure 2 Most procedures have at least two steps a This is a substep b Substeps must be completed in the order given Caution and Warning boxes When you see a Caution or Warning message read the information promptly and carefully before proceeding The formats for the boxes follows CAUTION Caution advises that a negative result such as a loss of data may occur WARNING Warnings provide information tha...

Page 16: ...4000 terminal provides application level statistical and diagnostic information to the host at the end of each settlement period This information enables the network operator or processor to be actively involved in maintenance and service For software maintenance the Hypercom ICE 4000 terminal uses application downloading from the Hypercom PC based Term Master terminal to terminal loading fast loa...

Page 17: ... 1 MB and optional 1 5 MB n Integrated PIN and signature capture pads n Smart card support n Multi host application support n High contrast 160 x 160 FSTN display with integrated 12 bit resolution n Optional full track 1 2 simultaneous card reader n Multi tasking operating system n Electronic receipt capture n On screen advertising available ...

Page 18: ...ower adapter is used internationally Contrast Control Dial Rotating the Contrast Control Dial located on the left side of the terminal changes the contrast of the display screen Terminal Modem The optional internal modem the Hypercom FastPOS 9600 is compatible with the Bell 212A modem and the CCITT V 22 interface and provides for Asynchronous or Synchronous operation at 9600 bps The optional modem...

Page 19: ...tistics such as response time measurements communication errors re dials card read errors and password review Application Program Changes Program changes are automated and downloaded through either a host resident process or Term Master Financial Integrity The ICE 4000 terminal generates automatic reversals to achieve total financial transaction integrity These reversals ensure that communications...

Page 20: ...ion costs low Term Master The ICE 4000 terminals support parameter and software downloading Parameter downloading does not affect merchant totals due to the sophisticated architecture of the terminal Term Master collects Management Information System MIS statistics and can be interrogated online for speedy problem resolution The PC based Term Master package supports software download requests from...

Page 21: ......

Page 22: ...and battery charger If using the ICE 4000 as a mobile unit plug the terminal in and let it charge for up to six hours Use the following procedures to access the battery pack Step by Step To access the battery pack on the ICE 4000 terminal 1 Remove the battery cover by placing your finger in the battery access panel groove Press in and lift the panel away from the ICE 4000 2 Insert the battery with...

Page 23: ...the power is connected successfully the terminal beeps twice and then performs a self test and diagnostic routine NOTE To fully charge the battery for mobile use plug in the 12 15 VDC power cable and turn the terminal on Leave the terminal powered up for six hours before using WARNING n Do not use an adaptor a power extender adaptor a power extender cable or an AC outlet that does not have a groun...

Page 24: ...tem may damage the touch screen and void the manufacturer warranty The stylus is located on the right side on the terminal below the power button and is stored in a built in sheath Step by Step To remove the stylus 1 Place your finger on the raised grip of the stylus 2 Push it up and away from the terminal to remove NOTE When the stylus is not in use return it to the sheath Figure 2 4 The ICE 4000...

Page 25: ... dial to adjust the display The contrast control dial is located on the side of the ICE 4000 terminal Step by Step To adjust the contrast on the ICE 4000 terminal 1 Place your finger on the Contrast Control dial 2 Turn the Contrast Control dial clockwise to darken or counter clockwise to lighten the contrast Figure 2 5 Contrast Control Dial ...

Page 26: ...lide the cover lock located on the back of the terminal to the right and remove the paper cover 2 Place the ICE 4000 on its face 3 Place the paper roll in the bucket so the paper feeds from under the roll not over the top and has a straight line path into the printer paper feed mechanism 4 Feed the end of the paper under the paper guide in a straight path until the paper feeds automatically 5 Repl...

Page 27: ... cable into the opening marked LINE on the back panel of the ICE 4000 terminal The use of a different telephone cable might result in improper operation Ensure that the telephone line cable latches are firmly locked into the jacks on both the ICE 4000 terminal and the wall receptacle NOTE If a dial tone is not heard check the cable connection Connecting another telephone set into the wall jack hel...

Page 28: ...he ICE 4000 underpanel connectors include power 1 battery 2 SAM chip panels 3 and RS232 PIN 4 and line ports 5 Figure 2 8 ICE 4000 under panel connectors Battery Pack panel 2 Contrast Control dial Power port 1 SAM chip access panel 3 RS232 PIN port 4 Line port 5 Paper Cover lock ...

Page 29: ...software the displays shown in the following table are typical Table 2 1 Self test and diagnostics when software is not loaded Description Terminal response SMIBOOTXXX Boot program name XXX Boot program release SMIBOOTXXX WAIT SELF TEST The memory page status indicates that no program is loaded MEMORY PAGE STATUS BOOT XXXX 01 FFFFFFFFFFFFFFF 17 FFFFFFFFFFFFFF PE indicates Program Error In this cas...

Page 30: ... XXXXXXXXX 1 2 3 4 5 6 7 8 9 0 Q W E R T Y U I O P A S D F G H J K L Z X C V B N M 2 Type the terminal ID number then touch Enter NOTE Some terminal IDs require 8 or 9 digits If the check digit ninth digit is missing or incorrect the terminal does not allow the entry of that ID Verify the check digit with your Help Desk MERCHANT PROGRAM INIT TELEPHONE NO XXXXXXXXX 1 2 3 4 5 6 7 8 9 0 3 Type the in...

Page 31: ...2 3 4 5 6 7 8 9 A B C D E F 6 Touch the appropriate character for the PABX code if necessary then touch Enter NOTE If you need an 8 9 or any other access code to dial out type it here PLEASE INITIALIZE OR CALL HELP FE Restart Merchant Program Program Load Clear Page Memory Maintenance Funcs Fast Load 7 Touch Cancel on the terminal to return to the Idle prompt Step Action Terminal response ...

Page 32: ...gram Load Clear Page Memory Maintenance Funcs Fast Load 1 Touch Program Load on the terminal display PROGRAM LOAD CORRECT NO YES 2 Touch Yes on the terminal display or touch Enter on the terminal The terminal checks the phone line for a proper connection PROGRAM LOAD CHECKING LINE The terminal detects a proper phone line connection and is waiting to detect a dial tone PROGRAM LOAD WAITING FOR DIAL...

Page 33: ...profile Step by Step To initialize an ICE terminals Step Action Terminal response 1 Touch Menu on the terminal NOTE The Idle prompt may vary depending on the terminal and its configuration MAIN X New Trans Batch Reports Terminal Server Tab Setup Tests Browser Functions Supervisor 2 Touch Terminal on the terminal display TERMINAL Ì X Initialize Prog Load Shift View Train Mode Logon ICE PAC NMS Call...

Page 34: ...hrough the pages until I find what I am looking for 4 How easily can you find information in this guide 1 Not easily 2 3 4 5 Very easily 5 How clear is the information in this guide 1 Not clear 2 3 4 5 Very clear 6 How easily can you follow the instructions described in this guide 1 Not easily 2 3 4 5 Very easily 7 How well did you understand the product before reading this guide 1 Not well 2 3 4 ...

Page 35: ......

Page 36: ......

Page 37: ...Document Number 940265 001 rev D Printed in the USA ...

Reviews: