Assembly
Assembly
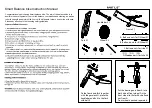
V-Brake
3
34
Check Your Brakes
3
35
3
3
While holding the shoe against the
rim, tighten the shoe fixing nut.
3.
Adjust the balance with the spring
tension adjustment screws.
5.
Depress the brake lever about 10 times as
far as the grip to check that everything is
operating correctly and that the shoe
clearance is correct before using the brakes.
6.
Pass the inner cable through the inner
cable lead. Set the cable with a clearance
of 1mm between each brake pad and the
rim, tighten the cable fixing bolt.
4.
5 mm Allen key
5 mm Allen key
1mm 1mm
1 mm
Spring tension
adjustment screw
Spring tension
adjustment screw
Depress about
10 times
1 mm 1 mm
shoe fixing nut
Check your Brakes
Press each brake lever to make sure that there is no binding and that the brake pads press hard enough on the rims to stop the bike.
The brake pads should be adjusted so they are 1mm to 2mm away from the rim when the brakes are not applied. Brake pads should
be centered on the rim and the rear portion of each brake pad should be about 0.5 – 1.0mm farther from the rim than the front portion
of the brake pad.
Do not ride the bicycle until the brakes are functioning properly.
To test, apply the brakes while trying to push the bike forward to
make sure they will stop the bicycle.
Brake pad aligned with the rim surface
Pad and rim should be parallel.
Direction of rim
rotation
0.5 - 1.0 mm
1- 2 mm
Summary of Contents for BMX BICYCLES
Page 51: ......