background image

ASSEMBLY OF THE APPLIANCE


Before proceeding with the assembly, make sure you have removed all the protective material 
used for packing and transporting the appliance.
Once the stove has been removed from its packaging, examine it to make sure it does not show 
obvious damage. In case of any doubt, do not use the appliance and contact a specialist 
technician. The packaging material should not be left within the reach of children, as it could be 
dangerous. Discard it according to what is established by the regulations in force.

·

 Differences in the device may be observed with respect to the illustrations or instructions in 

the manual. This should not be interpreted as a quality problem, but rather as a consequence 

of the improvements implemented in the product.

·

 The appliance must only be used with a LPG gas cylinder of less than 15 kg.

·

 The regulator used must be approved in accordance with standard EN16129 and the gas 

hose must be approved according to standard EN16436-1 and have a length of less than 50 cm.

Connect one end of the hose to the pressure regulator and the other end to the gas stopcock. 
Make sure that the connections are tight and that none of the connection components or fittings 
are damaged.

·

 Before connecting the cylinder, make sure that your stopcock is closed and that there are no 

open flames (oven on, etc.) in the vicinity. Also, check that the sealing gasket is in good 

condition. Next, screw the pressure regulator in the cylinder.

·

 Connect the regulator to the stop valve and firmly tighten the nut by turning it 

counterclockwise.

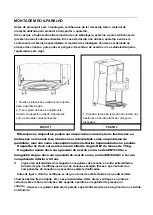
1. Slide down the base plate used as support 
for the gas bottle.
2. Secure the base plate to the rear housing 
of the appliance using 4 screws with their 
corresponding washers.

1. Attach the cylinder retaining cap to the slots 
on the side edge of the device housing.

1. Fold the base plate, on which the gas cyliner
will stand, downwards.

STEP

 2 

STEP

 1 

Summary of Contents for HBF-5205

Page 1: ...QUEMADURAS NÃO QUITAR User s manual manual de instrucciones manual de instruçoes Precaución lea y conserve estas importantes instrucciones Caution please read and preserve these important instructions This product is only suitable for well insulated spaces or occasional use Este producto solo es adecuado para espacios cerrados o uso ocasional Este produto só é adequado para espaços bem isolados ou...

Page 2: ... proximidad de otras fuentes de calor distancia mínima de separación 1 m ni de materiales inflamables o explosivos Tampoco deberá orientarse de manera que proyecte calor hacia objetos susceptibles de sufrir daños o incendiarse por ejemplo cortinas sillas o muebles fácilmente inflamables Posicione la estufa de manera que el calor se dirija hacia el centro de la habitación y en todo caso hacia un es...

Page 3: ...jada apague el aparato para evitar la posibilidad de una descarga eléctrica Los objetos metálicos como cuchillos tenedores cucharas y tapas no deben colocarse sobre la superficie ya que pueden calentarse No se debe usar un limpiador de vapor No use un limpiador de vapor para limpiar su cubierta El aparato no está diseñado para ser operado por medio de un temporizador externo o un sistema de contro...

Page 4: ...otectora 3 Panel frontal superior del armazón 4 Panel frontal del armazón izquierda 5 Panel frontal del armazón derecha 6 Conjunto de la tapa del depósito 7 Quemador de llama azul 8 Armazón posterior 9 Conjunto ODS Sistema de déficit de oxígeno 10 Conjunto de la base ...

Page 5: ... y la manguera de gas deberá estar homologada conforme a la norma EN16436 1 y contar con una longitud inferior a 50 cm Conecte un extremo de la manguera al regulador de presión y el otro extremo a la llave de paso del gas Asegúrese de que las conexiones estén bien apretadas y que ninguno de los componentes o racores de conexión están dañados Antes de conectar la bombona asegúrese de que su llave d...

Page 6: ... aparato No coloque la bombona bocabajo en un intento de aprovechar totalmente su contenido ya que cualquier residuo líquido presente en la bombona podría penetrar en la estufa y provocar daños irreparables INSTRUCCIONES DE UTILIZACIÓN ADVERTENCIA ACCEDA SIEMPRE A LOS MANDOS Y A LA LLAVE DE PASO DE LA BOMBONA DE LA PARTE LATERAL O TRASERA DE LA ESTUFA TRAS HABERSE APAGADO NO INTENTE VOLVER A ENCEN...

Page 7: ...ni la tubería Tenga cuidado de no golpear o dañar la superficie del quemador especialmente delicada racores tubos de gas llave de paso y demás componentes del circuito de gas Recomendamos que personal especializado revise la estufa una vez al año Si decide no utilizar la estufa durante períodos prolongados será conveniente que siga las instrucciones indicadas a continuación A Cierre la llave de pa...

Page 8: ...rato requiere una manguera y regulador de gas Consulte a su distribuidor de gas al respecto Utilice únicamente el aparato en lugares bien ventilados No utilice el aparato en vehículos de recreo tales como caravanas o autocaravanas La habitación donde vaya a instalarse el aparato deberá contar con suficiente circulación de aire para garantizar una buena ventilación y combustión adecuada La habitaci...

Page 9: ......

Page 10: ...he vicinity of other heat sources minimum separation distance 1 m or flammable or explosive materials Neither should it be oriented so as to project heat towards objects susceptible to damage or fire for example curtains chairs or easily inflammable furniture Position the stove so that the heat is directed towards the center of the room and in any case towards an open space The front of the applia...

Page 11: ...g If the surface is cracked switch off the appliance to avoid the possibility of electric shock Metallic objects such as knives forks spoons and lids should not be placed on the surface since they can get hot A steam cleaner is not to be used Do not use a steam cleaner to clean your cooktop The appliance is not intended to be operated by means of an external timer or separate remote control system...

Page 12: ...t panel of the frame 2 Protective grid 3 Upper front panel of the frame 4 Frame front panel left 5 Frame front panel right 6 Tank lid assembly 7 Blue flame burner 8 Subsequent frame 9 ODS Set Oxygen deficit system 10 Core set ...

Page 13: ...tor used must be approved in accordance with standard EN16129 and the gas hose must be approved according to standard EN16436 1 and have a length of less than 50 cm Connect one end of the hose to the pressure regulator and the other end to the gas stopcock Make sure that the connections are tight and that none of the connection components or fittings are damaged Before connecting the cylinder make...

Page 14: ... abuse the connections or any other component of the appliance Do not place the bottle face down in an attempt to fully exploit its contents as any liquid residue present in the cylinder could penetrate the stove and cause irreparable damage INSTRUCTIONS FOR USE WARNING ALWAYS ACCESS THE CONTROLS AND THE PUSH KEY OF THE BOMBON OF THE SIDE OR BACK OF THE STOVE AFTER HAVING TURNED OFF DO NOT ATTEMPT...

Page 15: ...e pipe Be careful not to hit or damage the surface of the burner especially delicate fittings gas pipes stopcock and other components of the gas circuit We recommend that specialized personnel check the stove once a year If you decide not to use the stove for long periods it is advisable to follow the instructions indicated below A Close the stop valve in the cylinder and disconnect the gas regula...

Page 16: ......

Page 17: ...da na proximidade de outras fontes de calor distância mínima de separação 1 m ou de materiais inflamáveis ou explosivos Também não deve ser orientado de modo a projetar calor para objetos suscetíveis a danos ou fogo por exemplo cortinas cadeiras ou móveis facilmente inflamáveis Posicione o fogão de modo que o calor seja direcionado para o centro da sala e em qualquer caso para um espaço aberto A f...

Page 18: ...estiver rachada desligue aparelho para evitar a possibilidade de choque elétrico Objetos de metal como facas garfos colheres e tampa não devem ser colocados na superfície pois podem ficar quentes Um limpador a vapor não deve ser usado Não use um limpador a vapor para limpar sua capa O aparelho não foi concebido para ser operado atravé de um temporizador externo ou de um sistema de controlo remoto ...

Page 19: ...de de proteção 3 Painel frontal superior do quadro 4 Painel frontal do quadro esquerda 5 Painel frontal do quadro direita 6 Montagem da tampa do tanque 7 Queimador de chama azul 8 Quadro subseqüente 9 ODS Set sistema de défice de oxigénio 10 Conjunto Básico ...

Page 20: ...cordo com a norma EN16129 e a mangueira de gás deve ser aprovada de acordo com a norma EN16436 1 e ter um comprimento inferior a 50 cm Ligue uma extremidade da mangueira ao regulador de pressão e a outra extremidade à torneira de gás Certifique se de que as conexões estejam firmes e que nenhum dos componentes de conexão ou acessórios estejam danificados Antes de ligar o cilindro certifique se de q...

Page 21: ...m abuse das conexões ou de qualquer outro componente do aparelho Não coloque a garrafa virada para baixo na tentativa de explorar completamente o seu conteúdo pois qualquer resíduo líquido presente no cilindro pode penetrar na estufa e causar danos irreparáveis INSTRUÇÕES DE UTILIZAÇÃO ATENÇÃO ACESSE SEMPRE OS COMANDOS E A CHAVE DA BOMBA DO LADO OU TRASEIRO DO FOGÃO APÓS A DESLIGAR NÃO TENTE RETOR...

Page 22: ...não bater ou danificar a superfície do queimador especialmente delicada acessórios tubos de gás torneira e outros componentes do circuito de gás Recomendamos que pessoal especializado verifique o fogão uma vez por ano Se decidir não usar a estufa por longos perí odos é aconselhável seguir as instruções indicadas abaixo A Feche a válvula de parada no cilindro e desconecte o regulador de gás dela B ...

Page 23: ...arato requiere una manguera y regulador de gas Consulte a su distribuidor de gas al respecto Utilice únicamente el aparato en lugares bien ventilados No utilice el aparato en vehículos de recreo tales como caravanas o autocaravanas La habitación donde vaya a instalarse el aparato deberá contar con suficiente circulación de aire para garantizar una buena ventilación y combustión adecuada La habitac...

Page 24: ...n N A kW two or more manual stages no room yes In standby mode elSB N A kW With mechanic thermostat room temperature no with electronic room temperature control no With electronic room temperature control plus no With electronic room temperature control plus no Other control options multiple selections possible room temperature control with presence no Room temperature control with open window no ...

Page 25: ...ros a través del correo info infiniton es INFORMACIÓN SOBRE EL PRODUCTO Si tiene alguna pregunta o duda relacionada con su dispositivo póngase en contacto con nosotros SERVICIO TÉCNICO También puede ponerse en contacto con nuestro servicio técnico oficial tel 34 958 087 169 e mail reparaciones info infiniton es www infiniton es Recuerda que en nuestra web tenemos un apartado de preguntas frecuente...

Page 26: ...onsejo de 9 de Marzo de 1 999 traspuesta a la legislación española mediante el Real Decreto 1 890 2000 de 20 de Noviembre Para más información relacionada con las declaraciones y certificados de conformidad póngase con nosotros a través del correo info infiniton es Síguenos en nuestras redes sociales y accede a contenido exclusivo Copyright 2020 Todos los derechos reservados ...

Page 27: ...INFINITON WORLD ELECTRONIC S L info infiniton es INFINITON WORLD ELECTRONIC S L info infiniton es ...

Page 28: ...Para mas información sobre nuestra política de RMA y Reparaciones visite www infiniton es rma politica rma infiniton pdf INFINITON WORLD ELECTRONIC S L info infiniton es WORLD ELECTRONIC ...

Reviews: