background image

Hardware Manual XE166 Low End Easy Kit Board V1.5

Information in Detail


Hardware Manual

22

V1.5, 2011-03


3.3.3

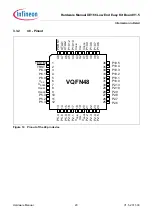
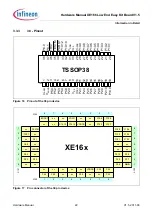
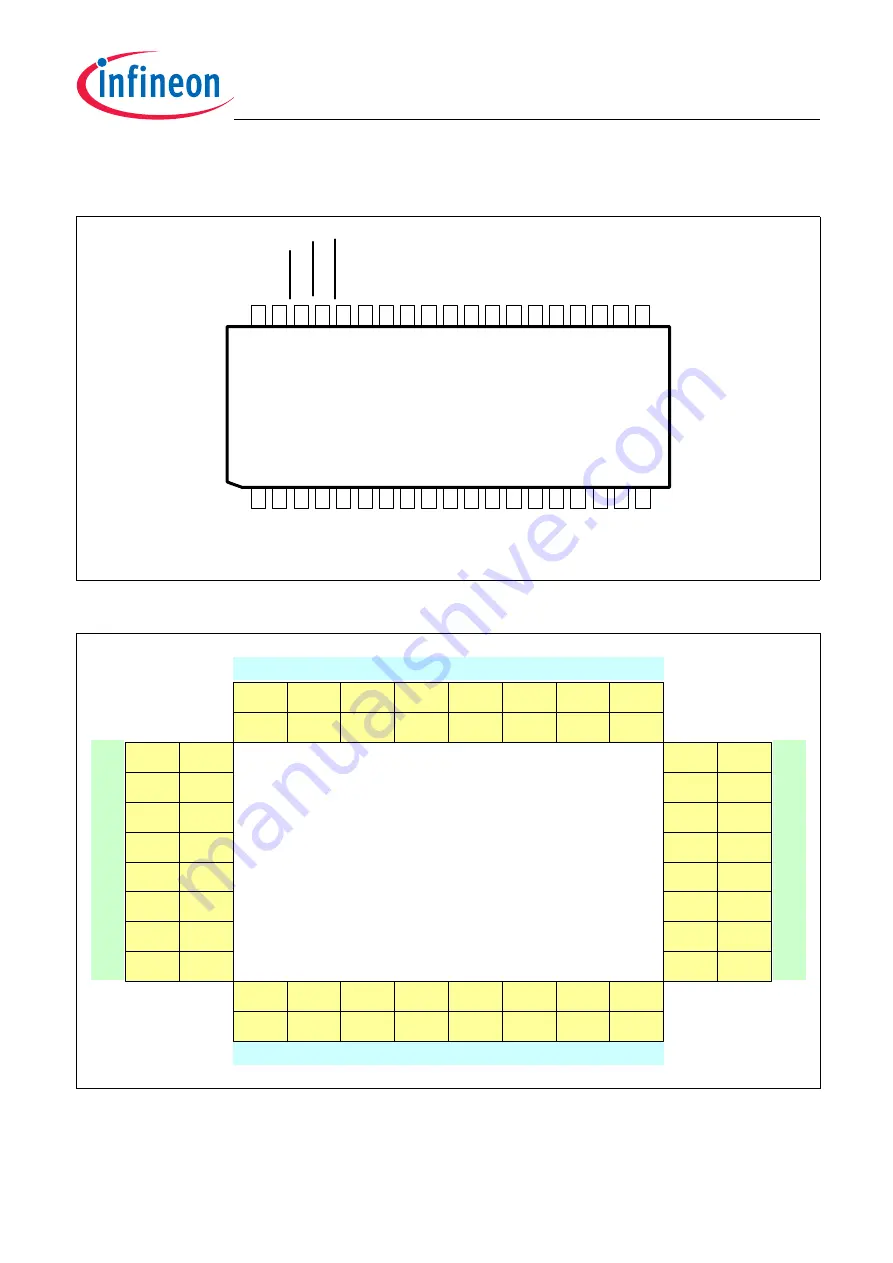
38 - Pinout

Figure 16

Pinout of the 38 pin device

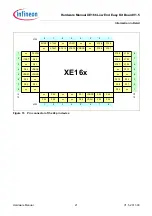
Figure 17

Pin connector of the 38 pin device

21

22

20

P10.1

TSSOP38

24

25

23

26

27

28

29

30

31

32

33

34

35

36

37

38

15

14

16

13

12

11

10

9

8

7

6

5

4

3

2

1

P10.

2

P10.

3

P10.

4

P10.

5

P10.

6

P10.

12

PO

R

S

T

V

DD

IM

P10.

7

P10.

10

P10.

9

P10.

8

TR

ST

V

DD

P

B

P2

.4

P2

.3

P2

.0

TEST

M

P5

.8

P5

.4

P5

.3

V

DDP

P6.0

P6.1

V

AR

EF

P5

.2

V

AG

N

D

P5

.0

P2

.5

18

17

19

P2

.7

P2

.6

P2

.8

P2.

9

P1

0

.0

P2

.1

0

V

SS

V

SS

GND

P2.6

P2.7

P2.8

P2.9

P2.10

nc

nc

nc

nc

P10.0

P10.1

P10.2

P10.3

P10.4

P10.5

1

2

3

4

5

6

7

8

P5.4

nc

P5.8

nc

nc

nc

nc

nc

P2.0

nc

nc

VDDPB

nc

P2.3

P2.4

P2.5

1

2

3

4

5

6

7

8

X102

X10

3

nc

/PORST

nc

nc

P10.12

nc

P10.10

VDDI1

VDDPB

nc

nc

nc

P10.9

P10.8

P10.7

P10.6

nc

nc

P5.3

P5.2

nc

P5.0

VAGND

nc

nc

P6.0

P6.1

nc

nc

/TRST

/TESTM

nc

8

7

6

5

4

3

2

1

X10

1

8

7

6

5

4

3

2

1

X104

XE16x

Summary of Contents for XE166 Series

Page 1: ...XE166 Family Hardware Manual XE166 Low End Easy Kit Board V1 5 Microcontrollers Hardware Manual V1 5 2011 03 ...

Page 2: ...MATION GIVEN IN THIS APPLICATION NOTE Information For further information on technology delivery terms and conditions and prices please contact the nearest Infineon Technologies Office www infineon com Warnings Due to technical requirements components may contain dangerous substances For information on the types in question please contact the nearest Infineon Technologies Office Infineon Technolog...

Page 3: ...E166 Revision History V1 5 2011 03 Previous Version s 1 4 We Listen to Your Comments Is there any information in this document that you feel is wrong unclear or missing Your feedback will help us to continuously improve the quality of this document Please send your proposal including a reference to this document to mcdocu comments infineon com ...

Page 4: ... 12 2 6 1 Power Supply via Power Plug 13 3 Information in Detail 14 3 1 Switch S101 14 3 1 1 DIP Switch Setting for XE16x L U Series 14 3 2 Headers Connectors and Components 15 3 2 1 USB Interface 15 3 2 2 CAN0 X106 15 3 2 3 LIN Interface X105 16 3 2 4 OCDS Interface 16 3 2 5 DAP Interface 16 3 2 6 ADC 17 3 2 7 LEDs 17 3 2 8 Serial EEPROM 17 3 3 Pin Definition and Location 18 3 3 1 64 Pinout 18 3 ...

Page 5: ...elivers more performance more Flash memory more RAM strongly enhanced peripherals and a complete DSP library MCU and DSP in a core Infineon Technologies Real Time Signal Controller combines the traditional strengths of a Microcontroller Unit MCU to control peripherals with the computing power of Digital Signal Processors DSP All in one enhanced C166S V2 core Together the Microcontroller s real tim...

Page 6: ...E166 Board offers a wide variety of connectors USB connector for ASC JTAG SPD Interface 4 pin header for LIN Transceiver 16 pin header for JTAG interface OCDS 10 pin 2x5 header for CAN High Speed Transceiver CAN0 10 pin header for DAP SPD interface Components Low Drop Voltage Regulator TLE 4274 Four status LED s for Power RESET JTAG CAN Transceiver TLE 6251DS LIN Transceiver TLE 7259 FT2232HL Dual...

Page 7: ... about XE166 Easy Kit Board Hardware Manual 7 V1 5 2011 03 2 2 Block Diagram Figure 1 Block diagram of XE166 Easy Kit layout overview XE16x CPU OCDS1 XTAL USB To UART JTAG Bridge TxD RxD MultiCAN Voltage Regulator LIN Transceiver CAN Transceiver 8 LEDs EEPROM LIN USB DAP ...

Page 8: ...mation about XE166 Easy Kit Board Hardware Manual 8 V1 5 2011 03 2 3 Board Overview Figure 2 Top View basic components USB Power 1 LIN1 1 CAN0 Config 1 4 Infineon XE166 Reset Debug Run Debug Active Power Supply 1 Power Supply Jumper DAP 1 1 OCDS1 10 7 AN0 ADC Reset ...

Page 9: ...the logic levels at a number of pins at the end of the internal reset sequence DIP switch S101 allows to configure the startup setting of the XE166 during RESET The default System Startup Configuration is shown in Table 1 By default all DIP Switches are OFF The XE166 executes a standard start from internal Flash Note The Kit is programmed with BMI for DAP To connect a JTAG debugger box from a Tool...

Page 10: ...be delivered with a Software called DAS Device Access Server The goal of the DAS architecture is to provide one single interface for all types of tools which fulfills all performance and reliability needs Additionally a driver for a virtual COM port will be installed Find out more about DAS on the Infineon Web page http www infineon com DAS This DAS Software can be found in the Easy Kit CD under t...

Page 11: ...Hardware Manual XE166 Low End Easy Kit Board V1 5 General Information about XE166 Easy Kit Board Hardware Manual 11 V1 5 2011 03 Figure 4 Tools install ...

Page 12: ...power The specification provides for no more than 5 25 V and no less than 4 35 V between the ve and ve bus power lines Initially a device is only allowed to draw 100 mA It may request more current from the upstream device in units of 100 mA up to a maximum of 500 mA In practice most ports will deliver the full 500 mA or more before shutting down power even if the device hasn t requested it or even...

Page 13: ...be changed Note In case the USB Host PC goes into Suspend Mode an external Power Supply should be used 2 6 1 Power Supply via Power Plug The XE166 Board can be supplied either with USB cable or with an external power supply For external power supply a regulated DC power supply with max 12Volt 400mA can be connected to the power connector The maximum power dissipation of the used voltage regulator ...

Page 14: ... a limited number of start up modes For all possible start up modes please refer to the corresponding User s Manual 3 1 Switch S101 3 1 1 DIP Switch Setting for XE16x L U Series Table 4 DIP Switch Settings for S101 Name in schematic Default configuration Description S101 Startup configuration Standard start from internal Flash xx xx OFF xx S101 Startup configuration BMI valid BLS disable Start up ...

Page 15: ...t see Figure 7 Figure 7 On board header P201 3 2 2 CAN0 X106 One CAN transceiver is connected to the MultiCAN on XE166 node 0 The transceiver is connected to the IDC10 plug For the pinout of IDC10 plug see Figure 8 You can use a IDC female connector with crimp connector flat cable and SUB D 9 plug with crimp connector to have a 1 1 adapter to SUB D 9 CAN module is not available to XE16xU series Fi...

Page 16: ...ou connect a debug hardware ensure that the MiniWiggler circuit is not active ACTIV LED is off and on the DAP connector X203 no hardware is connected or the hardware is tristate If the ACTIV LED is on then stop the active DAS Server JTAG over USB Chip and or remove the USB connection to the PC Figure 10 On board header X202 3 2 5 DAP Interface The board comes with a DAP connector X203 For pinout o...

Page 17: ... 2 8 Serial EEPROM By default the USIC0 Channel 1 of the XE166 is connected to a serial EEPROM with a size of 512K 64 x 8 The default setting for the SSC is described in Table 6 Table 5 LEDs description LED number Description D201 red Debug Run Mode switched by DAS Server D202 green Debug Active Mini Wiggler circuit active D207 red Power On Reset Active D208 green Board Voltage 5 Volts D101 D108 y...

Page 18: ...34 33 LQFP64 50 51 49 52 53 54 55 56 57 58 59 60 61 62 63 64 31 30 32 29 28 27 26 25 24 23 22 21 20 19 18 17 P5 6 P5 5 P5 3 P5 2 P5 1 P5 0 VAGND TESTM P6 3 VAREF VDDPB P6 2 P6 1 P6 0 P2 7 P2 8 P2 9 P2 10 P2 11 P2 12 P2 13 P2 6 P10 4 VDDPB P10 0 P10 3 P10 2 P10 1 P10 5 P10 7 P10 8 P10 9 P10 10 P10 11 P10 12 P10 13 PORST V DDIM P10 14 XTAL1 XTAL2 P10 15 ESR0 V DDPB P2 5 P2 4 P2 3 P2 2 P2 1 P2 0 P5 1...

Page 19: ...DDPB P10 0 P10 1 P10 2 P10 3 P10 4 P10 5 1 2 3 4 5 6 7 8 P5 4 P5 7 P5 8 P5 9 P5 10 P5 11 P5 13 P5 15 P2 0 P2 1 VDDI1 VDDPB P2 2 P2 3 P2 4 P2 5 1 2 3 4 5 6 7 8 X102 X103 ESR0 PORST XTAL1 XTAL2 P10 12 P10 11 P10 10 VDDI1 VDDPB P10 15 P10 14 P10 13 P10 9 P10 8 P10 7 P10 6 P5 6 P5 5 P5 3 P5 2 P5 1 P5 0 VAGND VAREF VDDPB P6 0 P6 1 P6 2 P6 3 TRST TESTM GND 8 7 6 5 4 3 2 1 X101 8 7 6 5 4 3 2 1 X10⁴ XE16x...

Page 20: ... 36 35 34 33 32 31 30 29 28 27 26 25 VQFN48 37 38 39 40 41 42 43 44 45 46 47 48 24 23 22 21 20 19 18 17 16 15 14 13 P5 3 P5 2 VDDPB TESTM P6 3 P6 1 VAGND VAREF P6 0 P5 0 P2 6 P2 7 P2 8 P10 4 P10 0 P10 3 P10 2 P10 1 P10 5 P10 6 P10 7 P10 12 PORST V DDIM XTAL2 P10 9 P10 8 V DDPB P2 2 P2 1 P2 0 V DDPB P2 3 P5 8 P5 9 V DDIM P2 5 P2 4 XTAL1 TRST P5 4 P2 9 P2 10 P2 13 P10 10 VSS V SS V SS ...

Page 21: ...2 10 nc nc P2 13 nc P10 0 P10 1 P10 2 P10 3 P10 4 P10 5 1 2 3 4 5 6 7 8 P5 4 nc P5 8 P5 9 nc nc nc nc P2 0 P2 1 VDDI1 VDDPB P2 2 P2 3 P2 4 P2 5 1 2 3 4 5 6 7 8 X102 X103 nc PORST XTAL1 XTAL2 P10 12 nc P10 10 VDDI1 VDDPB nc nc nc P10 9 P10 8 P10 7 P10 6 nc nc P5 3 P5 2 nc P5 0 VAGND VAREF VDDPB P6 0 P6 1 nc P6 3 TRST TESTM nc 8 7 6 5 4 3 2 1 X101 8 7 6 5 4 3 2 1 X10⁴ XE16x ...

Page 22: ...RST V DDIM P10 7 P10 10 P10 9 P10 8 TRST V DDPB P2 4 P2 3 P2 0 TESTM P5 8 P5 4 P5 3 V DDP P6 0 P6 1 V AREF P5 2 V AGND P5 0 P2 5 18 17 19 P2 7 P2 6 P2 8 P2 9 P10 0 P2 10 V SS V SS GND P2 6 P2 7 P2 8 P2 9 P2 10 nc nc nc nc P10 0 P10 1 P10 2 P10 3 P10 4 P10 5 1 2 3 4 5 6 7 8 P5 4 nc P5 8 nc nc nc nc nc P2 0 nc nc VDDPB nc P2 3 P2 4 P2 5 1 2 3 4 5 6 7 8 X102 X103 nc PORST nc nc P10 12 nc P10 10 VDDI1...

Page 23: ...1 R135 R133 134 connect disconnect CAN0 enable disable CAN0 supply Bus voltage internal external CAN0 connect Bus disconnect Bus CAN0 Microcontroller XE16x Analog reference Voltage supply R148 R213 R147 change of analog reference source change of voltage supply AT25128N 2 Serial EEPROM 2 The soldered part may differ from the schematic for example Atmel 25040AN R140 R141 R142 R143 connect to USIC0 ...

Page 24: ... OCDS Debugging Interface The XE166 Easy Kit offers access to device via four interfaces UART JTAG DAP SPD through a USB connection With the FTDI chip an on board USB JTAG wiggler has been implemented Further the USB interface allows to emulate a USB to UART bridge A simple 16 pin JTAG DAP SPD header can be used to connect a debugger from one of Infineon s tool suppliers Both systems include an On...

Page 25: ...2 10 GND 1 3 2 D109 BAT54 04 R112 10K 1 3 2 X10⁷ I2C_opt P10 1 P10 2 GND TRST 36 PORST 34 TESTM 35 P5 0 3 P2 0 8 P2 3 11 P2 4 12 P2 5 13 P2 6 14 P2 7 15 P2 9 17 P2 8 16 P6 0 38 P6 1 37 P10 0 19 P10 1 20 P10 2 21 P10 3 22 P10 4 23 P10 5 24 P10 6 25 P10 7 26 P10 8 27 P10 9 28 P10 10 32 P10 12 33 VDDI1 31 VDDPB 10 VDDPB 29 GND 30 VAGND 2 VAREF 1 P5 2 4 P5 3 5 P5 4 6 P5 8 7 GND 9 P2 10 18 U103 XC2XXX ...

Page 26: ...201 BC858C 5V R217 47K CB210 100n GND S201 RESET GND PORST R216 1K 5V R219 1K5 GND D206 LP T67K PORT 2 10 RO 2 GND 4 BUC 3 VCC 5 VS 8 R 1 BDS 6 BUO 7 U206 TLE6365G_opt CB207 220n_opt GND R227 47K_opt R228 100K_opt C206 470n_opt GND GND GND C207 10n_opt L203 DO3316P 224_opt D203 SS14_opt GND CB208 220n_opt GND BDBUS0 BDBUS1 C208 100µF 10V_opt GND 5V VDD_USB VDD_REG 1 2 3 JP201 POWER 1 3 2 Q206 BSS1...

Page 27: ...Published by Infineon Technologies AG w w w i n f i n e o n c o m ...

Page 28: ...Mouser Electronics Authorized Distributor Click to View Pricing Inventory Delivery Lifecycle Information Infineon KITXE161FLEKV1TOBO1 KITXE160FUEKV1TOBO1 KITXE162FMEKV1TOBO1 KITXE162FNEKV1TOBO1 ...

Reviews: