CALIBRE NO. 0S00
CHRONOGRAPH FUNCTION: CENTER SECOND HAND CHRONOGRAPH 1/1 sec. Timing up to
11 hours 59 minutes 59 seconds.
BATTERY: SR927SW
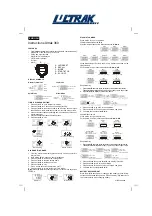
A) DISPLAYS AND BUTTONS
B) SETTING THE TIME
C) SETTING THE DATE
D) SETTING THE DAY
E) USING THE CHRONOGRAPH
F) CHRONOGRAPH RESET( INCL. AFTER REPLACING BATTERY)
A) DISPLAYS AND BUTTONS
B) SETTING THE TIME
1. Pull the crown out to the 2nd click position.
2. Turn the crown to set hour and minute hands.
3. When the crown is pushed back to the normal position, small second hand begins to run.
C) SETTING THE DATE
1. Pull the crown out to the 1st click position.
2. Turn the crown anticlockwise to set the date.
* If the date is set between the hours of around 9:00 PM and 1:00 AM, the date may not change on
the following day.
3. After the date has been set, push the crown back to the Normal position.
D) SETTING THE DAY
1. Pull the crown out to the 1st click position.
2. Turn the crown clockwise to set the day.
* If the day is set between the hours of around 11:15 PM and 6:00 AM, the day may not change on
the following day.
3. After the day has been set, push the crown back to the Normal position.
Chronograph second
Button A
Normal position
1st click position
2nd click position
Button B
Date
Day
Hour hand
Minute hand
Chronograph
minute hand
Chronograph
hour hand
Small second hand