background image

Tank Mounting 

The NAUTILUS 

XP 

is designed to mount onto the back of the SCUBA tank.   To do so, 

loop the strap into the buckle forming a loop.  Slide the loop and NAUTILUS 

XP  

over the 

tank until the bottom of the NAUTILUS 

XP 

is about 1/2 inch from the bottom of the tank.           

Tighten the strap.   NOTE:  If the BCD cam strap inter-fears,  leave the NAUTILUS 

XP 

loose 

in position. Tighten the BCD and then tighten NAUTILUS 

XP

.

Trigger Warnings

• 

The trigger is ALWAYS to be used in the left hand.  This keeps your right hand   


free to access your regulator should the need arise.

Forward/Reverse

NAUTILUS 

XP

 features both forward and reverse control.  The trigger is a rocker design.  

When the front (away from the connecting wire) is depressed,  NAUTILUS 

XP

 will drive 

forward.  When toggled toward the wire connection or back, it will reverse.

Sleep Mode

To ensure that maximum battery is available and to protect against accidentally pushing 

the trigger in travel, the NAUTILUS 

XP

 goes into a sleep mode when not toggled for three 

minutes.   

TO TAKE OUT OF SLEEP MODE TOGGLE THE FOLLOWING SEQUENCE

REVERSE

FORWARD
FORWARD
A TONE WILL OCCUR UPON AWAKENING.

7

Summary of Contents for NAUTILUS XP

Page 1: ...Indigo INDUSTRIES NAUTILUS USER GUIDE...

Page 2: ...4 PARTS 4 SPECIFICATIONS 5 MOTOR 5 BATTERY 5 GENERAL 5 GETTING STARTED 5 CHARGING THE BATTERY 5 REPLACING THE BATTERY 5 6 TANK MOUNTING 7 TRIGGER 7 MAINTENANCE 8 FAILURE MODE 8 AFTER USE 8 BATTERY O...

Page 3: ...ather a tool to assist you in improving your dives by increasing bottom time through lower exertion assisting with photography and aiding in assent stop control Properly Used NAUTILUS XP will provide...

Page 4: ...or combustible material store in a cool dry ventilated area ALWAYS keep batteries away from children NEVER attempt to recharge an Indigo Industries lithium battery module with any other recharger than...

Page 5: ...with long hair Water Intrusion Be sure to check all sealing areas prior to each and every dive Battery cap O rings should be checked on every dive for damage and replaced every 10 dives If water ente...

Page 6: ...two O rings there will be continuous tension on the cap Carefully set the cap aside ensuring that the o rings stay clear of debris and dirt Disconnect the XT60 connector Repeat on the second tube Plug...

Page 7: ...completely into the tube pull it out inch and reposition until the modules are centered DO NOT USE FORCE The module should sit easily into the tube and front cap Inspect the O rings on each cap for s...

Page 8: ...the left hand This keeps your right hand free to access your regulator should the need arise Forward Reverse NAUTILUS XP features both forward and reverse control The trigger is a rocker design When...

Page 9: ...nish and free any small debris from the impeller CAUTION Do not insert any object including fingers into the impeller housing unless both batteries have been unplugged Verify this is complete by depre...

Page 10: ...nector Review charger Is the light coming on in green indication of full charge Review battery connector for damage If found return battery module and charger to an Authorized Indigo Industries dealer...

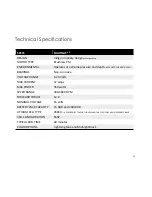
Page 11: ...BEARINGS Non corrosive VOLTAGE RANGE 6 20 Volts MAX CURRENT 22 amps MAX POWER 350 waPs SPEED RANGE 300 3800 RPM FORWARD THRUST 12 NOMINAL VOLTAGE 16 volts BATTERY PACK CAPACITY 15 AHR and 240 WHR LIT...

Page 12: ...his warranty does not apply to commercially used product Indigo Industries will repair or replace any warranted component or replacement part that is defective in materials or workmanship Replacement...

Page 13: ...s 4626 North 300 West 150 Provo UT 84604 Phone 385 374 0444 Connect With Us Online Website www Indigo Industries com Facebook Page www facebook com indigoindustriesscuba Twitter indigoindustrie Instag...

Page 14: ...Indigo INDUSTRIES INDIGO INDUSTRIES COM...

Reviews:

Related manuals for NAUTILUS XP