


9
GB
ATTENTION
Read your manual carefully since it contains instructions
which will ensure safe installation, use and maintenance of
your appliance.
Your Refrigerator is built to International safety standards
(EN60) ans has been awarded the European approval mark
(IMQ) for compliance with UK electrical safety requirements.
It also meets the EC standards on the prevention and elimi-
nation of readio interference (EC directive 87/308 - 02.06.89).
1.
This appliance is designed to be used indoors and under
no circumstances should it be installed outside even if pro-
tected by a roof. Leaving the appliance exposed to the rain
and whether is exceedingly dangerous.
2.
The appliance should be used only by adults and exclu-
sively for storing foodstuffs in compliance with the instruc-
tions provided in this manual. Under no circumstances should
children be allowed to operate, or tamper with, this prod-
uct.
3.
Do not attempt to operate or handle this appliance when
barefoot, or with wet hands or feet.
4.
It is highly recommended that you do not operate this
appliance by connecting it to the power supply with exten-
sions or multiple socket plugs. If the refrigerator has been
installed between two cabinets, make sure that the supply
chord is not dangerously crimped or trapped beneath a heavy
object.
5.
Never pull the cable or the appliance to remove the plug
from the socket; this is exceedingly dangerous.
6.
Do not touch the internal cooling elements, especially if
your hands are wet, since you could burn or hurt yourself.
7.
Before doing any cleaning, disconnect the appliance from
the electricity (by pulling out the plug or turning off the gen-
eral switch in your home).
8.
Before disposing of your old appliance, remember to break
or remove the lock as a safety measure to protect children
who might lock themselves inside the appliance when play-
ing. In addition, if the appliance is a new one with a lock,
keeo the key out of the reach of small children.
9.
If your appliance is not operating properly, read the chap-
ter entitled, “Trouble Shooting”, which might help you re-
solve the problem, before calling an after-sales service cen-
tre. Do not attempt to repair the appliance by tampering
with the internal components.
10.
If the power supply cord must be replaced, please contact
one of our Customer Service Centers. In some cases, the con-
nections are made using special terminals and in others a special
tool must be used to access the connections.
11.
Do not use electric appliances inside the compartment
for food storage, if these are not those recommended by
the manufacturer.
12.
At the end of the functional life of your appliance –
containing cyclopentane gas in the insulation foam and
perhaps gas R600a (isobutane) in the refrigeration circuit –
the latter should made safe before being sent to the dump.
For this operation, please contact your dealer or the Local
Organisation in charge of waste disposal.
Installation
Proper installation of the appliance is essential to en-
sure the best and most efficient performance of your
appliance.
Ventilation
The compressor and condenser generate heat and, there-
fore, need to be ventilated properly. Rooms with less than
perfect ventilation are not very suited for installation of the
appliance. Therefore, it should be installed in a room with
an opening (window or French window) that provide the
appropriate amount of air re-circulation. It is also important
that the room not be too humid.
During installation, make sure not to cover or obstruct the
grates that allow for proper ventilation of the appliance.
For proper ventilation of the appliance, you must leave:
- a space of at least 10 cm between the top part and any
cabinets above it;
- a space of at least 5 cm between the sides of the appliance
and any adjacent cabinets/walls.
Away from Heat
Avoid positioning the appliance in a place where it is directly
exposed to sunlight or near an oven, cook top or the like.
Levelling
The floor should be perfectly level; if not, you can adjust the
feet at the front of the appliance.
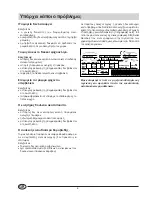
Earthing
Before making the electrical connection, check that the volt-
age shown on the data plate, that you will find on the bot-
tom left hand side of the appliance next to the crisper, cor-
responds to that of your home and that the socket is earthed
in compliance with all current electrical regulations. If the
system is not earthed, the manufacturer declines all liability
for consequent damages or losses. Do not use adapters or
multiple sockets.
Position the appliance in such a way
that you can access the socket where it is plugged in.
Check the power load
The electrical socket must support the maximum power load
of the appliance shown on the data plate (on the bottom
left hand side of the appliance next to the crisper).
Before plugging the appliance to the mains
Stand the appliance upright and wait at least 3 hours before
plugging the appliance into the mains to ensure proper per-
formance.
Safety - a good habit to get into.
Summary of Contents for T5 FNF P
Page 1: ...T5 FNF P Refrigerator Installation and use Frigor fico Instalaci n y uso...
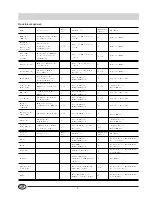
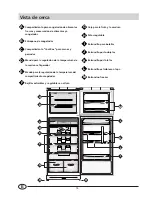
Page 4: ...2 GR A B C D E F G H I J K L M freezer L K M J I H H G F D E B C A...
Page 6: ...4 GR Freezer MED MAX MED MIN MED freezer MAX 24 freezer freezer freezer freezer 9 14...
Page 9: ...7 GR 10 W 4 4...
Page 27: ...25 E...
Page 28: ...3 1 2 Reversing the door opening Reversibilidad abiertura puertas...
Page 29: ...4 3mm...
Page 30: ......
Page 31: ......