60
PT
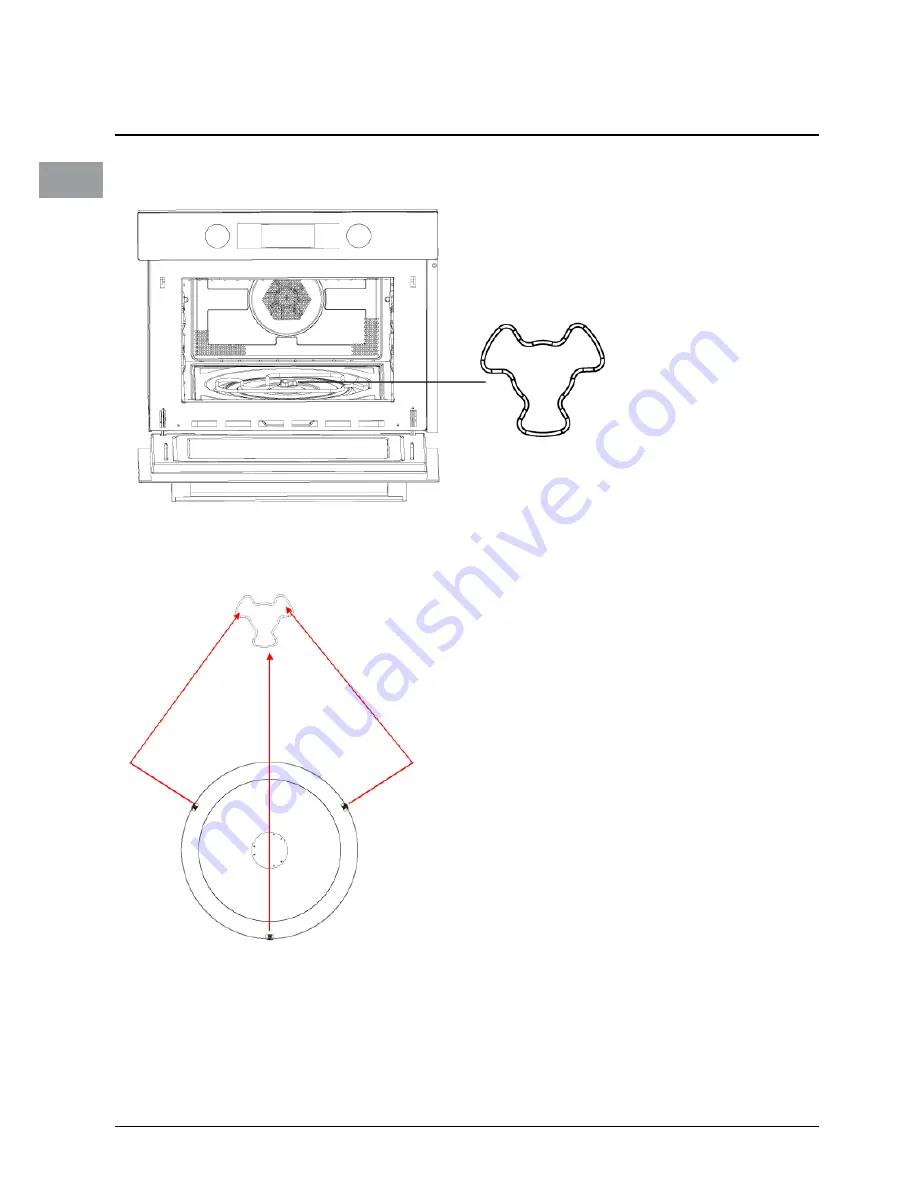
1. Verifique o ângulo do eixo
2. Ajuste o ângulo da chapa do grill e o eixo.
3. Coloque a chapa dentro da cavidade e ajuste ligeiramente.
INSTaLaR a cHaPa DO GRILL
Page 1: ...Se si rispettano le istruzioni il forno sarà in grado di garantire un funzionamento ottimale per molti anni CONSERVARE LE ISTRUZIONI CON CURA Italiano Français Nederlands Poliski Portuges Español Deutsch Русскии DE RS PT ES NL PL FR IT Sommario Precauzioni e consigli 2 Installazione forno 6 Istruzioni funzionamento 11 Anomalie e rimedi 17 Installazione 9 English GB ...
Page 2: ... non conservare alimenti come pane biscotti ecc all interno del forno 12 Rimuovere le chiusure di filo metallico e le maniglie in metallo dai contenitori confezioni in plastica o carta prima di metterli nel forno 13 Installare o posizionare il forno rispettando scrupolosamente le istruzioni di installazione fornite 14 Non riscaldare uova con il guscio o uova sode intere nel forno a microonde perch...
Page 3: ...o di alimentazione in dotazione è piuttosto corto per ridurre il rischio di impigliarsi o di inciampare se fosse più lungo 2 Se si utilizza un cavo lungo o una prolunga 1 ll valore elettrico riportato sulla targhetta del cavo o della prolunga deve essere pari almeno a quello indicato per l apparecchio 2 La prolunga deve essere un cavetto a tre conduttori del tipo adatto alla messa a terra 3 Un cav...
Page 4: ...e Non utilizzare piatti rotti o scheggiati Sacchetti per Seguire le istruzioni del produttore Non chiudere con chiusure metalliche cottura in forno Praticare dei tagli per consentire la fuoriuscita di vapore Tazze e piatti Utilizzare unicamente per cuocere riscaldare per brevi periodi di carta Non lasciare il forno incustodito durante la cottura Tovaglioli di carta Utilizzare per coprire il cibo d...
Page 5: ...ili in metallo Il metallo protegge il cibo dall energia delle microonde o con finiture Le finiture metalliche possono provocare la formazione di un arco elettrico metalliche Chiusure in metallo Possono provocare la formazione di un arco elettrico e persino un incendio all interno del forno Sacchetti di carta Possono provocare un incendio all interno del forno Plastica espansa La plastica espansa p...
Page 6: ...dall interno del forno stesso Il forno viene fornito con i seguenti accessori Vassoio smaltato 1 Gruppo piatto girevole 1 Libretto di istruzioni 1 INSTALLAZIONE DEL FORNO 1 Pannello comandi 2 Elemento grill 3 Spia 4 Livello 5 Vetro porta 6 Cerniera 7 Supporto reggipiatto girevole 8 Ripiano corto grill 9 Ripiano lungo grill 10 Leccarda ...
Page 7: ...utti i poli per ottenere uno scollegamento completo Inoltre l apparecchio deve essere incluso nel cablaggio fisso in conformità con le norme relative al cablaggio Installazione piatto girevole a In nessun caso posizionare il vassoio in vetro capovolto Il movimento del vassoio inoltre non dovrebbe mai essere ostacolato b Durante la cottura utilizzare sempre sia il vassoio in vetro sia il gruppo pia...
Page 8: ...aniglia della porta non è in grado di sostenere il peso dell apparecchio e potrebbe rompersi 1 Spingere con cura il forno all interno del contenitore assicurandosi che sia posizionato al centro 2 Aprire la porta e fissare il microonde con le viti in dotazione Inserire completamente l apparecchio e centrarlo Non attorcigliare il cavo di collegamento Avvitare l apparecchio in sede Lo spazio vuoto tr...
Page 9: ...rificare l angolazione del supporto reggipiatto 2 Regolare l angolazione della leccarda e del supporto reggipiatto 3 Mettere la leccarda all interno del forno e regolare quanto basta INSTALLAZIONE DELLA LECCARDA ...
Page 10: ...ratteristiche FUNZIONAMENTO 1 Manopola funzioni 2 Tasto Potenza Peso 3 Tasto Preriscaldamento rapido 4 Tasto Accensione Spegnimento 5 Tasto Temperatura Menu automatico 6 Tasto Orologio 7 Tasto Avvio Pausa 8 Manopola di selezione ...
Page 11: ... Sul display compare la scritta lampeggiante 01 00 assieme al simbolo del microonde Se il funzionamento non è attivato entro 10 secondi la potenza attuale verrà confermata automaticamente 2 Ruotare la manopola per selezionare il tempo di cottura Il tempo di cottura massimo dipende dalla potenza impostata Quando la potenza è di 900W il tempo MASSIMO è di 30 minuti Per potenze diverse è di 90 minuti...
Page 12: ...ne di pezzi di carne e pesce non troppo spessi Riscaldamento Aria calda Riscaldamento inferiore Usare questa funzione per arrostire grossi tagli di carne cuocere pizze ecc Funzioni combinate Aria calda Microonde Aria calda Usare questa funzione per arrostire i cibi rapidamente Grill ventilato Microonde Grill ventilato Grill Microonde Grill Usare questa funzione per cuocere i cibi rapidamente e ren...
Page 13: ...one microonde 2 Ruotare per selezionare la modalità di cottura Si illumina la spia 3 Ruotare per selezionare la modalità grill ventilato La temperatura preimpostata è di 180 gradi La spia si accende quando viene selezionata la modalità grill ventilato 4 Premere per accedere alla selezione della temperatura 5 Ruotare per selezionare la temperatura da 100 a 230 gradi Le temperature sono 100 105 110 ...
Page 14: ... impostazione del tempo Il tempo preimpostato è di 10 minuti 9 Ruotare per selezionare il tempo di cottura del grill Il tempo massimo è di 90 minuti 10 Premere il tasto START PAUSE per avviare la cottura 9 Cottura Microonde Grill ventilato 1 Premere il tasto STOP CLEAR per attivare la funzione microonde 2 Ruotare per selezionare la modalità di cottura Si accendono e 3 Ruotare per selezionare la mo...
Page 15: ...re il preriscaldamento aprendo la porta del forno o premendo il tasto STOP CLEAR Nota 1 La funzione di preriscaldamento si attiva solo se è stata già scelta una delle modalità sopra descritte Durante il preriscaldamento la funzione microonde è spenta 2 Si può aprire la porta e introdurre il cibo all interno del forno solo quando risuona il segnale di avvertimento e il simbolo del preriscaldamento ...
Page 16: ...icroonde combinato avvia la fase successiva automaticamente P05 Prodotti da forno Dolci P06 Prodotti da forno Torta di mele P07 Prodotti da forno Quiche P08 Riscaldamento Bevande minestre P09 Riscaldamento Alimenti alla piastra P10 Riscaldamento Sughi stufati pietanze P11 Cibi precotti Pizza surgelata P12 Cibi precotti Patate al forno Se si sente un segnale sonoro girare il cibo Il forno a microon...
Page 17: ...a cibo all interno è molto pericoloso Problema Possibile causa Rimedio Il forno non si accende 1 Il cavo di alimentazione non è inserito correttamente Staccare la spina dalla presa e reinserirla dopo 10 secondi 2 Il fusibile salta o entra in funzione l interruttore automatico Sostituire il fusibile o ripristinare l interruttore automatico riparato da personale qualificato dell azienda 3 Problemi c...
Page 18: ...us suivez les instructions votre four vous satisfera pleinement pendant de longues années VEUILLEZ CONSERVER CES INSTRUCTIONS PRÉCIEUSEMENT Sommaire Précautions et conseils 19 Installation du four 23 Instructions pour le fonctionnement 28 Anomalies et remèdes 34 Installation 26 Italiano Français Nederlands Poliski Portuges Español Deutsch Русскии DE RS PT ES NL PL FR IT English GB ...
Page 19: ...sser la porte fermée pour éviter la formation de flammes 10 Ne pas faire trop cuire les aliments 11 Ne pas utiliser la cavité du four à des fins de stockage Ne pas stocker d aliments tels que du pain des biscuits ou autres à l intérieur du four 12 Retirer les liens et poignées métalliques des récipients sacs en papier ou plastique avant de les mettre dans le four 13 Installer et positionner ce fou...
Page 20: ...sultez un électricien qualifié ou un technicien de maintenance Si l utilisation d une rallonge s avère nécessaire utilisez une rallonge à 3 fils 1 L appareil est doté d un cordon d alimentation court afin de réduire les risques que le fil s emmêle ou que quelqu un trébuche dessus choses courantes avec un cordon plus long 2 En cas d utilisation d un cordon amovible long ou d une rallonge 1 Les cara...
Page 21: ... fabricant Ne fermez pas les sacs avec cuisson au four un lien métallique Réalisez des entailles pour permettre à la vapeur de s échapper Assiettes et Utilisez les uniquement pour les cuissons rapides ou pour réchauffer les aliments tasses en papier Ne les laissez pas dans le four sans surveillance Serviettes Utilisez les pour couvrir les aliments à réchauffer et absorber la graisse en papier Util...
Page 22: ...es micro ondes en empêchant celles ci de passer métalliques ou Les décors métalliques peuvent entraîner la formation d arcs électriques présentant des décors métalliques Liens métalliques Ils peuvent entraîner la formation d arcs électriques et pourraient être à l origine d un incendie dans le four Sacs en papier Ils peuvent être à l origine d un incendie dans le four Mousse en La mousse en plasti...
Page 23: ...trouve dans la cavité du four Votre four est fourni avec les accessoires suivants Plateau émaillé 1 Support de plateau tournant 1 Mode d emploi 1 INSTALLATION DE VOTRE FOUR 1 Panneau de commande 2 Grill 3 Lumière 4 Niveau 5 Porte vitrée 6 Charnière 7 Axe du plateau tournant 8 Petite grille 9 Grande grille 10 Plateau ...
Page 24: ...et l appareil doit être raccordé directement à l installation électrique en respectant les règles de câblage applicables Installation du plateau tournant a Ne placez jamais le plateau en verre à l envers La rotation du plateau en verre ne doit jamais être empêchée b Le plateau en verre et son support doivent toujours être utilisés pendant la cuisson c Tous les aliments et les récipients doivent to...
Page 25: ...t se briser 1 Poussez le four avec précaution dans la niche en vous assurant qu il est bien centré 2 Ouvrez la porte et fixez le four à micro ondes avec les vis fournies Insérez l appareil à fond et centrez le Veillez à ne pas tordre le câble de raccordement Vissez l appareil en position L espace entre le plan de travail et l appareil ne doit en aucun cas être fermé par des tasseaux supplémentaire...
Page 26: ...26 FR 1 Vérifiez l angle du moyeu 2 Ajustez l angle du plateau et du moyeu 3 Placez le plateau dans la cavité et ajustez le légèrement INSTALLATION DU PLATEAU ...
Page 27: ...t fonctions FONCTIONNEMENT 1 Molette de fonction 2 Bouton puissance poids 3 Bouton de préchauffage rapide 4 Bouton marche arrêt 5 Bouton de température menu auto 6 Bouton de l horloge 7 Bouton marche pause 8 Molette de sélection ...
Page 28: ...du mode micro ondes apparaît Si vous ne faites rien dans les 10 secondes qui suivent la puissance actuelle est automatiquement confirmée 2 Tournez la molette pour régler le temps de cuisson Le temps de cuisson maximal dépend de la puissance qui a été réglée Lorsque la puissance est de 900 W la durée de cuisson maxi est de 30 minutes tandis qu elle est de 90 minutes pour les autres puissances 3 App...
Page 29: ...la préparation de fines pièces de viande et de poisson Air chaud Résistance inférieure Utilisez cette fonction pour faire rôtir de gros morceaux de viande faire cuire des pizzas etc Modes combinés Air chaud Micro ondes air chaud Utilisez cette fonction pour faire rôtir rapidement vos plats Grill avec ventilation Micro ondes grill avec ventilation Grill Micro ondes grill Utilisez cette fonction pou...
Page 30: ...iver la fonction micro ondes 2 Tournez la molette pour sélectionner le mode de cuisson Le voyant s allume 3 Tournez la molette pour sélectionner le mode grill avec ventilation La température par défaut est de 180 degrés Le voyant s allume lorsque la fonction grill avec ventilation est sélectionnée 4 Appuyez sur pour accéder au réglage de la température 5 Tournez la molette pour sélectionner la tem...
Page 31: ...au grill La durée maximale est de 90 minutes 10 Appuyez sur le bouton START PAUSE pour lancer la cuisson 9 Cuisson micro ondes grill avec ventilation 1 Appuyez sur le bouton STOP CLEAR pour activer la fonction micro ondes 2 Tournez la molette pour sélectionner le mode de cuisson et s allument 3 Tournez la molette pour sélectionner le mode de cuisson La température par défaut est de 180 degrés Le v...
Page 32: ... La fonction de préchauffage ne fonctionne que si vous avez préalablement choisi l un des modes indiqués ci dessus Pendant le préchauffage la fonction micro ondes est désactivée 2 Vous ne pouvez ouvrir la porte et mettre les aliments dans le four qu une fois que le signal sonore a retenti et que l icône de préchauffage s est mise à clignoter 13 Fonction de sécurité enfants Verrouillage Sur le four...
Page 33: ...ournez les aliments Le four à micro ondes combiné commence la phase suivante automatiquement P05 Pâtisserie Gâteau P06 Pâtisserie Tarte aux pommes P07 Pâtisserie Quiche P08 Réchauffage Boisson soupe P09 Réchauffage Plat cuisiné P10 Réchauffage Sauce ragoût plat P11 Pratique Aliments surgelés pizza P12 Pratique Frites au four Si vous entendez un bip retournez les aliments Le four à micro ondes comb...
Page 34: ...rieur C est très dangereux Problème Cause possible Solution Impossible de mettre le four en marche 1 Le cordon d alimentation n est pas bien branché Débranchez le Puis rebranchez le au bout de 10 secondes 2 Le fusible saute ou le disjoncteur se déclenche Remplacez le fusible ou remettez le disjoncteur en état de marche réparé par un technicien qualifié de votre société d électricité 3 Il y a un pr...
Page 35: ...amente Si sigue estas instrucciones el horno le ofrecerá muchos años de buen funcionamiento GUARDE ESTAS INSTRUCCIONES CUIDADOSAMENTE Sumario Precauciones y consejos 36 Instalación del horno 40 Instrucciones de uso 45 Anomalías y soluciones 51 Instalación 43 Italiano Français Nederlands Poliski Portuges Español Deutsch Русскии DE RS PT NL PL IT ES FR English GB ...
Page 36: ...ir en el horno contenedores o bolsas de papel o de plástico quitar los cierres de alambre y las manijas de metal 13 Instalar o emplazar el horno respetando las instrucciones de instalación suministradas 14 Los huevos duros o pasados por agua no se deberían calentar en el microondas ya que pueden explotar aun después de terminar el calentamiento por microondas 15 Destinar el aparato sólo a los usos...
Page 37: ...ngador éste deberá ser de 3 hilos 1 Para prevenir peligros de enredo o tropiezo con cables largos se suministra un cable de alimentación corto 2 En caso de utilizar un cable largo o un prolongador 1 La potencia eléctrica nominal del cable o del prolongador debe ser al menos del valor de la potencia eléctrica nominal del aparato 2 El cable prolongador debe ser de 3 hilos con tierra 3 El cable largo...
Page 38: ...segurarse de que no tenga bordes metálicos No utilizar vajilla rajada o mellada Bolsas de cocción Seguir las instrucciones del fabricante No utilizar cierres de alambre para horno Tajearlas para permitir la salida del vapor Platos y tazas Sólo para una breve cocción o calentamiento sin dejar de vigilar el horno de papel Toallas de papel Para cubrir los alimentos durante el recalentamiento y para a...
Page 39: ...anija de metal Utensilios El metal bloquea el paso de la energía de las microondas a los alimentos metálicos o con Los bordes metálicos pueden causar la formación de arcos eléctricos bordes metálicos Cierres de alambre Pueden causar la formación de arcos eléctricos e incendios en el horno Bolsas de papel Pueden causar un incendio en el horno Espuma plástica La espuma plástica puede derretirse o co...
Page 40: ...la cavidad del horno El horno se suministra con los siguientes accesorios Bandeja esmaltada 1 Aro giratorio 1 Manual de instrucciones 1 PREPARACIÓN DEL MICROONDAS 1 Panel de control 2 Grill 3 Luz 4 Nivel 5 Vidrio de la puerta 6 Bisagra 7 Eje del plato giratorio 8 Rack grill corto 9 Rack grill largo 10 Plato Grill ...
Page 41: ...ato se debe incorporar en la instalación según las reglas de cableado Instalación del plato giratorio a No invertir la bandeja de vidrio No restringir la bandeja de vidrio b La bandeja de vidrio y el aro giratorio se deben utilizar siempre durante la cocción c Los alimentos y los recipientes de alimentos siempre se deben apoyar sobre la bandeja de vidrio para la cocción d Si la bandeja de vidrio o...
Page 42: ... y se puede romper 1 Empujar el microondas cuidadosamente en el hueco asegurándose de que quede bien centrado 2 Abrir la puerta y fijar el microondas con los tornillos suministrados Insertar bien el aparato y centrarlo No retorcer el cable de conexión Atornillar el aparato El espacio entre la encimera y el aparato no se debe cerrar con listones superficie de aireación mín 250 cm2 superficie de air...
Page 43: ...ES 43 1 Comprobar el ángulo del eje 2 Ajustar el ángulo del plato grill y el eje 3 Poner el grill en la cavidad y ajustarlo ligeramente INSTALACIÓN DEL PLATO GRILL ...
Page 44: ...acterísticas FUNCIONAMIENTO 1 Selector de funciones 2 Tecla de encendido peso 3 Tecla de precalentamiento rápido 4 Tecla de encendido apagado 5 Tecla de temperatura menú Auto 6 Tecla reloj 7 Tecla Inicio Pausa 8 Mando de selección ...
Page 45: ...nguna operación en un plazo de 10 segundos la potencia actual se confirma automáticamente 2 Girar el selector para ajustar el tiempo de cocción El tiempo de cocción máximo depende de la potencia elegida Con 900W de potencia el tiempo máximo es 30 minutos con las otras potencias el tiempo máximo es 90 minutos 3 Pulsar para ajustar la potencia de microondas 4 Girar el selector para elegir la potenci...
Page 46: ...ico para preparar rodajas delgadas de carne o pescado Calentamiento Aire caliente Calentamiento inferior Utilizar esta función para dorar trozos de carne grandes pizza etc Combinación Aire caliente Microondas Aire caliente Utilizar esta función para dorar las comidas rápidamente Grill con ventilador Microondas Grill con ventilador Grill Microondas Grill Utilizar esta función para cocinar las comid...
Page 47: ...a predeterminada es 180 grados El indicador se enciende al seleccionar la función grill ventilado 4 Pulsar para pasar a la selección de la temperatura 5 Girar para seleccionar la temperatura entre 100 y 230 grados Las temperaturas posibles son 100 105 110 115 120 125 130 135 140 145 150 155 160 165 170 175 180 185 190 195 200 205 210 215 220 225 230 Pulsar para pasar al ajuste del tiempo El tiempo...
Page 48: ...eleccionar esta función 4 Pulsar para pasar a la selección de la temperatura 5 Girar para seleccionar la temperatura entre 100 y 230 grados 6 Pulsar para seleccionar la potencia La potencia predeterminada es 300W 7 Girar para seleccionar 700W 450W 300W o 100W 8 Pulsar para pasar al ajuste del tiempo El tiempo predeterminado es 10 minutos 9 Girar para seleccionar el tiempo de cocción grill El tiemp...
Page 49: ...o e introducir el alimento 13 Función de bloqueo para niños Bloqueo En estado de espera pulsar START PAUSE y simultáneamente suena una señal acústica larga que indica la activación del estado de bloqueo para niños y el indicador se enciende Desbloqueo En estado de bloqueo pulsar START PAUSE y 3 segundos suena una señal acústica larga que indica la desactivación del estado de bloqueo para niños y e...
Page 50: ...el alimento El microondas combi comienza la fase siguiente automáticamente P05 Pan Tortas P06 Pan Pastel de manzanas P07 Pan Quiche P08 Recalentar Bebidas sopas P09 Recalentar Plato de comida P10 Recalentar Salsa guiso plato P11 Conveniencia Congelados pizza P12 Conveniencia Patatas para horno Al oír una señal acústica invertir el alimento El microondas combi comienza la fase siguiente automáticam...
Page 51: ...rior Esto es muy peligroso Problema Causa posible Solución El horno no se pone en funcionamiento 1 El cable de alimentación no está bien conectado a la toma eléctrica Desconectarlo Esperar 10 segundos y volver a conectarlo 2 Fusible quemado o disyuntor disparado Cambiar el fusible o restablecer el disyuntor las reparaciones son tarea del personal profesional de la empresa 3 Problema con la toma el...
Page 52: ...dosamente Se seguir as instruções o forno irá funcionar corretamente ao longo de muitos anos GUARDE AS INSTRUÇÕES CUIDADOSAMENTE Sumário Precauções e conselhos 53 Instalação forno 57 Instruções funcionamento 62 Anomalias e soluções 68 Instalação 60 Italiano Français Nederlands Poliski Portuges Español Deutsch Русскии DE RS NL PL IT FR PT ES English GB ...
Page 53: ...amento Não guarde alimentos tais como pão bolachas ou outros dentro do forno 12 Remova os fios de arame e pegas de metal dos recipientes sacos de papel ou plástico antes de os colocar no forno 13 Instale ou coloque o forno apenas de acordo com as instruções de instalação fornecidas 14 Os ovos com casca ou ovos cozidos inteiros não devem ser aquecidos no micro ondas pois podem explodir mesmo após t...
Page 54: ...aso seja necessário utilizar um cabo de extensão utilize apenas um cabo com 3 fios 1 É fornecido um cabo curto para reduzir a possibilidade de que se enrole ou que se possa tropeçar num cabo comprido 2 Caso seja utilizado um cabo comprido ou extensão 1 A classificação elétrica do cabo ou extensão deve ser pelo menos igual à classificação elétrica do aparelho 2 O cabo de extensão deve ser um cabo c...
Page 55: ...has Sacos para Siga as instruções do fabricante Não feche com o fio de arame cozinhar alimentos Faça pequenos furos para deixar sair o vapor Copos e pratos Utilize apenas para cozinhar aquecer durante pouco tempo de papel Não deixe o forno sem supervisão durante a cozedura Toalhas de papel Utilize para cobrir os alimentos para requentar os alimentos e absorver a gordura Utilize com supervisão e ap...
Page 56: ...icro ondas em metal Utensílios O metal protege os alimentos da energia de micro ondas de metal ou com As peças em metal podem produzir centelhas partes em metal Fios de arame Podem produzir centelhas e causar um incêndio dentro do forno Sacos de papel Podem causar um incêndio dentro do forno Esferovite A esferovite pode derreter ou contaminar os líquidos no interior quando exposta a altas temperat...
Page 57: ...equipado com os seguintes acessórios Tabuleiro de esmalte 1 Conjunto do anel rotativo 1 Manual de instruções 1 CONFIGURAR O FORNO MICRO ONDAS 1 Painel de controlo 2 Elemento de grill 3 Luz 4 Nível 5 Porta de vidro 6 Dobradiça 7 Eixo do prato rotativo 8 Prateleira curta de grill 9 Prateleira comprida de grill 10 Chapa de grill ...
Page 58: ...sligamento total e o aparelho deve ser incorporado nas ligações elétricas fixas de acordo com as regras Instalação do prato rotativo a Nunca coloque o tabuleiro de vidro ao contrário O tabuleiro de vidro deve mover se sempre livremente b O tabuleiro de vidro e o anel rotativo devem ser sempre utilizados durante a cozedura c Todos os alimentos e recipientes devem ser colocados sobre o tabuleiro par...
Page 59: ...1 Com cuidado empurre o micro ondas para dentro da caixa assegurando se que esteja ao centro 2 Abra a porta e fixe o micro ondas com os parafusos fornecidos Insira completamente o aparelho e centre o Não dobre o cabo de ligação Fixe o aparelho com os parafusos A folga entre o plano superior e o aparelho não deve ser obstruída por tábuas adicionais superfície mínima de ventilação 250 cm2 superfície...
Page 60: ...60 PT 1 Verifique o ângulo do eixo 2 Ajuste o ângulo da chapa do grill e o eixo 3 Coloque a chapa dentro da cavidade e ajuste ligeiramente INSTALAR A CHAPA DO GRILL ...
Page 61: ...o e características FUNCIONAMENTO 1 Manípulo de funções 2 Botão de ligação peso 3 Botão de pré aquecimento rápido 4 Botão On Off 5 Botão de temperatura menu Auto 6 Botão do relógio 7 Botão Iniciar Pausa 8 Manípulo de seleção ...
Page 62: ...o ícone do micro ondas Caso não seja feita qualquer operação nos 10 segundos seguintes a potência atual é confirmada automaticamente 2 Rode o manípulo para selecionar o tempo de cozedura O tempo máximo de cozedura depende da potência configurada Quando a potência está a 900 W o tempo MAX é 30 minutos e para as outras potências é 90 minutos 3 Pressione o botão para ajustar a potência do micro ondas...
Page 63: ...rill é adequado para peças de carne pouco espessas e peixe Ar quente Ar inferior Utilize esta função para assar grandes peças de carne pizza etc Combinação Ar quente Micro ondas Ar quente Utilize esta função para assar alimentos rapidamente Grill com ventoinha Micro ondas Grill com ventoinha Grill Micro ondas Grill Utilize esta função para cozinhar alimentos rapidamente e criar uma crosta dourada ...
Page 64: ...ionar o modo de grill com ventoinha A temperatura predefinida é 180 graus O indicador acende se quando a função grill é selecionada 4 Pressione para introduzir a seleção de temperatura 5 Rode para selecionar uma temperatura entre 100 e 230 graus As temperaturas selecionáveis são 100 105 110 115 120 125 130 135 140 145 150 155 160 165 170 175 180 185 190 195 200 205 210 215 220 225 230 Pressione pa...
Page 65: ...botão STOP CLEAR para ativar a função de micro ondas 2 Rode para selecionar o modo de cozedura Acendem se as luzes e 3 Rode para selecionar o modo de cozedura A temperatura predefinida é 180 graus O indicador acende se quando esta função é selecionada 4 Pressione para introduzir a seleção de temperatura 5 Rode para selecionar uma temperatura entre 100 e 230 graus 6 Pressione para selecionar a potê...
Page 66: ... já tiver selecionado um dos modos acima Durante o pré aquecimento a função de micro ondas é desligada 2 Só quando ouvir o alarme e quando o ícone de pré aquecimento estiver intermitente é que pode abrir a porta e colocar os alimentos 13 Função de bloqueio para crianças Bloqueio No estado de espera pressione START PAUSE e durante 3 segundos ouvirá um bip longo que indica a ativação do bloqueio par...
Page 67: ...no micro ondas combi começa a nova fase automaticamente P05 Pão Bolos P06 Pão Tarte de maçã P07 Pão Quiche P08 Requentar Bebidas sopa P09 Requentar Refeição em prato P10 Requentar Molho guisado prato P11 Alimentos pré cozinhados Pizza congelada P12 Alimentos pré cozinhados Batatas fritas no forno Quando ouvir um bip vire os alimentos O forno micro ondas combi começa a nova fase automaticamente P13...
Page 68: ...ade sem alimentos no interior É muito perigoso Problema Causa possível Solução O forno não liga 1 O cabo não está bem ligado Desligar Voltar a ligar após 10 segundos 2 O fusível queimou ou o disjuntor disparou Substitua o fusível ou reponha o disjuntor reparado por técnicos qualificados da empresa 3 Problemas com a tomada Teste a tomada com outros aparelhos elétricos O forno não aquece 4 A porta n...
Page 69: ...ig Als u de instructies opvolgt zult u vele jaren plezier hebben van uw magnetron BEWAAR DEZE INSTRUCTIES ZORGVULDIG Inhoud Voorzorgsmaatregelen en advies 70 Installatie oven 74 Instructies werking 79 Storingen en oplossingen 85 Installatie 77 Italiano Français Nederlands Poliski Portuges Español Deutsch Русскии DE RS PL IT FR ES NL PT English GB ...
Page 70: ... Als u rook waarneemt moet u de stekker van het apparaat uit het stopcontact halen en de deur afgesloten houden om de vlammen te verstikken 10 Laat het voedsel niet te lang koken 11 Gebruik de magnetron niet om dingen in op te bergen Bewaar geen brood koekjes enz in de magnetron 12 Verwijder metalen sluitclips en metalen handvatten van papieren of plastic verpakkingen zakjes voor u ze in de magnet...
Page 71: ...gsinstructies niet volledig begrijpt of als u twijfels heeft of het apparaat goed geaard is Als het noodzakelijk is een verlengsnoer te gebruiken dient u uitsluitend snoeren met 3 draden te gebruiken 1 Bij het apparaat wordt een kort snoer geleverd om het risico van verstrikking of struikelen te voorkomen 2 Als men een lang snoer of een verlengsnoer gebruikt 1 Het aangegeven vermogen van het snoer...
Page 72: ...wezig zijn Gebruik geen gebarsten of gebroken borden Braadzakken Volg de instructies van de fabrikant Sluit ze niet af met metalen sluitclips Scheur de zak enigszins open om te zorgen dat de stoom wordt afgevoerd Papieren borden Gebruik alleen voor snel koken opwarmen en bekers Laat de magnetron niet onbeheerd terwijl hij aan het koken is Papieren doeken Gebruik om voedsel af te dekken bij opwarme...
Page 73: ...rpen Metaal beschermt het voedsel tegen magnetronenergie of voorwerpen met Een metalen versiering kan vonkontlading veroorzaken metalen versieringen Metalen sluitclips Kunnen vonkontlading veroorzaken of brand in de magnetron Papieren zakjes Kunnen brand in de magnetron veroorzaken Plastic schuim Plastic schuim kan smelten of de vloeistof die zich erin bevindt verontreinigen als het aan hoge tempe...
Page 74: ...nkant van de magnetron De volgende accessoires worden bij uw magnetron geleverd Schaal van email 1 Draairing 1 Gebruiksaanwijzing 1 DE MAGNETRON MONTEREN 1 Bedieningspaneel 2 Grill element 3 Licht 4 Niveau 5 Deur glas 6 Scharnier 7 Schacht voor draaitafel 8 Kort grillrooster 9 Lang grillrooster 10 Grillpan ...
Page 75: ...een scheiding van de contacten in alle polen die een volledige uitschakeling leveren Het apparaat moet worden aangesloten op het lichtnet overeenkomstig de geldende normen Installatie draaitafel a Plaats de glazen schaal nooit ondersteboven De glazen schaal moet nooit worden begrensd b Zowel de glazen schaal als de draairing moeten altijd worden gebruikt tijdens het koken c Al het voedsel of houde...
Page 76: ...gnetron zachtjes in de opening en controleer of hij zich in het midden bevindt 2 Open de deur en bevestig de magnetron met de bijgeleverde schroeven Duw het apparaat volledig op z n plaats en centreer het Knik het snoer niet Schroef het apparaat op zijn plaats De opening tussen het aanrecht en het apparaat mag niet worden afgesloten door aanvullende latten min ventilatie oppervlak 250 cm2 min vent...
Page 77: ...NL 77 1 Zorg ervoor dat de hoek van de schacht 2 Regel de hoek van de grillpan af op de schacht 3 Plaats de pan in de holte en regel enigszins HET INSTALLEREN VAN DE GRILLPAN ...
Page 78: ...78 NL Bedieningspaneel en functies WERKING 1 Functieknop 2 Vermogen Gewichtsknop 3 Knop voor snel voorverwarmen 4 On Off knop 5 Temperatuur Automenu knop 6 Knop klok 7 Start Pauzeknop 8 Selectieknop ...
Page 79: ...n verschijnt Als er 10 seconden lang niets gebeurt zal het huidige vermogen automatisch worden bevestigd 2 Draai aan de knop om de kooktijd in te stellen De maximale kooktijd hangt af van het vermogen dat u heeft ingesteld Als het vermogen op 900W staat het maximum is de max tijd 30 minuten Bij andere vermogens is dat 90 minuten 3 Druk op de knop om het vermogen van de magnetron functie te regelen...
Page 80: ... Grill De grill is bijzonder geschikt om dunne plakjes vlees of vis te bereiden Hete lucht hitte vanaf onderzijde Gebruik deze functie om grote stukken vlees te braden pizza te maken enz Combinatie Hete lucht Magnetron Hete lucht Gebruik deze functie om gerechten snel te braden Grillen met ventilator Magnetron Grillen met ventilator Grill Magnetron Grill Gebruik deze functie om gerechten snel te k...
Page 81: ...us te selecteren De default temperatuur is 180 graden De aanwijzer zal oplichten als de grill ventilator functie is geselecteerd 4 Druk op om de temperatuurselectie te bevestigen 5 Draai aan om een temperatuur tussen de 100 en de 230 graden te selecteren De temperaturen zijn 100 105 110 115 120 125 130 135 140 145 150 155 160 165 170 175 180 185 190 195 200 205 210 215 220 225 230 Druk op om de mo...
Page 82: ...okmodus te selecteren De default temperatuur is 180 graden De aanwijzer zal oplichten als deze functie is geselecteerd 4 Druk op om de temperatuurselectie te bevestigen 5 Draai aan om een temperatuur tussen de 100 en de 230 graden te selecteren 6 Druk op om het vermogen te selecteren Het default vermogen is 300W 7 Draai aan om 700W 450W 300W en 100W te selecteren 8 Druk op om de modus voor het ins...
Page 83: ...uitgeschakeld 2 Alleen als u het alarm hoort en het voorverwarmingssymbool knippert kunt u de deur openen en het voedsel in de magnetron plaatsen 13 Veiligheidsfunctie voor kinderen Slot In de wachtstand drukt u tegelijkertijd op START PAUSE en U zult een lange piep horen die aangeeft dat u in de kinderbeveilingsstand zit De aanwijzer zal oplichten Openmaken In de afgesloten stand drukt u 3 second...
Page 84: ...n piep hoort moet u het voedsel omdraaien De combi magnetron start de volgende fase automatisch P05 Gebak Taart P06 Gebak Appeltaart P07 Gebak Quiche P08 Opwarmen Drank soep P09 Opwarmen Kant en klaar gerecht P10 Opwarmen Saus stoofpot gerecht P11 Voordeel Diepvriespizza P12 Voordeel Ovenpatat Als u een piep hoort moet u het voedsel omdraaien De combi magnetron start de volgende fase automatisch P...
Page 85: ...ogelijke oorzaak Oplossing Magnetron kan niet worden gestart 1 De stekker zit niet goed in het stopcontact Haal de stekker eruit Doe de stekker er na 10 seconden weer in 2 Er is een zekering gesprongen of de installatieautomaat is uitgeschakeld Vervang zekering of reset de installatieautomaat moet worden gerepareerd door professionele vaklui 3 Problemen met het stopcontact Test het stopcontact met...
Page 86: ...nweisungen befolgen wird Ihnen Ihr Ofen über viele Jahre hinweg gute Dienste erweisen BEWAHREN SIE DIESE ANLEITUNG SORGFÄLTIG AUF Inhaltsverzeichnis Vorsichtsmaßnahmen und Hinweise 87 Einbau des Mikrowellenherds 91 Betriebsanweisungen 96 Störungen und Abhilfe 102 Einbau 94 Italiano Français Nederlands Poliski Portuges Español Deutsch Русскии RS PL IT FR ES PT DE NL English GB ...
Page 87: ...Sie den Ofen nicht zu Lagerungszwecken Lagern Sie keine Produkte wie Brot Kekse usw im Ofen 12 Entfernen Sie Bindedrähte und Metallgriffe von den Papier oder Kunststoffbehältnissen beuteln bevor Sie diese in den Ofen stellen 13 Installieren und stellen Sie diesen Ofen nur gemäß den angegebenen Installationsanweisungen auf 14 Eier in der Schale und ganze hartgekochte Eier sollten nicht in der Mikro...
Page 88: ...ungskabels erforderlich ist verwenden Sie nur ein Dreileiterverlängerungskabel 1 Das Stromkabel ist kurz um das Risiko eines Verfangens oder Stolperns über ein längeres Kabel zu verringern 2 Bei Verwendung eines Verlängerungskabels 1 Die markierten elektrischen Nennwerte des Verlängerungskabels sollten mindestens so hoch sein wie die elektrischen Nennwerte des Geräts 2 Das Verlängerungskabel muss ...
Page 89: ... kein rissiges oder beschädigtes Geschirr Kochbeutel Befolgen Sie die Anweisungen des Herstellers Nicht mit Metallstücken verschließen Machen Sie Schlitze um das Abströmen des Dampfes zu ermöglichen Papierteller Nur für kurzes Kochen Erwärmen verwenden und tassen Lassen Sie den Ofen während des Kochens nicht unbeaufsichtigt Küchenpapier Verwendung zum Abdecken von Speisen zur Rückgewinnung der Hit...
Page 90: ...llengeeignetes Geschirr Metall oder Metall schirmt die Speisen von der Mikrowellenenergie ab Utensilien mit Metallränder könnten Funkenbildung verursachen Metallrand Metallbindedrähte Könnten Funkenbildung und Feuer im Ofen verursachen Papierbeutel Könnten Feuer im Ofen verursachen Kunststoffschaum Kunststoffschaum könnte schmelzen oder die Flüssigkeit im Ofen kontaminieren wenn er zu hohen Temper...
Page 91: ...der Verpackung Im Lieferumfang des Ofens ist Folgendes inbegriffen Emaillierte Schale 1 Drehtellergruppe 1 Bedienungsanleitung 1 AUFSTELLEN DES OFENS 1 Schalttafel 2 Grillelement 3 Licht 4 Stufe 5 Türscheibe 6 Scharnier 7 Drehtellerachse 8 Kurzer Grillrost 9 Langer Grillrost 10 Grillblech ...
Page 92: ... und das Gerät muss gemäß den Bestimmungen in die feste Verdrahtung integriert werden Installation des Drehtellers a Stellen Sie den Glaseinsatz niemals auf den Kopf Der Glaseinsatz sollte niemals eingeengt werden b Sowohl der Glaseinsatz als auch die Drehtellergruppe müssen während des Kochens stets verwendet werden c Alle Speisen und Lebensmittelbehältnisse müssen beim Kochen stets auf dem Glase...
Page 93: ... das Gehäuse und vergewissern Sie sich dass sie zentral ausgerichtet ist 2 Öffnen Sie die Tür und befestigen Sie die Mikrowelle mit den im Lieferumfang inbegriffenen Schrauben Setzen Sie das Gerät zur Gänze ein und zentrieren Sie es Das Anschlusskabel nicht knicken Schrauben Sie das Gerät fest Die Lücke zwischen der Arbeitsfläche und dem Gerät darf nicht mit zusätzlichen Leisten verschlossen werde...
Page 94: ...94 DE 1 Prüfen Sie den Winkel der Achse 2 Stellen Sie den Winkel des Grillblechs und der Achse ein 3 Stellen Sie das Blech in die Öffnung und passen Sie es an INSTALLATION DES GRILLBLECHS ...
Page 95: ...DE 95 Bedienfeld und Funktionen BETRIEB 1 Funktionsknopf 2 Leistungs Gewichttaste 3 Schnelles Vorheizen 4 Ein Aus Taste 5 Temperatur Auto Menü Taste 6 Uhr Taste 7 Start Pause Taste 8 Auswahlknopf ...
Page 96: ...00 blinkt auf dem Display und das Mikrowellensymbol wird angezeigt Wenn innerhalb von zehn Sekunden kein Betrieb erfolgt wird die aktuelle Leistung automatisch bestätigt 2 Drehen Sie den Knopf um die Kochzeit einzustellen Die höchstzulässige Kochzeit hängt von der eingestellten Leistung ab Wenn die Leistung 900 W beträgt sind höchstens 30 Minuten zulässig bei anderen Leistungsstufen sind 90 Minute...
Page 97: ...e zu sorgen Grill Grill Der Grill ist ideal für die Zubereitung dünner Fleisch oder Fischstücke Heizen Heißluft Unterhitze Verwenden Sie diese Funktion um große Fleischstücke Pizza usw zu braten Kombination Heißluft Mikrowelle Heißluft Verwenden Sie diese Funktion um Fleisch rasch zu braten Grill mit Gebläse Mikrowelle Grill mit Gebläse Grill Mikrowelle Grill Verwenden Sie diese Funktion um Speise...
Page 98: ...nfunktion zu aktivieren 2 Drehen Sie um den Kochmodus auszuwählen Die Anzeige leuchtet auf 3 Drehen Sie um den Grill mit Gebläse Modus auszuwählen Die vorgegebene Temperatur beträgt 180 Grad Die Anzeige leuchtet auf wenn die Grill mit Gebläse Funktion ausgewählt wird 4 Drücken Sie um die Temperatur auszuwählen 5 Drehen Sie um eine Temperatur zwischen 100 und 230 Grad auszuwählen Folgende Temperatu...
Page 99: ...dus auszuwählen Die vorgegebene Zeit beträgt zehn Minuten 9 Drehen Sie um die Grillzeit auszuwählen Es können höchstens 90 Minuten eingestellt werden 10 Drücken Sie auf die Taste START PAUSE um den Kochvorgang zu starten 9 Mikrowelle Grill mit Gebläse 1 Drücken Sie auf die Taste STOP CLEAR um die Mikrowellenfunktion zu aktivieren 2 Drehen Sie um den Kochmodus auszuwählen und leuchten auf 3 Drehen ...
Page 100: ...atur erreicht ist gibt das Gerät drei Signaltöne ab Sie können das Vorheizen stoppen indem Sie die Ofentür öffnen oder auf die Taste STOP CLEAR drücken Hinweis 1 Die Vorheizfunktion ist nur dann möglich wenn Sie bereits einen oder oben genannten Modi ausgewählt haben Während des Vorheizens ist die Mikrowellenfunktion ausgeschaltet 2 Erst wenn ein Signalton abgegeben wird und das Vorheizsymbol blin...
Page 101: ...isen um wenn Sie einen Signalton hören Der Kombi Mikrowellenherd beginnt automatisch mit der nächsten Stufe P05 Backwaren Kuchen P06 Backwaren Apfelkuchen P07 Backwaren Quiche P08 Aufwärmen Getränke Suppen P09 Aufwärmen Tellergericht P10 Aufwärmen Soße Eintopf P11 Bequem Tiefkühlpizza P12 Bequem Backofen Pommes Frites Drehen Sie die Speisen um wenn Sie einen Signalton hören Der Kombi Mikrowellenhe...
Page 102: ...h Fehler Mögliche Ursache Maßnahme Der Ofen kann nicht in Betrieb genommen werden 1 Das Stromkabel ist nicht richtig angeschlossen Stecken Sie es aus Stecken Sie es nach zehn Sekunden erneut ein 2 Eine Sicherung ist durchgebrannt oder der Schutzschalter wurde aktiviert Ersetzen Sie die Sicherung oder setzen Sie den Schutzschalter zurück Reparatur durch qualifiziertes Personal Ihres Unternehmens 3 ...
Page 103: ...есте Соблюдение инструкций гарантирует долгий срок службы Вашей микроволновой печи СОХРАНИТЕ НАСТОЯЩИЕ ИНСТРУКЦИИ В НАДЕЖНОМ МЕСТЕ Содержание Предосторожности и рекомендации 104 Установка духового шкафа 108 Инструкции по эксплуатации 113 Неисправности и методы их устранения 119 Установка 111 Italiano Français Nederlands Poliski Portuges Español Deutsch Русскии PL IT FR ES PT NL RS DE English GB ...
Page 104: ...чки с бумажной или пластиковой посуды пакетов перед их помещением в печь 13 Установите печь в соответствии с инструкциями 14 Не нагревайте в СВЧ печи сырые или вареные яйца в скорлупе так как они могут взорваться даже по завершении СВЧ нагревания 15 Используйте изделие только в целях описанных в настоящих инструкциях Не используйте коррозивные химические вещества или пар для ухода за изделием Данн...
Page 105: ...сетевого провода сокращает риск зацепления или наступания 2 В случае длинного сетевого провода или удлинителя 1 Указанное номинальное электрическое значение провода или удлинителя должно быть не меньше номинального электрического значения изделия 2 Удлинитель должен быть 3 хжильным с заземлением 3 Длинный провод должен быть расположен таким образом чтобы не свешиваться со столешницы или кухонного ...
Page 106: ...рукциям производителя Не завязывайте металлической проволокой Проделайте сверху в пакете дырочки для выхода пара Бумажные тарелки Используйте только для быстрого приготовления разогрева и стаканы Не оставляйте печь без присмотра в процессе приготовления Бумажные Используйте для покрытия блюд для повторного разогрева и для впитывания полотенца жира Используйте под контролем только для быстрого приг...
Page 107: ... ручкой Металлическая Металл экранирует продукт от СВЧ излучения Металлическая отделка посуда или может вызвать дуговой разряд посуда с металлическими деталями Металлические Могут вызвать дуговой разряд и возгорание внутри печи крученые проволочки Бумажные пакеты Могут вызвать возгорание внутри печи Пенопласт Пенопласт может расплавиться или загрязнить содержимое под воздействием высокой температу...
Page 108: ...Ваша печь укомплектована следующими деталями Эмалированная тарелка 1 Вращающееся кольцо 1 Руководство по эксплуатации 1 НАСТРОЙКА ВАШЕЙ СВЧ ПЕЧИ 1 Консоль управления 2 Элемент гриля 3 Освещение 4 Уровень 5 Стекло дверцы 6 Ручка 7 Вращающаяся ось 8 Низкая решетка для гриля 9 Высокая решетка для гриля 10 Противень ...
Page 109: ...зъединение Изделие должно быть подключено к стационарной проводке согласно правилам электропроводки Установка вращающегося блока a Никогда не устанавливайте стеклянную тарелку перевернутой Стеклянная тарелка всегда должна вращаться свободно b И стеклянная тарелка и вращающееся кольцо всегда должны быть установлены для использования СВЧ печи c Все блюда и посуда для еды должны устанавливаться на ст...
Page 110: ...торваться 1 Осторожно вставьте СВЧ печь в нишу проверив чтобы она встала по центру 2 Откройте дверцу и прикрепите СВЧ печь прилагаемыми шурупами Полностью вставьте изделие в нишу по центру Не сжимайте сетевой провод Прикрутите изделие шурупами к нише Зазор между кухонным топом и изделием не должен быть закрыт дополнительными панелями мин вентиляционная поверхность 250 см2 мин вентиляционная поверх...
Page 111: ...RS 111 1 Проверьте угол вращающейся оси 2 Отрегулируйте угол поддона для гриля и вращающуюся ось 3 Установите поддон в печь и слегка отрегулируйте его положение УСТАНОВКА ПОДДОНА ДЛЯ ГРИЛЯ ...
Page 112: ...вления и функции ИНСТРУКЦИИ ПО ЭКСПЛУАТАЦИИ 1 Рабочий регулятор 2 Кнопка Мощность Вес 3 Кнопка быстрого нагрева 4 Кнопка Вкл Выкл 5 Кнопка Температура Автом режим 6 Кнопка часов 7 Кнопка Пуск Пауза 8 Рукоятка переключения ...
Page 113: ...има СВЧ печи 01 00 мигает на дисплее и загорается символ СВЧ Если в течение 10 секунд не производится никаких действий данная мощность автоматически подтверждается 2 Поверните регулятор для настройки продожительности приготовления Максимальная продолжительность приготовления зависит от заданной мощности Если задана мощность 900 Вт продолжительность будет 30 минут для других уровней мощности 90 мин...
Page 114: ...х ломтиков мяса и рыбы Горячий воздух Нагрев снизу Используйте эту функцию для зажаривания больших порций мяса пиццы и т п Комбинированный режим Горячий воздух СВЧ Горячий воздух Используйте эту функцию для быстрого обжаривания блюд Гриль с вентиляцией СВЧ Гриль с вентиляцией Гриль СВЧ Гриль Используйте эту функцию для быстрого приготовления блюд и в то же время для образования румяной корочки так...
Page 115: ... приготовления 5 Приготовление в режиме Гриль с вентиляцией 1 Нажмите кнопку STOP CLEAR для включения режима СВЧ 2 Поверните переключатель для выбора режима приготовления Загорится индикатор 3 Поверните переключатель для выбора режима гриль с вентиляцией По умолчанию дается температура 180 градусов Индикатор загорится при выборе режима гриль с вентиляцией 4 Нажмите кнопку для переключения в режим ...
Page 116: ...а температуры от 50 до 230 градусов 6 Нажмите кнопку для выбора мощности По умолчанию задается мощность 300 Вт 7 Поверните переключатель для выбора 700 Вт 450 Вт 300 Вт и 100 Вт 8 Нажмите кнопку для выбора режима настройки продолжительности По умолчанию задается время 10 минут 9 Поверните регулятор для настройки продожительности приготовления в режиме гриль Максимальное устанавливаемое время 90 ми...
Page 117: ...ей и СВЧ нагрев снизу конвекция 1 Нажмите нопку На дисплее загорается символ предварительного нагрева 2 Нажмите кнопку START PAUSE для включения предварительного нагрева По достижения нужной температуры включатся три звуковых сигнала Предварительный нагрев можно прервать открыв дверь печи или нажав кнопку STOP CLEAR Примечание 1 Функция предварительного нагрева работает только после выбора одного ...
Page 118: ...т следующую фазу программы P05 Кондитерская выпечка Торт P06 Кондитерская выпечка Яблочный пирог P07 Кондитерская выпечка Запеканка P08 Повторный нагрев Напитки супы P09 Повторный нагрев Готовые блюда в упаковке P10 Повторный нагрев Соусы блюда из тушеного мяса или рыбы P11 Готовые блюда Замороженая пицца P12 Готовые блюда Чипсы в духовке Если вы услышите звуковой сигнал переверните продукт Комбин...
Page 119: ...чина Методы устранения Печь не включается 1 Сетевой провод плохо подсоединен к сетевой розетке Отсоедините штепсельную вилку Подождите 10 секунд и вновь вставьте вилку в сетевую розетку 2 Перегорел плавкий предохранитель или сработал защитный разъединитель Замените предохранитель или взведите разъединитель обращайтесь к профессиональному электрику 3 Неисправна сетевая розетка Проверьте сетевую роз...
Page 120: ...odne ze wskazówkami zawartymi w instrukcji zapewni długą żywotność urządzenia NALEŻY STARANNIE PRZECHOWYWAĆ INSTRUKCJĘ Spis tresci Zalecenia i środki ostrożności 121 Instalacja kuchenki 125 Instrukcje użytkowania 130 Nieprawidłowości w działaniu i sposoby ich usuwania 136 Instalacja 128 Italiano Français Nederlands Poliski Portuges Español Deutsch English Русскии IT FR ES PT NL DE GB RS PL ...
Page 121: ...ności 11 Nie używać kuchenki do przechowywania żywności Nie przechowywać produktów takich jak chleb ciastka itp we wnętrzu kuchenki 12 Przed włożeniem do kuchenki papierowych lub plastikowych pojemników torebek należy usunąć druciki i metalowe uchwyty 13 Instalować lub umieścić kuchenkę wyłącznie zgodnie z dostarczoną instrukcją instalacji 14 Nie podgrzewać w kuchence jaj w skorupkach i całych jaj...
Page 122: ...alifikowanym elektrykiem lub pracownikiem serwisu W razie konieczności użycia przedłużacza należy używać wyłącznie przedłużacza trójprzewodowego 1 W celu ograniczenia ryzyka na skutek zaplątania się lub potknięcia o długi kabel załączono krótki kabel zasilania 2 W przypadku użycia zestawu z długim kablem lub przedłużacza 1 Oznaczone parametry elektryczne zestawu kabli lub przedłużacza powinny być ...
Page 123: ...ostępować zgodnie z instrukcjami producenta Nie zamykać toreb drucianym wiązadłem Nakłuć torby w celu umożliwienia ujścia pary Papierowe talerze Używać wyłącznie do krótkotrwałego gotowania podgrzewania i kubki Nie pozostawiać kuchenki bez nadzoru podczas gotowania Ręczniki papierowe Używać do nakrywania żywności podczas podgrzewania i w celu usuwania tłuszczu Stosować pod nadzorem wyłącznie w cel...
Page 124: ...ikrofalowej uchwytami Naczynia metalowe Metal nie dopuszcza energii mikrofal do żywności lub metalizowane Opaski metalowe mogą być przyczyną iskrzenia Wiązadła druciane Mogą być przyczyną iskrzenia i pożaru w kuchence Torebki papierowe Mogą być przyczyną pożaru w kuchence Pianka z tworzywa Po wystawieniu na działanie wysokiej temperatury tworzywo sztuczne może ulec sztucznego stopnieniu lub zaniec...
Page 125: ... Kuchenka jest dostarczana z następującymi akcesoriami Emaliowana taca 1 Zespół pierścienia tacy obrotowej1 Instrukcja Obsługi 1 USTAWIANIE KUCHENKI 1 Panel kontrolny 2 Element Grilla 3 Światło 4 Poziom 5 Szklane drzwiczki 6 Zawias 7 Wał tacy obrotowej 8 Krótki ruszt do grillowania 9 Długi ruszt do grillowania 10 Taca grilla ...
Page 126: ...gunach co zapewni pełne rozłączenie i urządzenie powinno być włączone do stałej instalacji elektrycznej zgodnie z zasadami okablowania Instalacja Tacy Obrotowej a Nigdy nie umieszczać szklanego talerza w pozycji odwróconej Nigdy nie ograniczać ruchu szklanej tacy b Podczas gotowania w kuchence powinna być używana zarówno szklana taca jak i zespół pierścienia obrotowego c Podczas gotowania należy u...
Page 127: ...kuchenkę mikrofalową do pudełka upewniając się że została umieszczona na środku 2 Otworzyć drzwiczki i przymocować kuchenkę za pomocą dostarczonych śrub Włożyć całkowicie urządzenie i je wyśrodkować Nie załamywać kabla łączącego Przymocować urządzenie do miejsca instalacji Nie zasłaniać szczeliny między blatem i urządzeniem za pomocą dodatkowych listew min powierzchnia wentylacyjna 250 cm2 min pow...
Page 128: ...128 PL 1 Sprawdzić kąt wału 2 Ustawić kąt tacy do grillowania i wał 3 Umieścić tacę w otworze i delikatnie ją dopasować INSTALCJA TACY GRILLA ...
Page 129: ...kontrolny i funkcje DZIAŁANIE 1 Pokrętło funkcyjne 2 Przycisk Mocy Masy 3 Przycisk szybkiego podgrzewania 4 Przycisk On Off 5 Przycisk Temperatury Menu Auto 6 Przycisk Zegara 7 Przycisk Start Pauza 8 Pokrętło wyboru ...
Page 130: ...ej Na wyświetlaczu zacznie migotać 01 00 i pojawi się ikona kuchenki mikrofalowej Jeśli w ciągu 10 sekund nie zostanie wykonane żadne działanie bieżąca moc zostanie potwierdzona w sposób automatyczny 2 Przekręcić pokrętło w celu ustawienia czasu gotowania Maksymalny czas gotowania zależy od ustawionej mocy Jeżeli moc wynosi 900W MAX czas wynosi 30 minut Przy innych mocach czas wynosi 90 minut 3 Na...
Page 131: ... Grill Grill Grill służy do przygotowania cienkich kawałków mięsa i ryb Gorące powietrze grzanie od spodu Funkcja ta służy do pieczenia dużych kawałków mięsa pizzy itp Kombinacje Gorące powietrze Kuchenka mikrofalowa Gorące powietrze Funkcja ta służy do pieczenia Grill z wentylatorem Kuchenka mikrofalowa Grill z wentylatorem Grill Kuchenka mikrofalowa Grill Funkcja ta służy do szybkiego gotowania ...
Page 132: ...tura wynosi 180 stopni Wskaźnik zaświeci się gdy zostanie wybrana funkcja grilla z wentylatorem 4 Nacisnąć w celu wprowadzenia temperatury 5 Obracać w celu wyboru temperatury od 100 do 230 stopni Temperatury wynoszą 100 105 110 115 120 125 130 135 140 145 150 155 160 165 170 175 180 185 190 195 200 205 210 215 220 225 230 Nacisnąć w celu wyboru trybu ustawiania czasu Domyślny czas wynosi 10 minut ...
Page 133: ...kcja 4 Nacisnąć w celu wprowadzenia temperatury 5 Obracać w celu wyboru temperatury od 100 do 230 stopni 6 Nacisnąć w celu wyboru mocy Domyślna moc wynosi 300W 7 Przekręcić w celu wyboru 700W 450W 300W i 100W 8 Nacisnąć w celu wyboru trybu ustawiania czasu Domyślny czas wynosi 10 minut 9 Przekręcić w celu wyboru czasu grillowania Maksymalny czas wynosi 90 minut 10 Nacisnąć przycisk START PAUSE w c...
Page 134: ...zęciu migotania ikony podgrzewania 13 Funkcja Blokowania przed Dziećmi Blokowanie W stanie oczekiwania nacisnąć równocześnie START PAUSE i zostanie wyemitowany długi sygnał dźwiękowy informujący o przejściu w stan zablokowania przed dziećmi i nastąpi zaświecenie wskaźnika Odblokowanie W stanie zablokowania naciskać START PAUSE i przez 3 sekundy zostanie wyemitowany długi sygnał świadczący o tym że...
Page 135: ...eży obrócić żywność Kuchenka mikrofalowa combi rozpoczyna następną fazę w sposób automatyczny P05 Pieczywo Ciasta P06 Pieczywo Szarlotka P07 Pieczywo Quiche P08 Ponowne podgrzewanie Napoje zupa P09 Ponowne podgrzewanie Danie na talerzu P10 Ponowne podgrzewanie Sos gulasz danie P11 Zalecany Zamrożone pizza P12 Zalecany Frytki Po usłyszeniu sygnalizacji dźwiękowej należy obrócić żywność Kuchenka mik...
Page 136: ...yna Środki zaradcze Nie następuje uruchomienie kuchenki 1 Przewód zasilania nie jest podłączony w prawidłowy sposób Odłączyć Następnie podłączyć ponownie po 10 sekundach 2 Przepalenie bezpiecznika lub zadziałanie wyłącznika obwodu Wymienić bezpiecznik lub zresetować wyłącznik obwodu naprawa wykonana przez wykwalifikowany personel 3 Problemy z gniazdem Przetestować gniazdo przy użyciu innych urządz...
Page 137: ...you follow the instructions your oven will provide you with many years of good service SAVE THESE INSTRUCTIONS CAREFULLY Italiano Français Nederlands Poliski Portuges Español Deutsch Русскии DE RS PT ES NL PL FR Contents Precautions and suggestions 138 Oven installation 142 Operating instructions 147 Troubleshooting 153 Installation 145 English GB IT ...
Page 138: ...t ties and metal handles from paper or plastic containers bags before placing them in the oven 13 Install or locate this oven only in accordance with the installation instructions provided 14 Eggs in the shell and whole hard boiled eggs should not be heated in microwave ovens since they may explode even after microwave heating has ended 15 Use this appliance only for its intended uses as described...
Page 139: ...gled in or tripping over a longer cord 2 If a long cord set or extension cord is used 1 The marked electrical rating of the cord set or extension cord should be at least as great as the electrical rating of the appliance 2 The extension cord must be a grounding type 3 wire cord 3 The long cord should be arranged so that it will not drape over the counter top or tabletop where it can be pulled on b...
Page 140: ...allic trim Do not use cracked or chipped dishes Oven coking bags Follow manufacturer s instructions Do not close with metal tie Make slits to allow steam to escape Paper plates and cups Use for short term cooking warming only Do not leave oven unattended while cooking Paper towels Use to cover food for reheating and absorbing fat Use with supervision for a short term cooking only Parchment paper U...
Page 141: ...sh metal handle Metal or Metal shields the food from microwave energy Metal trim may cause arcing metaltrimmed utensils Metal twist ties May cause arcing and could cause a fire in the oven Paper bags May cause a fire in the oven Plastic foam Plastic foam may melt or contaminate the liquid inside when exposed to high temperature Wood Wood will dry out when used in the microwave oven and may split o...
Page 142: ...carton and oven cavity Your oven comes with the following accessories Enamel Tray 1 Turntable ring assembly 1 Instruction Manual 1 SETTING UP YOUR OVEN 1 Control panel 2 Grill element 3 Light 4 Level 5 Door glass 6 Hinge 7 Turntable shaft 8 Short Grill Rack 9 Long Grill Rack 10 Grill Pan ...
Page 143: ...must have a contact separation in all poles that provide full disconnection and the appliance must be incorporated in the fixed wiring in accordance with the wiring rules Turntable Installation a Never place the glass tray upside down The glass tray should never be restricted b Both glass tray and turntable ring assembly must always be used during cooking c All food and containers of food are alwa...
Page 144: ...dle cannot hold the weight of the appliance and may break off 1 Carefully push the microwave into the box making sure that it is in the centre 2 Open the door and fasten the microwave with the screws that were supplied Fully insert the appliance and centre it Do not kink the connecting cable Screw the appliance into place The gap between the worktop and the appliance must not be closed by addtiona...
Page 145: ...GB 145 1 Be sure the angle of the shaft 2 Adjust the angel of the grill pan and the shaft 3 Put the pan into the cavity and adjust slightly INSTALL THE GRILL PAN ...
Page 146: ...GB Control Panel and Features OPERATION 1 Function knob 2 Power Weight button 3 Quickly preheating button 4 On Off Button 5 Temperature auto menu button 6 Clock button 7 Start Pause button 8 Selection knob ...
Page 147: ...1 00 is blinking in the display and the microwave icon appears If no operation in 10 seconds the current power will be confirmed automatically 2 Turn knob to set the cooking time The max cooking time depends on the power that has been set When the power is 900W the MAX time is 30 minutes and other powers are 90 minutes 3 Press button to adjust the power microwave power 4 Turn knob to set the micro...
Page 148: ...n crust Grill Grill The grill is very suitable to prepare thin pieces of meat and fish Heat Hot air Bottom heat Use this function to roast big pieces of meat pizza etc Combination Hot air Microwave Hot air Use this function to roast meals quickly Grill with fan Microwave Grill with Fan Grill Microwave Grill Use this function to cook meals quickly and at the same time give the meal a brown crust al...
Page 149: ... microwave function 2 Turn to select the cooking mode indicator lights 3 Turn to select grill fan mode The default temperature is 180 degrees indicator will light when grill fan function is selected 4 Press to enter to the temperature selection 5 Turn to select the temperature between 100 to 230 degrees The temperature are 100 105 110 115 120 125 130 135 1 40 145 150 155 160 165 170 175 180 185 19...
Page 150: ...10 Press START PAUSE button to start cooking 9 Microwave Grill Fan Cooking 1 Press STOP CLEAR button to activate the microwave function 2 Turn to select the cooking mode and will light 3 Turn to select cooking mode The default temperature is 180 degrees indicator will light when this function is selected 4 Press to enter to the temperature selection 5 Turn to select the temperature between 100 to ...
Page 151: ...works if you have already chosen one of the modes above During preheating the microwave function is switched off 2 Only when you can hear alarm and preheating icon is blinking you can open the door and put food inside 13 Lock out Function for Children Lock In waiting state press START PAUSE and at the same time there will be a long beep denoting entering into the children lock state and indicator ...
Page 152: ...ces Fish pieces If you hear a beep turn the food The combi microwave oven starts the next fase automatically P05 Bakery Cake P06 Bakery Apple pie P07 Bakery Quiche P08 Reheat Drink soup P09 Reheat Plated meal P10 Reheat Sauce stew dish P11 Convenience Frozen pizza P12 Convenience Oven chips If you hear a beep turn the food The combi microwave oven starts the next fase automatically P13 Convenience...
Page 153: ...ble Cause Remedy Oven cannot be started 1 Power cord not plugged in tightly Unplug Then plug again after 10 seconds 2 Fuse blowing or circuits breaker works Replace fuse or reset circuits breaker repaired by professional personnel of your company 3 Trouble with outlet Test outlet with other electrical appliances Oven does not head 4 Door not closed well Close door well Glass turntable makes noise ...