background image

8

IT

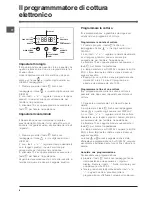
Il programmmatore di cottura

elettronico

DISPLAY

Tasto

IMPOSTAZIONE
TEMPI

Icona

FINE COTTURA

Icona

OROLOGIO

Icona

DURATA

Icona

CONTAMINUTI

Tasto

DIMINUZIONE

TEMPI

Tasto

AUMENTO
TEMPI

••


••

Impostare l’orologio

!

 Si può impostare sia quando il forno è spento che

quando è acceso, ma non si è programmata la fine
di una cottura.
Dopo l’allacciamento alla rete elettrica o dopo un

black-out, l’icona 

 e i quattro digit numerici sul

DISPLAY lampeggiano.
1. Premere più volte il tasto 

 finchè non

lampeggiano l’icona 

  e i quattro digit numerici sul

DISPLAY;
2. con i tasti  “+” e “-”  regolare l’ora; se si tengono
premuti, i numeri scorrono più velocemente per
facilitare l’impostazione.
3. attendere 10 sec oppure premere nuovamente il
tasto 

 per fissare l’impostazione.

Impostare il contaminuti

!

 Questa funzione non interrompe la cottura e

prescinde dall’utilizzo del forno; permette solo di
azionare il segnale acustico allo scadere dei minuti
impostati.

1. Premere più volte il tasto 

 finchè non

lampeggiano l’icona 

  e i tre digit numerici sul

DISPLAY;
2. con i tasti  “+” e “-”  regolare il tempo desiderato;
se si tengono premuti, i numeri scorrono più
velocemente per facilitare l’impostazione.
3. attendere 10 sec oppure premere nuovamente il
tasto 

 per fissare l’impostazione.

Seguirà la visualizzazione del conto alla rovescia al
termine del quale si azionerà il segnale acustico.

Programmare la cottura

!

 La programmazione è possibile solo dopo aver

selezionato un programma di cottura.

Programmare la durata di cottura

1. Premere più volte il tasto 

 finchè non

lampeggiano l’icona 

  e i tre digit numerici sul

DISPLAY;
2. con i tasti  “+” e “-”  regolare la durata desiderata;
se si tengono premuti, i numeri scorrono più
velocemente per facilitare l’impostazione.
3. attendere 10 sec oppure premere nuovamente il
tasto 

 per fissare l’impostazione.

4. a tempo scaduto, sul DISPLAY compare la scritta
END, il forno termina la cottura e viene emesso un
segnale acustico.
• Esempio: sono le 9:00 e viene programmata una

durata di 1 ora e 15 minuti. Il programma si
arresta automaticamente alle 10:15.

Programmare la fine di una cottura

!

 La programmazione della fine di una cottura è

possibile solo dopo aver impostato una durata di
cottura.

1. Seguire la procedura da 1 a 3 descritta per la
durata;
2. poi premere il tasto 

 finchè non lampeggiano

l’icona 

 e i quattro digit numerici sul DISPLAY;

3. con i tasti  “+” e “-”  regolare l’ora di fine cottura
desiderata; se si tengono premuti i numeri, scorrono
più velocemente per facilitare l’impostazione.
4. attendere 10 sec oppure premere nuovamente il
tasto 

 per fissare l’impostazione.

5. a tempo scaduto, sul DISPLAY compare la scritta
END, il forno termina la cottura e viene emesso un
segnale acustico.
Le icone 

 e 

 accese segnalano che è stata

effettuata una programmazione. Sul DISPLAY vengono
visualizzate alternativamente l’ora di fine cottura e la
durata.

Annulare una programmazione

Per annullare una programmazione:
• premere il tasto 

 finchè non lampeggia l’icona

dell’impostazione da annullare e i digit sul
display. Premere il tasto “-” finchè sul display non

compaiono le cifre 00:00.

• tenere premuti contemporaneamente i tasti “+” e

”-”; in questo modo si annullano tutte le
programmazioni effettuate contaminuti compreso.

Summary of Contents for FI 53 K.A IX/BK UK

Page 1: ...Programmi di cottura Consigli pratici di cottura Tabella cottura Il programmmatore di cottura elettronico 8 Precauzioni e consigli 9 Sicurezza generale Smaltimento Risparmiare e rispettare l ambiente Manutenzione e cura 10 Escludere la corrente elettrica Pulire l apparecchio Pulire la porta Sostituire la lampadina Montaggio del Kit Guide Scorrevoli Assistenza 11 Assistenza attiva 7 giorni su 7 Ita...

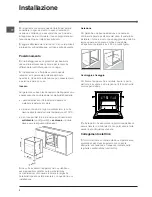
Page 2: ...C per l incasso del forno sia nel caso di inserimento sottotavolo vedi figura che a colonna il mobile deve avere le seguenti dimensioni Una volta incassato l apparecchio non debbono essere possibili contatti con le parti elettriche Le dichiarazioni di consumo indicate in targhetta caratteristiche sono state misurate con questo tipo di installazione Aerazione Per garantire una buona aerazione è nec...

Page 3: ...alimentazione sia compresa nei valori nella targhetta caratteristiche vedi sotto la presa sia compatibile con la spina dell apparecchio In caso contrario sostituire la presa o la spina non usare prolunghe e multiple Ad apparecchio installato il cavo elettrico e la presa della corrente devono essere facilmente raggiungibili Il cavo non deve subire piegature o compressioni Il cavo deve essere contro...

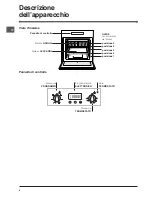
Page 4: ...o LECCARDA GUIDE di scorrimento dei ripiani posizione 5 posizione 4 posizione 3 posizione 2 posizione 1 Descrizione dell apparecchio Vista d insieme Pannello di controllo Manopola PROGRAMMI Manopola TERMOSTATO Programmatore ELETTRONICO Spia TERMOSTATO ...

Page 5: ...Durante la cottura è sempre possibile modificare il programma di cottura agendo sulla manopola PROGRAMMI modificare la temperatura agendo sulla manopola TERMOSTATO interrompere la cottura riportando la manopola PROGRAMMI in posizione 0 Non appoggiare mai oggetti sul fondo del forno perché si rischiano danni allo smalto Porre sempre i recipienti di cottura sulla griglia in dotazione Ventilazione di...

Page 6: ...zo sono riportati al paragrafo Consigli pratici per la cottura Effettuare le cotture con la porta del forno chiusa Programma GRATIN Si attiva l elemento riscaldante superiore ed entra in funzione la ventola Unisce all irradiazione termica unidirezionale la circolazione forzata dell aria all interno del forno Ciò impedisce la bruciatura superficiale degli alimenti aumentando il potere di penetrazio...

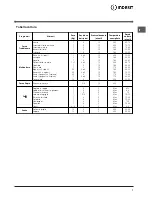
Page 7: ...1 ripiano Pan di spagna su 2 ripiani Torte salate 1 1 1 1 1 1 1 0 5 0 5 0 5 1 1 5 2 e 4 3 2 2 e 4 2 2 2 e 4 2 e 4 2 2 e 4 3 15 10 10 15 10 10 10 10 10 10 15 230 180 180 200 180 170 190 180 170 170 200 15 20 30 35 40 45 60 70 30 35 40 50 20 25 10 15 15 20 20 25 25 30 Forno Sopra Ritocchi di cottura 3 4 15 220 Grill l Sogliole e seppie Spiedini di calamari e gamberi Filetto di merluzzo Verdure alla ...

Page 8: ...mere più volte il tasto finchè non lampeggiano l icona e i tre digit numerici sul DISPLAY 2 con i tasti e regolare la durata desiderata se si tengono premuti i numeri scorrono più velocemente per facilitare l impostazione 3 attendere 10 sec oppure premere nuovamente il tasto per fissare l impostazione 4 a tempo scaduto sul DISPLAY compare la scritta END il forno termina la cottura e viene emesso u...

Page 9: ...utenzione senza aver prima staccato la spina dalla rete elettrica In caso di guasto in nessun caso accedere ai meccanismi interni per tentare una riparazione Contattare l Assistenza vedi Assistenza Non appoggiare oggetti pesanti sulla porta del forno aperta Non è previsto che l apparecchio venga utilizzato da persone bambini compresi con ridotte capacità fisiche sensoriali o mentali da persone ine...

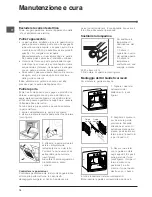
Page 10: ... levette poste sulle due cerniere vedi figura 3 afferrare la porta ai due lati esterni richiudendola lentamente ma non del tutto Poi tirare la porta verso di sé estraendola dalle cerniere vedi figura Rimontare la porta seguendo il procedimento in senso contrario Controllare le guarnizioni Controllare periodicamente lo stato della guarnizione attorno alla porta del forno In caso risulti danneggiata...

Page 11: ...l luogo da cui si chiama È attivo 7 giorni su 7 sabato e domenica compresi e non lascia mai inascoltata una richiesta Al costo di 14 26 centesimi di Euro al minuto iva inclusa dal Lun al Ven dalle 08 00 alle 18 30 il Sab dalle 08 00 alle 13 00 e di 5 58 centesimi di Euro al minuto iva inclusa dal Lun al Ven dalle 18 30 alle 08 00 il Sab dalle 13 00 alle 08 00 e i giorni festivi per chi chiama da t...

Page 12: ...g modes 17 18 Cooking modes Practical cooking advice Cooking advice table The electronic cooking programmer 19 Precautions and tips 20 General safety Disposal Respecting and conserving the environment Maintenance and care 21 Switching the appliance off Cleaning the appliance Cleaning the oven door Replacing the light bulb Assembling the sliding rack kit Operating Instructions OVEN GB Français 22 E...

Page 13: ...ets with a veneer exterior must be assembled with glues which can withstand temperatures of up to 100 C to install the oven under the counter see diagram and in a kitchen unit the cabinet must have the following dimensions The appliance must not come into contact with electrical parts once it has been installed The consumption indications on the data plate have been calculated for this type of ins...

Page 14: ...e terminal marked N the Brown wire to the terminal marked L and the Yellow Green wire to the terminal marked see diagram 3 Secure the cable by fastening the clamp screw 4 Close the cover of the terminal board Connecting the supply cable to the mains Install a standardised plug corresponding to the load indicated on the data plate see side The appliance must be directly connected to the mains using...

Page 15: ...liance Overall view Control panel position 5 position 4 position 3 position 2 position 1 SELECTOR SELECTOR SELECTOR SELECTOR SELECTOR Knob THERMOSTAT THERMOSTAT THERMOSTAT THERMOSTAT THERMOSTAT Knob ELECTRONIC programmer Indicator light THERMOSTAT THERMOSTAT THERMOSTAT THERMOSTAT THERMOSTAT ...

Page 16: ... the oven 4 You may do the following during cooking change the cooking mode by turning the SELECTOR knob change the temperature by turning the THERMOSTAT knob stop cooking by turning the SELECTOR knob to the 0 position Never put objects directly on the oven bottom to avoid damaging the enamel coating Always place cookware on the rack s provided Cooling ventilation In order to cool down the externa...

Page 17: ...e oven door closed GRATIN mode The top heating element as well as the fan will come on This combination of features increases the effectiveness of the unidirectional thermal radiation of the heating elements through forced circulation of the air throughout the oven This helps prevent food from burning on the surface allowing the heat to penetrate right into the food Always cook in this mode with t...

Page 18: ...k Sponge cake on 2 racks Savoury pies 1 1 1 1 1 1 1 0 5 0 5 0 5 1 1 5 2 and 4 3 2 2 and 4 2 2 2 and 4 2 and 4 2 2 and 4 3 15 10 10 15 10 10 10 10 10 10 15 230 180 180 200 180 170 190 180 170 170 200 15 20 30 35 40 45 60 70 30 35 40 50 20 25 10 15 15 20 20 25 25 30 Top oven Browning food to perfect cooking 3 4 15 220 Grill Soles and cuttlefish Squid and prawn kebabs Cod filet Grilled vegetables Vea...

Page 19: ... Programming the cooking duration 1 Press the button several times until the icon and the three digits on the DISPLAY begin to flash 2 Use the and buttons to set the desired duration if you press and hold either button the display will scroll through the values more quickly making it quicker and easier to set the value 3 Wait for 10 seconds or press the button again to finalise the setting 4 When ...

Page 20: ... In the case of a malfunction under no circumstances should you attempt to repair the appliance yourself Repairs carried out by inexperienced persons may cause injury or further malfunctioning of the appliance Contact a Service Centre see Assistance Do not rest heavy objects on the open oven door The appliance should not be operated by people including children with reduced physical sensory or men...

Page 21: ... 2 Lift up and turn the small levers located on the two hinges see diagram 3 Grip the door on the two external sides and close it approximately half way Then pull the door towards you lifting it out of its seat see diagram To replace the door reverse this sequence Inspecting the seals Check the door seals around the oven periodically If the seals are damaged please contact your nearest After sales...

Page 22: ...ce Programmes 27 28 Programmes de cuisson Conseils de cuisson Tableau de cuisson Le programmateur de cuisson électronique 29 Précautions et conseils 30 Sécurité générale Mise au rebut Economies et respect de l environnement Nettoyage et entretien 31 Mise hors tension Nettoyage de l appareil Nettoyage de la porte Remplacement de l ampoule d éclairage Montage du Kit glissières coulissantes Mode d em...

Page 23: ... colles résistent à une température de 100 C la cavité du meuble pour encastrement du four tant sous plan voir figure qu en colonne doit avoir les dimensions suivantes Après encastrement de l appareil il ne doit plus y avoir possibilité de contact avec les parties électrifiées Les déclarations de consommation indiquées sur l étiquette des caractéristiques ont été mesurées pour ce type d installati...

Page 24: ...dans le serre câble prévu 4 Fermer le couvercle du bornier Branchement du câble d alimentation au réseau électrique Montez sur le câble une prise normalisée pour la charge indiquée sur l étiquette des caractéristiques voir ci contre En cas de raccordement direct au réseau il faut intercaler entre l appareil et le réseau un interrupteur à coupure omnipolaire ayant au moins 3 mm d écartement entre l...

Page 25: ...sement Description de l appareil Vue d ensemble Tableau de bord niveau 5 niveau 4 niveau 3 niveau 2 niveau 1 Bouton PROGRAMMES Bouton THERMOSTAT THERMOSTAT THERMOSTAT THERMOSTAT THERMOSTAT Programmateur ELECTRONIQUE Voyant THERMOSTAT THERMOSTAT THERMOSTAT THERMOSTAT THERMOSTAT ...

Page 26: ...ES modifier la température à l aide du bouton THERMOSTAT interrompre la cuisson en ramenant le bouton PROGRAMMES sur 0 Ne posez jamais d objets à même la sole du four vous pourriez abîmer l émail Placez toujours vos plats sur la grille fournie avec l appareil Système de refroidissement Pour obtenir un abaissement des températures extérieures certains modèles sont équipés d un système de refroidiss...

Page 27: ...d utilisation dans le paragraphe Conseils utiles pour la cuisson Cuisson porte du four fermée Programmes Programme GRATIN Mise en marche de la résistance de voûte ainsi que de la turbine L irradiation thermique unidirectionnelle s ajoute au brassage de l air pour une répartition uniforme de la chaleur dans l enceinte du four Plus de risques de brûler vos aliments en surface et plus grande pénétrat...

Page 28: ...veau Génoise sur 2 niveaux Tartes salées 1 1 1 1 1 1 1 0 5 0 5 0 5 1 1 5 2 et 4 3 2 2 et 4 2 2 2 et 4 2 et 4 2 2 et 4 3 15 10 10 15 10 10 10 10 10 10 15 230 180 180 200 180 170 190 180 170 170 200 15 20 30 35 40 45 60 70 30 35 40 50 20 25 10 15 15 20 20 25 25 30 Résistance de voûte Pour parfaire la cuisson 3 4 15 220 Gril Soles et seiches Brochettes de calmars et de crevettes Tranches de colin Lég...

Page 29: ...uche jusqu à ce que l icône et les trois digits numériques de l AFFICHEUR se mettent à clignoter 2 régler la durée avec les touches et si les touches restent enfoncées les numéros défilent plus rapidement 3 attendre 10 secondes ou appuyer à nouveau sur la touche pour valider 4 à expiration de la durée sélectionnée l AFFICHEUR affiche END le four stoppe la cuisson et un signal sonore retentit Exemp...

Page 30: ...r auparavant débranché la fiche de la prise de courant En cas de panne n essayez en aucun cas d accéder aux mécanismes internes pour tenter de réparer l appareil Contactez le service d Assistance voir Assistance Ne posez pas d objets lourds sur la porte du four ouverte Cet appareil n est pas prévu pour être utilisé par des personnes y compris les enfants dont les capacités physiques sensorielles o...

Page 31: ...s taches sont difficiles à enlever utilisez des produits spéciaux Il est conseillé de rincer abondamment et d essuyer après le nettoyage N utilisez ni poudres abrasives ni produits corrosifs Nettoyez l enceinte du four après toute utilisation quand il est encore tiède Utilisez de l eau chaude et du détergent rincez et séchez avec un chiffon doux Evitez tout produit abrasif Tous les accessoires peu...

Page 32: ...cia Programas 37 38 Programas de cocción Consejos prácticos de cocción Tabla de cocción El programador de cocción electrónico 39 Precauciones y consejos 40 Seguridad general Eliminación Ahorrar y respetar el medio ambiente Mantenimiento y cuidados 41 Cortar el suministro eléctrico Limpiar el aparato Limpiar la puerta Sustituir la bombilla Montaje del Kit Guías Deslizables Manual de instrucciones H...

Page 33: ... de 100 C para empotrar el horno tanto cuando se instala bajo encimera ver la figura como en columna el mueble debe tener las siguientes dimensiones Una vez empotrado el aparato no se deben permitir contactos con las partes eléctricas El consumo declarado en la placa de características fue medido en una instalación de este tipo Aireación Para garantizar una buena aireación es necesario eliminar la...

Page 34: ...o Verde ver la figura 3 Fijar el cable en el correspondiente sujetacable 4 Cerrar la tapa del panel de bornes Conexión del cable de alimentación eléctrica a la red Instale en el cable un enchufe normalizado para la carga indicada en la placa de características ver al costado En el caso de conexión directa a la red es necesario interponer entre el aparato y la red un interruptor omnipolar con una d...

Page 35: ...andeja GRASERA GUÍAS de deslizamiento de los estantes Descripción del aparato Vista de conjunto Panel de control posición 5 posición 4 posición 3 posición 2 posición 1 Mando PROGRAMAS Mando TERMOSTATO Programador ELECTRÓNICO Piloto TERMOSTATO ...

Page 36: ...peratura externa algunos modelos poseen un ventilador de enfriamiento El mismo genera un chorro de aire que sale entre el panel de control y la puerta del horno Al final de la cocción el ventilador permanece en funcionamiento hasta que el horno esté suficientemente frío Luz del horno Se enciende seleccionando con el mando PROGRAMAS Permanece encendida cuando se selecciona un programa de cocción As...

Page 37: ...os de su uso Realice las cocciones con la puerta del horno cerrada Programas Programa GRATIN Se enciende el elemento calentador superior y se pone en funcionamiento el ventilador A la irradiación térmica unidireccional le agrega la circulación forzada del aire en el interior del horno Esto impide que se quemen superficialmente los alimentos aumentando el poder de penetración del calor Realice las ...

Page 38: ...es Bizcocho en 1 nivel Bizcocho en 2 niveles Tortas saladas 1 1 1 1 1 1 1 0 5 0 5 0 5 1 1 5 2 y 4 3 2 2 y 4 2 2 2 y 4 2 y 4 2 2 y 4 3 15 10 10 15 10 10 10 10 10 10 15 230 180 180 200 180 170 190 180 170 170 200 15 20 30 35 40 45 60 70 30 35 40 50 20 25 10 15 15 20 20 25 25 30 Horno superior Retoques de cocción 3 4 15 220 Grill Lenguados y sepias Broquetas de calamares y cangrejos Filete de merluza...

Page 39: ...con los botones y regular la duración deseada si se mantienen presionados los números deslizan mas velozmente para facilitar la fijación 3 Esperar 10 seg o bien presionar nuevamente el botón para fijar la programación 4 Una vez cumplido ese tiempo en el DISPLAY aparecerá la palabra END la cocción finalizará y se emitirá una señal sonora Ejemplo son las 9 00 horas y se programa una duración de 1 ho...

Page 40: ...enimiento sin haber desconectado primero el aparato de la red eléctrica En caso de avería no acceda nunca a los mecanismos internos para intentar una reparación Llame al Servicio de Asistencia Técnica ver Asistencia No apoye objetos pesados sobre la puerta del horno abierta No está previsto que el aparato sea utilizado por personas niños incluidos con reducidas capacidades físicas sensoriales o me...

Page 41: ... esponja empapada en agua tibia y jabón neutro Si las manchas son difíciles de eliminar use productos específicos Se aconseja enjuagar abundantemente y secar después de la limpieza No utilice polvos abrasivos ni sustancias corrosivas El interior del horno se debe limpiar preferentemente cada vez que se utiliza cuando todavía está tibio Utilice agua caliente y detergente enjuague y seque con un pañ...

Page 42: ...gramas 47 48 Programas de cozedura Conselhos práticos para cozedura Tabela de cozedura O programador de cozedura electrónico 49 Precauções e conselhos 50 Segurança geral Eliminação Economia e respeito do meio ambiente Manutenção e cuidados 51 Desligar a corrente eléctrica Limpeza do aparelho Limpeza da porta Substituição da lâmpada Montagem do Kit Guias Corrediças Instruções para utilização FORNO ...

Page 43: ... C para encaixar o forno quer no caso de instalação sob uma banca veja a figura quer em coluna o móvel deve ter as seguintes medidas Depois de ter encaixado o aparelho não deve ser possível contacto com as partes eléctricas As declarações de consumo indicadas na placa de identificação foram medidas para este tipo de instalação Ventilação Para garantir uma boa ventilação é necessário eliminar a par...

Page 44: ... Azul N Castanho L Amarelo Verde veja a figura 3 Prenda o cabo no respectivo grampo 4 Feche a tampa da caixa dos terminais Ligação à rede do cabo de fornecimento eléctrica Monte no cabo uma ficha em conformidade com as normas para a carga indicada na placa de identificação veja ao lado No caso de uma ligação directa à rede será necessário interpor entre o aparelho e a rede um interruptor omnipolar...

Page 45: ...escorrimento das prateleiras Descrição do aparelho Vista de conjunto Painel de comandos posição 5 posição 4 posição 3 posição 2 posição 1 Selector dos PROGRAMAS Selector dos TERMOSTATO TERMOSTATO TERMOSTATO TERMOSTATO TERMOSTATO Programador ELECTRÓNICO Indicador luminoso TERMOSTATO ...

Page 46: ...ra mediante o selector de PROGRAMAS modificar a temperatura mediante o selector do TERMÓSTATO interromper a cozedura se recolocar o selector dos PROGRAMAS na posição 0 Nunca encoste objectos no fundo do forno para evitar riscos de danos ao esmalte Coloque sempre os recipientes de cozedura sobre a grade fornecida Ventilação de arrefecimento Para obter uma redução das temperaturas externas alguns mo...

Page 47: ...afo Conselhos práticos para a cozedura Coza com a porta do forno fechada Programas Programa de GRATIN Activa se o elemento aquecedor superior e começa a funcionar a ventoinha Une a irradiação térmica unidirecional com a circulação forçada do ar no interior do forno Deste modo impede se a queimadura da superfície dos alimentos ao aumentar se o poder de penetração do calor Coza com a porta do forno ...

Page 48: ...leiras Pão de ló em 1 prateleira Pão de ló em 2 prateleiras Tortas salgadas 1 1 1 1 1 1 1 0 5 0 5 0 5 1 1 5 2 e 4 3 2 2 e 4 2 2 2 e 4 2 e 4 2 2 e 4 3 15 10 10 15 10 10 10 10 10 10 15 230 180 180 200 180 170 190 180 170 170 200 15 20 30 35 40 45 60 70 30 35 40 50 20 25 10 15 15 20 20 25 25 30 Forno de cima Retoques na cozedura 3 4 15 220 Grill Linguado e chocas Espetinhos de calamares e camarão Fil...

Page 49: ...lgarismos piscarem no VISOR 2 com as teclas e regule a data desejada se manter pressionadas as teclas os números passarão mais rapidamente para facilitar a configuração 3 Aguarde 10 segundos ou carregue novamente na tecla para fixar a programação 4 depois que terminar o prazo no VISOR aparecerá escrito END e tocará um sinal acústico Exemplo São 9 00 horas e é programada uma duração de cozedura de ...

Page 50: ...avarias em nenhum caso mexa nos mecanismos internos para tentar repará las Contacte a Assistência Técnica veja a Assistência técnica Não coloque objectos pesados sobre a porta do forno aberta Não é previsto que este aparelho seja utilizado por pessoas incluso crianças com reduzidas capacidades físicas sensoriais ou mentais por pessoas inexperientes ou que não tenham familiaridade com o produto a n...

Page 51: ...abão neutro Se for difícil remover as manchas empregue produtos específicos É aconselhado enxaguar com água abundante e enxugar depois da limpeza Não empregue pós abrasivos nem substâncias corrosivas O interior do forno deve ser sempre limpado de preferência depois de cada utilização enquanto ainda estiver morno Utilize água quente e detergente enxagúe e enxugue com um pano macio Evite abrasivos O...

Page 52: ...rogramma s 57 58 Kookprogramma s Praktische kooktips Kooktabel De elektronische programmeur 59 Voorzorgsmaatregelen en advies 60 Algemene veiligheidsmaatregelen Afvalverwijdering Energiebesparing en milieubesef Onderhoud en verzorging 61 De elektrische stroom afsluiten Schoonmaken van de oven De ovendeur reinigen Vervangen van het lampje Montage van de Geleiders Kit Gebruiksaanwijzing OVEN NL Fran...

Page 53: ...0 C voor het inbouwen van de oven zowel onder het aanrecht zie figuur als in stapelbouw dient het meubel de volgende afmetingen te hebben Nadat het apparaat is ingebouwd mag er geen contact meer mogelijk zijn met de elektrische onderdelen Het gebruik dat staat aangegeven op het typeplaatje is gebaseerd op dit soort installatie Ventilatie Om een goede ventilatie te hebben is het noodzakelijk de ach...

Page 54: ... het klemmenbord Het aansluiten van de voedingskabel aan het net Gebruik voor de voedingskabel een stekker die genormaliseerd is voor de lading aangegeven op het typeplaatje zie hiernaast Wanneer het apparaat rechtstreeks op het net wordt aangesloten moet men tussen het apparaat en het net een meerpolige schakelaar aanbrengen met een afstand tussen de contacten van minstens 3mm aangepast aan het e...

Page 55: ...ster LEKPLAAT GLIJDERS in te schuiven Beschrijving van het apparaat Algemeen aanzicht Bedieningspaneel positie 5 positie 4 positie 3 positie 2 positie 1 Knop PROGRAMMA S Knop THERMOSTAAT ELEKTRONISCHE programmering Controlelampje THERMOSTAAT ...

Page 56: ...jd het kookprogramma veranderen met behulp van de knop PROGRAMMA S de temperatuur veranderen met behulp van de knop THERMOSTAAT het koken onderbreken door de knop PROGRAMMA S weer op stand 0 te zetten Zet nooit voorwerpen op de bodem van de oven u riskeert hiermee het email te beschadigen Plaats de ovenschalen altijd op bijgeleverde roosters Starten en gebruik Ventilator Teneinde de hitte aan de b...

Page 57: ... tabel Praktische raadgevingen voor het koken Kook met de ovendeur dicht Programma s Programma GRATINEREN Het bovenste verwarmingselement gaat aan en de ventilator gaat draaien Hiermee wordt de rechtstreekse bovenhitte van de grill gecombineerd met de circulatie van de lucht in de oven Eventueel verbranden van de buitenkant wordt zo vermeden de warmte dringt gemakkelijker door naar de binnenkant K...

Page 58: ...r Cake op 2 roosters Quiche 1 1 1 1 1 1 1 0 5 0 5 0 5 1 1 5 2 en 4 3 2 2 en 4 2 2 2 en 4 2 en 4 2 2 en 4 3 15 10 10 15 10 10 10 10 10 10 15 230 180 180 200 180 170 190 180 170 170 200 15 20 30 35 40 45 60 70 30 35 40 50 20 25 10 15 15 20 20 25 25 30 Oven Boven Afmaken van het gerecht 3 4 15 220 Grill Tong en inktvis Calamari en garnalenspiesjes Kabeljauwfilet Gegrilde groenten Kalfsbiefstuk Kotele...

Page 59: ...e malen op de toets totdat het symbool en de drie cijfers op het DISPLAY beginnen te knipperen 2 druk op de toetsen en om de gewenste duur in te stellen als u ze ingedrukt houdt zullen de nummers sneller lopen en kunt u de tijd sneller instellen 3 wacht 10 seconden of druk nogmaals op de toets om de instelling te bevestigen 4 als de ingestelde duur is verstreken verschijnt op het DISPLAY het woord...

Page 60: ...r geen onderhoud uit als de stekker nog in het stopcontact zit Als de oven defect is mag u nooit aan het interne systeem sleutelen om een reparatie proberen uit te voeren Neem contact op met de Technische Dienst zie Service Plaats geen zware voorwerpen op de open ovendeur Dit apparaat mag niet worden gebruikt door personen kinderen inbegrepen met een beperkt lichamelijk sensorieel of geestelijk ve...

Page 61: ...dient u alles goed af te spoelen en te drogen Gebruik geen schuurmiddelen of bijtende producten De binnenkant van de oven kunt u het beste direct na gebruik schoonmaken als hij nog lauw is Gebruik warm water en een schoonmaakmiddel spoel vervolgens af en droog met een zachte doek Gebruik geen schuurmiddelen De accessoires kunnen gewoon worden afgewassen eventueel ook in de vaatwasser met uitzonder...

Page 62: ...7 68 Garprogramme Praktische Back Brathinweise Back Brattabelle Der elektronische Garprogrammierer 69 Vorsichtsmaßregeln und Hinweise 70 Allgemeine Sicherheit Entsorgung Energie sparen und Umwelt schonen Reinigung und Pflege 71 72 Abschalten Ihres Gerätes vom Stromnetz Reinigung des Gerätes Reinigung der Tür Lampenaustausch Kundendienst Montage des Gleitschienen Bausatzes Bedienungsanleitung BACKO...

Page 63: ...eratur von 100 C standhalten Für den Einbau des Backofens in einen Unterschrank siehe Abbildung oder einen Hochschrank muss das entsprechende Möbel über folgende Abmessungen verfügen Nach dem Einbau des Gerätes muss eine Berührung mit den Elektroteilen ausgeschlossen sein Die auf dem Typenschild enthaltenen Verbrauchsangaben wurden bei dieser Art der Installation ermittelt Belüftung Um eine einwan...

Page 64: ... Deckel des Klemmengehäuses Anschluss des Versorgungskabels an das Stromnetz Versehen Sie das Kabel mit einem Normstecker für die auf dem Typenschild angegebene Belastung siehe nebenstehende Tabelle Wird das Gerät direkt an das Stromnetz angeschlossen ist zwischen Stromnetz und Gerät ein allpoliger der Last und den einschlägigen Vorschriften entsprechender Schalter mit einer Mindestöffnung der Kon...

Page 65: ...HRUNGEN für die Einschübe Beschreibung des Gerätes Geräteansicht Bedienfeld Einschubhöhe 5 Einschubhöhe 4 Einschubhöhe 3 Einschubhöhe 2 Einschubhöhe 1 Drehknopf PROGRAMME Drehknopf THERMOSTAT Kontrollleuchte THERMOSTAT Drehknopf TIMER ZUR EINSTELLUNG DES GARZEITENDES ...

Page 66: ...ie zu garenden Speisen in den Backofen 4 Während des Garvorgangs sind folgende Einstellungen jederzeit möglich Änderung des Garprogramms durch Betätigen des Drehknopfes PROGRAMME Änderung der Temperatur mit Hilfe des Drehknopfes THERMOSTAT Unterbrechung des Garvorgangs durch Drehen des Knopfes PROGRAMME auf die Position 0 Stellen Sie niemals Kochgeschirr auf den Backofenboden da dadurch das Email ...

Page 67: ...ren Sie bei geschlossener Backofentür Programme Programm Überbacken Bräunen Das obere Heizelement schaltet sich ein und das Gebläse wird in Betrieb gesetzt Zusätzlich zu der einseitigen Strahlungshitze zirkuliert Heißluft im Innern des Backofens Hierdurch wird ein Verbrennen der Speisenoberflächen verhindert und die Hitze dringt tiefer in die Speisen ein Garen Sie bei geschlossener Backofentür Pra...

Page 68: ...Ebenen Quiche 1 1 1 1 1 1 1 0 5 0 5 0 5 1 1 5 2 und 4 3 2 2 und 4 2 2 2 und 4 2 und 4 2 2 und 4 3 15 10 10 15 10 10 10 10 10 10 15 230 180 180 200 180 170 190 180 170 170 200 15 20 30 35 40 45 60 70 30 35 40 50 20 25 10 15 15 20 20 25 25 30 Oberhitze Nachgaren von Speisen 3 4 15 220 Grill Seezungen und Tintenfische Tintenfisch und Krebsspieße Kabeljaufilet Gegrillte Gemüse Kalbsteaks Koteletts Ham...

Page 69: ...eingestellt wenn sie gedrückt gehalten werden wird der Lauf der eingeblendeten Zeit beschleunigt um die Einstellung zu vereinfachen 3 warten Sie 10 Sek oder drücken Sie erneut die Taste um die Einstellung zu bestätigen 4 Nach Ablauf der Zeit erscheint auf dem DISPLAY die Anzeige END Der Backofen schließt den Garvorgang ab und es ertönt ein akustisches Signal Beispiel Es ist 9 00 Uhr und es wird ei...

Page 70: ...m Stecker selbst Ziehen Sie vor der Reinigung oder Wartungsarbeiten stets den Stecker aus der Steckdose Bei etwaigen Störungen versuchen Sie bitte nicht Innenteile selbst zu reparieren Kontaktieren Sie den Kundendienst siehe Kundendienst Stellen Sie bitte keine schweren Gegenstände auf der geöffneten Backofentür ab Das Gerät ist nicht zur Verwendung durch Personen einschließlich Kinder mit eingesc...

Page 71: ...önnen mit einem mit lauwarmem Wasser und einem neutralen Reinigungsmittel getränkten Schwamm gereinigt werden Sollten die Flecken nur schwer zu entfernen sein verwenden Sie spezielle Reinigungsmittel Es ist ratsam die Teile nach der Reinigung gut nachzuspülen und trockenzureiben Benutzen Sie auf keinen Fall Scheuermittel oder sonstige scharfe Reiniger Der Backofen sollte möglichst nach jedem Gebra...

Page 72: ...dann das Einrastteil C auf Achten Sie hierbei auf die Laufrichtung zum Auszug der Gleitschiene 3 Befestigen Sie die mit den Gleitschienen versehenen beiden Rahmen in den entsprechenden Löchern der Backofenwände siehe Abbildung Die oberen Löcher sind für den linken Rahmen bestimmt die unteren dagegen für den rechten Rahmen 4 Stecken Sie die Rahmen abschließend wieder auf die Abstandsstücke A auf Se...

Page 73: ...PIEKARNIK PL PL IT E S P T D E N L ...

Page 74: ...74 PL pod blatem i w pionie 595 mm 595 mm 24 mm 545 mm 5 mm 567 mm 23 mm 575 585 mm 45 mm 560 mm 547 mm min 560 mm 45 mm ...

Page 75: ...y Zużycie energii deklaracja Klasa konwekc ji Wymuszona funkcja ogrzewania Multipieczenie Modele z wentylacją do schładzania Zużycie energii konwekcji Wymuszonej funkcja ogrzewania Multipieczenie Zużycie energii deklaracja Klasa konwekc ji Naturalna funkcja ogrzewania Tradycyjny Niniejsze urządzenie zostało wyproduko wane zgodnie z następującymi dyrektywa mi unijnymi 2006 95 EWG z dnia 12 12 06 ni...

Page 76: ...76 PL ...

Page 77: ...77 PL ...

Page 78: ...78 PL ...

Page 79: ...to biszkoptowe na 1 półce Ciasto biszkoptowe na 2 półkach Słone ciasta 1 1 1 1 1 1 1 0 5 0 5 0 5 1 1 5 2 i 4 3 2 2 i 4 2 2 2 i 4 2 i 4 2 2 i 4 3 15 10 10 15 10 10 10 10 10 10 15 230 180 180 200 180 170 190 180 170 170 200 15 20 30 35 40 45 60 70 30 35 40 50 20 25 10 15 15 20 20 25 25 30 Podgrzewanie górne Poprawki pieczenia 3 4 15 220 Grill Sole i mątwy Szaszłyki z kalmarów i raków Filet z dorsza ...

Page 80: ...80 PL ...

Page 81: ...81 PL ...

Page 82: ...82 PL A B C Prowadnica lewa Prowadnica prawa Kierunek w yciągania ...

Page 83: ...83 PL D ...

Page 84: ...84 PL 06 2011 195070995 03 XEROX FABRIANO ...

Reviews: