background image

10 


Figure 2-9 


2.2.3 VUH5222CH 

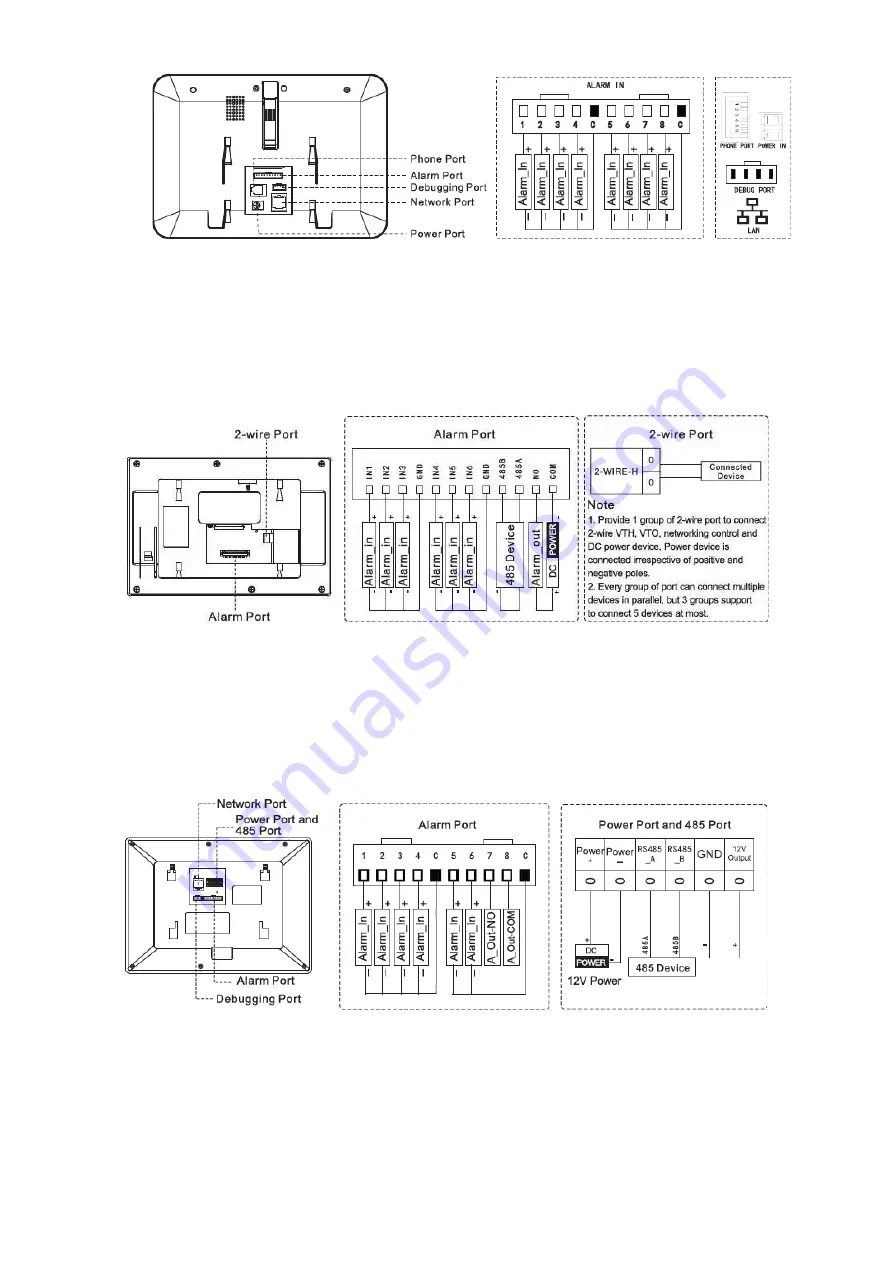
VUH5222CH 2-wire VUH provides 6 alarm input ports, 1 alarm output port, 1 RS485 port and 

1 group of 2-wire port, as shown in Figure 2-10. VUH1550CHW-2 has 3 groups of 2-wire port. 


Figure 2-10 


2.2.4 VUH1660CH 

VUH1660CH digital VUH provides 8 alarm input ports, 1 RS485 port, 1 debugging port, 1 

network port and power port, as shown in Figure 2-11. 


Figure 2-11 


2.2.5 VUH2221A 

VUH2221A digital VUH provides 8 alarm input ports, 1 network port and power port, as shown 

in Figure 2-12. 

Summary of Contents for VUH15 series

Page 1: ...Video Intercom User Manual Digital...

Page 2: ...es to help ensure that only authorized users are able to access the system 2 Change Default HTTP and TCP Ports Change default HTTP and TCP ports for systems These are the two ports used to communicate...

Page 3: ...for multiple users ensure that each user only has rights to features and functions they need to use to perform their job 10 UPnP UPnP will automatically try to forward ports in your router or modem No...

Page 4: ...Ports on the Back of an NVR Cameras connected to the PoE ports on the back of an NVR are isolated from the outside world and cannot be accessed directly 16 Isolate NVR and IP Camera Network The networ...

Page 5: ...UH VUH1550CHW 2 VUH5222CH Device Upgrade Please don t cut off power supply during upgrade Power can be cut only after the device completes upgrade and reboots Safety Instructions The following categor...

Page 6: ...ding to the latest laws and regulations of related regions For detailed information see the paper User s Manual CD ROM QR code or our official website If there is inconsistency between paper User s Ma...

Page 7: ...ids onto the device don t put on the device anything filled with liquids in order to prevent liquids from flowing into the device Please install the device at well ventilated places don t block its ve...

Page 8: ...10 2 2 4 VUH1660CH 10 2 2 5 VUH2221A 10 3 Network Diagram 12 3 1 2 wire System 12 3 2 Digital System 13 4 Device Installation 15 4 1 Installation Flow Chart 15 4 2 Open case Inspection 15 4 3 Install...

Page 9: ...O 62 6 4 5 Call Log 63 6 5 Monitor 64 6 5 1 Monitoring of VUO 64 6 5 2 Monitoring of IPC 66 6 5 3 Favorite 69 6 6 SOS 69 6 7 Info 70 6 7 1 Alarm 70 6 7 2 Guest Message 71 6 7 3 Publish Info 72 6 7 4 V...

Page 10: ...peration richer functional extension more convenient system management and safer data transmission 1 2 Product Function Wi Fi Networking Realize Wi Fi networking of devices Video Intercom Call or conn...

Page 11: ...rd of this device Alarm After 8 6 channel area triggers an alarm pop up an alarm prompt interface provide linkage alarm output and report to Call Center Record Inquiry Inquire call records and alarm r...

Page 12: ...Table 2 1 for details Figure 2 1 No Name Description 1 Camera occlusion switch Slide it to occlude or open the camera 2 Camera Only VUH5221DW C supports front facing camera 3 Microphone Voice input 4...

Page 13: ...to unit VUO villa VUO and fence station During speaking press this key to exit speaking 9 SOS Press this key to call the Call Center in case of emergency Table 2 1 2 1 2 VUH15 Series Type A B In VUH1...

Page 14: ...turns on in green it represents normal power supply Network indicator If this indicator turns on it represents normal communication with VUO If this indicator turns off it represents abnormal communic...

Page 15: ...onitoring press this key to exitmonitoring Unlock Press this key during calling talking monitoring and speaking of VUO so corresponding VUO will be unlocked Message indicator If this indicator turns o...

Page 16: ...standby mode press this key to monitor the main VUO During monitoring press this key to exit monitoring Unlock Press this key during calling talking monitoring and speaking of VUO so corresponding VUO...

Page 17: ...nt VUO villa VUO and fence station During speaking press this key to exit speaking Monitor In standby mode press this key to monitor the main VUO During monitoring press this key to exitmonitoring Unl...

Page 18: ...2 2 2 VUH15 Series Type A Type B Type CH In VUH15 series different types of digital VUH have different port positions but the same port owns the same function Taking VUH1550CH as an example specific...

Page 19: ...in Figure 2 10 VUH1550CHW 2 has 3 groups of 2 wire port Figure 2 10 2 2 4 VUH1660CH VUH1660CH digital VUH provides 8 alarm input ports 1 RS485 port 1 debugging port 1 network port and power port as sh...

Page 20: ...11 Figure 2 12...

Page 21: ...12 3 1 2 wire System Network diagram of 2 wire system is shown in Figure 3 1 Figure 3 1 3 Network Diagram...

Page 22: ...System Digital system network consist of two types VUH adopts PoE power supply from floor switch as shown in Figure 3 2 Figure 3 2 VUH adopts independent power supply from power supply device as shown...

Page 23: ...14 Figure 3 3...

Page 24: ...ure 4 1 Please install VUH in the following steps Figure 4 1 For cable connection please refer to 2 2 Rear Panel Port For device installation please refer to 4 4 Device Installation 4 2 Open case Insp...

Page 25: ...s Table 4 1 4 3 Installation Requirement Don t install VUH in bad environment such as condensation high temperature stained dusty chemically corrosive and direct sunshine environment Engineering insta...

Page 26: ...with 86 box which is suitable for all types of devices Take VUH1560B BW for example Step 1 Embed 86 box into a wall at a proper height Step 2 Fix installation bracket onto 86 box with screws Step 3 Pu...

Page 27: ...en planned 5 1 Debugging Settings Set VUO info and VUH info at WEB interface of every VUO set VUH info network info and VUO info on every VUH and thus realize video intercom function 5 1 1 VUO Setting...

Page 28: ...interface It shall be at least 8 characters and shall include at least two types of number letter and symbol Figure 5 2 Step 4 Select Email and enter your Email address This Email address is used to...

Page 29: ...e and password and click Login Log in the WEB interface of the device Default user name is admin Password is the one set during initialization 5 1 1 2 Network Config Modify IP address of VUO to be pla...

Page 30: ...network segment the webpage cannot be displayed Please add PC into the planned network segment and login WEB interface again 5 1 1 3 LAN Config Set building no unit no and VUO no Step 1 Select System...

Page 31: ...obtain extension VUH info automatically Step 1 Select System Config Digital Indoor Station Manager The system displays Digital Indoor Station Manager interface as shown in Figure 5 7 Figure 5 7 Step 2...

Page 32: ...e system displays main interface 5 1 2 2 Network Config According to available network connection modes configure VUH network information IP addresses of VUH and VUO shall be in the same network segme...

Page 33: ...Enter Local IP Subnet Mask and Gateway press OK Or press to enable DHCP function and obtain IP info automatically If the device has wireless function please click Wired IP tab to set it WLAN 1 Press t...

Page 34: ...ask and Gateway and press OK At WLAN interface select WIFI click Wireless IP tab press to enable DHCP function and obtain IP info automatically as shown in Figure 5 13 To obtain IP info with DHCP func...

Page 35: ...n VUH 1 Press Master and switch to Extension 2 Enter Room No such as 9901 1 and Master IP IP address of masterVUH Master Name and Master Pwd are the user name and password of master VUH Default user n...

Page 36: ...of main VUO is ON by default After setting VUO info it will take effect after turning it off and then turning it on again Add sub VUO 1 Press to switch to sub VUO setting interface 2 Enter sub VUO nam...

Page 37: ...SD card has been inserted into VUH If SD card is not inserted recording and snapshot icons are gray Figure 5 16 5 2 2 VUH Monitors VUO VUH is able to monitor VUO fence station or IPC Take VUO for exam...

Page 38: ...29 Figure 5 17 Figure 5 18...

Page 39: ...room where VUH is located 2 Call Call a user Manage the contacts View and manage the call records 3 Info View delete and clear notices issued by Property Management Center View delete and clear securi...

Page 40: ...d or the device doesn t support SD card DND Do Not Disturb icon meaning that the device has enabled DND function It is not enabled by default 5 Time Display date day of the week and time 6 Arm disarm...

Page 41: ...n in Figure 6 2 Press or to page up and down Figure 6 2 Step 4 Press text box to select rings and press and to set thevolume 6 2 1 2 VUH Ring Set the ring of this VUH Step 1 Press Setting The system p...

Page 42: ...ring when VUH gives an alarm Step 1 Press Setting The system pops up Password prompt box Step 2 Input login password and press OK Default login password is 123456 Please refer to 6 2 5 3 Password Sett...

Page 43: ...g time MIC volume talk volume and ring mute setting Step 1 Press Setting The system pops up Password prompt box Step 2 Input login password and press OK Default login password is 123456 Please refer t...

Page 44: ...id incoming calls within a time period DND function is not enabled by default Under DND mode there is no call reminder when VUH is called but call info is recorded Parameters at this interface are set...

Page 45: ...and the icon becomes The system displays DND period as shown in Figure 6 7 Figure 6 7 Press time text box set start time and end time Press Click to select week and select DND week Press OK to save se...

Page 46: ...arm Wire Zone The system displays Wire Zone interface as shown in Figure 6 8 Figure 6 8 Step 4 Press corresponding positions to set zone type NO NC alarm status enter delay and exit delay Please refer...

Page 47: ...a within the delay time period will not lead to linkage alarm Linkage alarm will be produced if delay time comes to an end and it is not disarmed Delay is only valid to the areas of delay alarm Exit D...

Page 48: ...2 for details Press Edit to select a zone and press Delete to delete the selected area 6 2 3 3 Alarm Output After enabling alarm output when other devices call this VUH the alarm output device will o...

Page 49: ...er different modes Area mode can be set only in disarm status Step 1 Step 2 Step 3 Press Setting The system pops up Password prompt box Input login password and press OK Default login password is 1234...

Page 50: ...ser password and others 6 2 5 1 Time Setting Set VUH system time time zone and DST Parameters at this interface are set on master VUH only and extension VUH synchronize with master VUH Step 1 Step 2 S...

Page 51: ...nually Manual setting of system time 1 Press of system time and the icon becomes so as to enable manual setting function 2 Press time text box to set system time Setting of time zone 1 Press of system...

Page 52: ...time and endtime 6 2 5 2 Display Setting Set VUH screen brightness screensaver time and clean Step 1 Step 2 Step 3 Press Setting The system pops up Password prompt box Input login password and press...

Page 53: ...hijacking password of VUH setting interface Login password arm disarm password and unlock password are 123456 by default whereas anti hijacking password is the reversed login password Parameters at t...

Page 54: ...ll time auto capture and touch ring Extension VUH can set Auto Capture and Touch Ring but other parameters synchronize with master VUH and cannot be set Step 1 Step 2 Step 3 Press Setting The system p...

Page 55: ...doesn t have SD card but VUO has enabled Leave Message Upload and set FTP server Message tab will appear at VUH info interface If VUH doesn t answer when VUO calls enter message status according to pr...

Page 56: ...es will be captured automatically when VUO calls VUH View them at Info Record and Picture interface This function is valid only when SD card is inserted Touch Ring After enabling touch ring there will...

Page 57: ...Otherwise the function is invalid 6 3 Project Settings 6 3 1 Forget Password If you forget initialization password when entering project settings interface reset password through Forget Password at t...

Page 58: ...n import the file and reset a new password Please refer to VDPconfig Help Document for details 6 3 2 Network Settings Set VUH network info according to actual conditions since different types of devic...

Page 59: ...Enter Local IP Subnet Mask and Gateway press OK Or press to enable DHCP function and obtain IP info automatically If the device has wireless function please click Wired IP tab to set it WLAN 1 Press t...

Page 60: ...I click Wireless IP tab to enter Local IP Subnet Mask and Gateway and press OK At WLAN interface select WIFI click Wireless IP tab press to enable DHCP function and obtain IP info automatically as sho...

Page 61: ...as shown in Figure 6 23 Step 4 Set VUH info Figure 6 23 Be used as a master VUH Enter Room No such as 9901 Room no shall be the same with VUH Short No which is set when adding VUH at WEB interface Ot...

Page 62: ...Press left and right arrows to switch VUO config tab Sub VUO shall select device type which is Door by default When fence station is selected configure VUO middle no which is VUO no and obtain IP addr...

Page 63: ...h Device interface as shown in Figure 6 25 Figure 6 25 6 3 5 1 Search Device Press Refresh to refresh device list press to view thedevice 6 3 5 2 Modify IP Step 1 Select the needed VUO and press Modif...

Page 64: ...to save the settings 6 3 5 3 Add Manually Step 1 Step 2 Step 3 Select the needed VUO and press Add The system displays Add VUO interface as shown in Figure 6 27 Figure 6 27 Enter Name User Name and P...

Page 65: ...Step 2 Step 3 Step 4 Press Setting for over 6 seconds The system pops up Password prompt box Enter the password set during initialization and press OK Press Default The system displays Default interfa...

Page 66: ...to 6 3 1 Forget Password 6 4 Call Manage contact call users and view the latest call log 6 4 1 Contact Add and edit VUH and extension number Select Call Contact and the system displays Contact interf...

Page 67: ...o delete the contact person Multiple contact persons can be selected once 6 4 2 Call User Make sure that internal call function has been enabled Please refer to 6 2 5 4 Other Settings for details Call...

Page 68: ...er in other buildings or other units add the building number and unit number For example dial 1 1 9901 to call Building 1 Unit 1 Room 9901 If master VUH 9901 calls extension 9901 1 please enter room n...

Page 69: ...6 32 Figure 6 33 6 4 2 2 Call User in Contact Please add contact persons to the contact by reference to 6 4 1 1 Add User Step 1 Step 2 Step 3 Select Call Contact Select the one you want to call Press...

Page 70: ...another VUH calls this VUH the call interface will be displayed as shown in Figure 6 34 Figure 6 34 Press to talk with each other as shown in Figure 6 35 For key description please refer to Table 6 4...

Page 71: ...gray it means that unlock function of this channel is not available This key means to talk with the opposite end device Press this key to prohibit talking press it again to switch back to talking sta...

Page 72: ...back and save info about the contact persons Select Call Call Log and the system displays Call Log interface as shown in Figure 6 37 If contact person is VUO callback is not available Figure 6 37 6 4...

Page 73: ...able to monitor VUO or fence station Under the condition of monitoring press call key on the front panel to talk to VUO VUO will pick up the call automatically Step 1 Step 2 Select Monitor VUO The sys...

Page 74: ...This key is gray if SD card is not installed Press this key to record Complete recording when the call is completed or by pressing Videos are stored in SD card of this VUH If SD card is full the earl...

Page 75: ...e adding IPC please ensure that IPC has been powered on and connected to the same network with VUH Step 1 Select Monitor IPC The system displays IPC interface as shown in Figure 6 40 Press to add freq...

Page 76: ...C NVR DVR DVR User Name Input user name IPC NVR DVR DVR and password to login WEB interface of Password Port Default port is 554 Stream Select stream type according to needs including main stream and...

Page 77: ...IPC synchronized from VUO or the platform cannot be deleted Step 1 Step 2 Step 3 Step 4 Select Monitor IPC The system displays IPC interface Press Edit Select IPC Press Delete to delete the selected I...

Page 78: ...ite The system displays Favorite interface as shown in Figure 6 43 Figure 6 43 Select the device to be monitored and press The system displays monitoring interface In case of multiple devices in Favor...

Page 79: ...e alarm info to alarm record interface and management platform Figure 6 44 Alternatively select Info Alarm and the system displays Alarm interface as shown in Figure 6 45 All tab displays all alarm in...

Page 80: ...deo audio Message Uploading this function is valid too All messages will be uploaded to FTP Select Info Guest Message and the system displays Guest Message interface as shown in Figure 6 46 All tab di...

Page 81: ...red in SD card Select Info Publish Info and the system displays Publish Info interface as shown in Figure 6 47 All tab displays all info of the system whereas Unread tab displays unread info Press Edi...

Page 82: ...dit to select the video or picture press Delete to delete the selected video or picture Press Clear to delete all videos and pictures after confirmation Figure 6 48 6 8 Unlock Function When the VUH is...

Page 83: ...disarm password press OK The device beeps continuously which represents successful arm The key displays corresponding arm mode Default password of arm and disarm is 123456 Please refer to 6 2 5 3 Pas...

Page 84: ...3456 Please refer to 6 2 5 3 Password Setting for details If you are forced to enter disarm password in case of emergencies enter anti hijacking password which is the reversed arm password The system...

Page 85: ...e Material PC ABS Installation Installation with 86 box in the wall Network Ethernet 10M 100Mbps self adaptive Support WI FI 802 11b g n Network Protocol TCP IP Parameter Power Supply DC 12V 24V or de...

Page 86: ...ies Type CH System Main Processor Embedded microcontroller Operating System Embedded LINUX Operating System Video Video Compressio n Standard H 264 Video Resolution 800 480 Front Camera Only VUH1520CH...

Page 87: ...t in speaker Talk Support two way audio talk Display Screen Size 10 2 TFT color screen Operating Mode Input Touch screen technology Alarm Alarm Input 6 channel Alarm Output 1 channel Network Ethernet...

Page 88: ...echanical key SOS menu call monitor and unlock touch screen technology Alarm Alarm Input Support 6 channel local alarm input Alarm Output Reserve 1 channel local alarm output Network Ethernet 10M 100M...

Reviews: