background image

1

Introduction

The hard drive enclosure has four working modes including RAID0, RAID1, 

JBOD and NO RAID. With USB3.1 Type C, the transmission speed is up 

to 10Gbps. You can control mode through the switch jumper. With the 

aluminum and one-touch extraction design, no tool is needed to take 

apart the enclosure. The enclosure owns great texture and strong cooling 

capacity. You may judge working status of hard disks via shining LED 

indicator.

Product Overview

English


Summary of Contents for FE2101

Page 1: ...Instruction Manual 2 5 Hard Drive Raid Enclosure English Deutsch 日本語 Français Italiano Español ...

Page 2: ......

Page 3: ...nsmission speed is up to 10Gbps You can control mode through the switch jumper With the aluminum and one touch extraction design no tool is needed to take apart the enclosure The enclosure owns great texture and strong cooling capacity You may judge working status of hard disks via shining LED indicator Product Overview English ...

Page 4: ...interface 10 SW1 SW2 switch 11 Digital 2SATA interface Hard drive installation steps 1 Extract hard disk mounting rack from aluminum case 2 Lay the two hard disks into bracket 3 Use screw to fix the hard disk and its bracket 4 Connect to computer and adjust the mode 5 Mount the aluminum case Way to Change the Combination of RAID Step 1 In the state of power on put the SW1 SW2 to OFF and then press...

Page 5: ...lash 4 ON OFF RAID1 R A I D 1 w i t h t h e c a p a c i t y equivalent to the smaller disk When read and write both DISK1 and DISK2 will flash SW1 SW2 and LED status Product specifications Package Contents Product Name 2 5 Hard drive Raid Enclosure Product type Inateck FE2101 Material Aluminum Alloy Weight 255g Color Silver White Supported drives interface USB3 1 Gen2 10Gbps SATA6G Maximum height ...

Page 6: ...n system optimizes USB3 1 with the highest speed Besides you should transfer the disk partition to GPT or the system will not support 2TB hard disk partition D How to recover data when a disk suffers problem under RAID1 mode When one of the disks suffer problem under RAID1 mode please replace it with a new one and then connect the enclosure to computer Afterwards it will start data recovery status...

Page 7: ... s erreicht Die RAID Modi können über zwei Kontaktschiebeschalter gesteuert werden Mit dem Auswurfknopf und dem stabilen Aluminiumgehäuse und Rahmen werden zum Ein und Ausbau der Datenträger keine Werkzeuge benötigt Das Gehäuse besitzt eine überlegen zuverlässige Struktur und eine extrem gute Wärmeabfuhr Der Betriebsstatus der Laufwerke wird über die intuitiv informative LED Anzeige ersichtlich Pr...

Page 8: ...fwerke vorsichtig in den Rahmen ein 3 Verwenden Sie die Schrauben um die Laufwerke am Rahmen zu befestigen 4 Verbinden Sie das Gehäuse mit dem PC und konfigurieren Sie den Betriebsmodus 5 Mounten Sie die Datenträger im Gehäuse über das Betriebssystem Konfiguration der RAID Betriebsmodi Schritt 1 Stellen Sie die Schalter SW1 SW2 bei Gehäusebetrieb auf OFF und halten Sie dann den Reset Knopf gedrück...

Page 9: ...ID1 mit der Kapazität über d i e k l e i n e r e HDD DISK1 und DISK2 blinken bei Akt ivität SW1 SW2 Stellung und LED Technische Daten Lieferumfang Produktname 2 5 RAID Festplattengehäuse Typenbezeichnung Inateck FE2101 Material Aluminiumlegierung Gewicht 255g Farbe Silber Weiss Unterstützte Schnittstellen USB 3 1 Gen2 10Gb s SATA 6G 6 Gb s Maximale Bauhöhe der Laufwerke HDD SSD bis zu 8 mm Höhe un...

Page 10: ...er über die Datenträgerverwaltung oder das Festplattendienstprogramm erfolgen um dann neue Partitionen zu erstellen und zu formatieren C Wieso werden unter Windows XP keine Datenträger über 2 TB erkannt Windows XP unterstützt aufgrund der Beschränkungen von 32 bit und MBR nur Laufwerke bis zu 2TB so dass Sie auf Vista 64bit oder höher aufrüsten müssen Windows 8 1 oder höher ermöglicht die optimale...

Page 11: ... gleichen Marke und Konfiguration zu verwenden 3 Beschriften Sie Datenträger 1 und 2 um sie bei Fehlern und Beschädigungen zwecks Austauschs auseinander halten zu können 4 Bitte trennen Sie die USB Verbindung zum Rechner unter RAID0 nicht während Kopier Lese oder Löschvorgängen wenn die blauen LED noch blinken 5 Wenn die rote LED leuchtet tauschen Sie den fehlerhaften Datenträger zwecks Datenwiede...

Page 12: ...ID0 RAID1 JBOD および NO RAID の 4 つの作業モード があります スイッチのジャンパーでモードを制御できます USB3 1 タイ プ C では 最大データ伝送速度を 10Gbps に達します ワンタッチの抽出 設計では ハードディスクを取り出す際にツールは必要ありません アル ミニウム筐体は質感が良くて 強力な放熱能力を備えています LED イン ジケーターによりハードディスクの状態を判断することができます 製品図 ...

Page 13: ...ーフェース ハードドライブのインストール手順 1 アルミケースからハードディスクマウントラックを取り出します 2 2 つのハードディスクをブラケットに置きます 3 ネジを使用して ブラケットにハードディスクを固定します 4 コンピュータに接続して 作業モードを調整します 5 アルミケースに取り付けます RAID モードを変更する方法 ステップ 1 電源を入れた状態で SW1 SW2 を OFF にしてリセット ボタンを押します DISK1 2 が点滅したら リセットボタンを放 して NO RAID モードに戻ります ステップ 2 ご希望の作業モード RAID のスイッチ方式に従って SW1 SW2 を設定して RESET を押します DISK1 2 インジケーターが 点灯したら リセットボタンを放します 注意 作業モード RAID を変更する場合は 手順 1 を実行して NO RAID モ...

Page 14: ...2 インジケー タが点滅する 2 ON ON JBOD 組み合わせモー ド 総容量が 2 つのハードディ ス ク の 合 計 容 量 読み書きの時に DISK2 インジケー タが点滅する 3 OFF ON RAID0 RAID 0 総容量 が小さいほうの 容量を 2 倍した 容量になる 読み書きの時に DISK1 と DISK2 イ ンジケータが点滅 する 4 ON OFF RAID1 RAID1 総 容 量 が小さいほうの 容量に相当する 読み書きの時に DISK1 と DISK2 イ ンジケータが点滅 する SW1 SW2 と LED 状態 Status 製品仕様 商品名称 2 5 ハードドライブ RAID エンクロージャ 商品型番 Inateck FE2101 材料 アルミ合金 重量 255g 商品色 シルバーホワイト 対応ドライブインタフェース USB 3 1 Gen2 10Gb ...

Page 15: ...indows XP で 2TB を超えるハードディスクを認識できないのはなぜ ですか Windows XP は 2TB を超える大容量ハードディスクを正常に認識する ことができません Windows Vista 64bit 及び以降のシステムは問 題なくサポートできるので Vista 64bit 以上のシステムにアップグレ ードしてください システムをアップグレードしない場合は お使いの HDD SSD は GTP パーティションに変えることをお勧めします D RAID1 モードで一つのディスクに問題が発生した場合はデータの復旧方 法を教えてください RAID1 モードで 1 つのディスクに問題が発生すると 対応の赤色のエラ ーインジケータが点灯します この場合は 破損したディスクを新しい ディスクに交換してから エンクロージャをコンピュータに接続してく ださい その後 データ復旧ステータ...

Page 16: ...m の HDD SSD に適しています 安定した性能 を保証するために 同じブランドおよび仕様の 2 5 インチ HDD SSD を 使用することをお勧めします 3 二つのハードディスクにはそれぞれの番号タグを付けてあるため ハー ドディスクが破損したときに区別できます 4 RAID0 モードで青色のインジケータが点灯している限り データ伝送 削除する際に USB ケーブルを外しないでください 5 赤色のエラーインジケータが点灯したら データの安全を確保するため に ディスクをチェックして交換してください ...

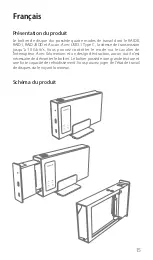
Page 17: ... de transmission jusqu à 10 Gbit s Vous pouvez contrôler le mode via le cavalier de l interrupteur Avec l aluminium et un design d extraction aucun outil n est nécessaire de démonter le boîtier Le boîtier possède une grande texture et une forte capacité de refroidissement Vous pouvez juger de l état de travail de disques via le voyant lumineux Schéma du produit ...

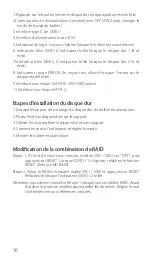
Page 18: ...h 11 Interface numérique SATA 2 Etapes d installation du disque dur 1 Extraire le support de montage du disque dur du boîtier en aluminium 2 Posez les deux disques durs sur le support 3 Utiliser les vis pour fixer le disque dur et son support 4 Connectez vous à l ordinateur et réglez le mode 5 Monter le boîtier en aluminium Modification de la combinaison de RAID Étape 1 À l état de mise sous tensi...

Page 19: ...FF RAID1 R A I D 1 a v e c l a c a p a c i t é équivalente au plus petit disque Lors de la lecture et de l écriture DISK1 et DISK2 cligneront SW1 SW2 et l état de la Spécifications du produit Contenu d emballage Nom du produit Boîtier externe RAID pour Disque dur 2 5 Modèle du produit Inateck FE2101 Matériel Aluminum Alloy Poids 255g Couleur Silver White Interface du disque pris en charge USB 3 1 ...

Page 20: ...es partitions C Pourquoi ne peut il pas reconnaître plus de 2 To de disque dur dans le système d XP Windows XP prend en charge le disque dur de 2 To et vous avez besoin d une mise à niveau vers le système Vista 64 bits ou supérieur Windows 8 1 ou version supérieure optimise USB3 1 avec la vitesse la plus élevée En outre vous devez transférer la partition de disque sur GPT ou le système ne prend pa...

Page 21: ... la même marque et de l autre 3 Marquez le disque dur 1 et 2 respectivement afin que vous puissiez les distinguer lorsque l un ou l autre est brisé 4 Ne débranchez pas USB lorsque vous envoyez supprimez transférez des données à l ordinateur sous le mode RAID0 aussi longtemps que l indicateur bleu brille 5 Lorsque l indicateur rouge est allumé vérifiez le disque et remplacez le pour rendre les donn...

Page 22: ...USB3 1 Tipo C la velocità di trasmissione raggiunge i 10 Gbps È possibile passare da una modalità all altra utilizzando l interruttore jumper Grazie al design particolare è possibile aprire il box in alluminio con un semplice tocco e non sono necessari attrezzi Si può monitorare lo status degli hard disk seguendo le spie LED Schema prodotto ...

Page 23: ...faccia Digital 2 SATA Passaggi installazione Hard drive 1 Estrarre il telaio di montaggio dell hard disk dalla scocca in alluminio 2 Inserire i 2 hard disk nella staffa 3 Per fissare i 2 hard disk utilizzare la vite 4 Connettere al computer e scegliere la modalità 5 Rimontare la scocca in alluminio Come cambiare la combinazione di RAID Passaggio 1 Quando il box è acceso portare l interruttore SW1 ...

Page 24: ...ISCO2 4 ON OFF RAID1 R A I D 1 c o n capacità equi valente a quella del disco più piccolo In fase di lettura scrittura lamp e g g i a n o s i a i l DISCO 1 che il DISCO2 Stato SW1 SW2 e LED Specifiche prodotto Nome prodotto Box esterno RAID per Hard drive 2 5 Tipo prodotto Inateck FE2101 materiale Lega di alluminio Peso 255g Colore Bianco Argentato Interfaccia drive supportati USB 3 1 Gen2 10Gb s ...

Page 25: ...stema superiore Windows 8 1 o le versioni superiori sono in grado di ottimizzare le velocità dell interfaccia USB3 1 Inoltre è meglio trasferire la partizione disco su GPT altrimenti il sistema non supporta la partizione di un hard disk da 2TB D Come posso recuperare i dati se si riscontrano problemi con un disco in modalità RAID1 Se si dovessero riscontrare problemi con uno dei dischi in modalità...

Page 26: ...uerta USB3 1 tipo C la velocidad de transferencia puede alcanzar los 10 Gbps Es posible pasar de una modalidad a otra usando el interruptor jumper Gracias su diseño es posible abrir la carcasa en aluminio simplemente con un dedo no hacen falta instrumentos Se puede controlar el estados de los discos duros por medio de las luces testigo LED Diagrama producto ...

Page 27: ...nterruptor SW1 SW2 11 Interruptor Digital 2 SATA Pasos para la instalación del Hard drive 1 Extraer de la carcasa en aluminio el chasis de montaje del disco duro 2 Insertar los dos discos duros 3 Para mantener firmes los discos duros usar el tornillo incluido 4 Conectar al ordenador y seleccionar la modalidad 5 Volver a colocar la carcasa en aluminio Cómo variar la combinación de RAID primir RESET...

Page 28: ...N OFF RAID1 R A I D 1 c o n c a p a c i d a d equivalente a la del disco más pequeño En fase de lectura escritura parpade an ambos discos Estado SW1 SW2 y LED Características producto Nombre Carcasa externa RAID para discos duros 2 5 Tipo producto Inateck FE2101 material Aleación de aluminio Peso 255g Color Blanco Plateado Interfaces drive soportados USB3 1 Gen2 10Gbps SATA6G Espesor mínimo de los...

Page 29: ...ad de máximo 2TB Es necesario pasar a Vista 64bit o a un sistema superior Windows 8 1 y las versiones superiores pueden optimizar las velocidades del interfaz USB3 1 Además se recomienda transferir la partición disco en GPT o el sistema no podrá soportar la partición de un disco duro de 2TB D Cómo puedo recuperar los datos si se detectan problemas con un disco en modalidad RAID1 Sustituir el disco...

Page 30: ......

Page 31: ... support inateck com Web http www inateck com de Addr F M Technology GmbH Fraunhoferstraße 7 04178 Leipzig Japan Email support inateck com Web www inateck com jp Addr Inateck 株式会社 547 0014 大阪府大阪市 平野区長吉川辺 3 丁目 10 番 11 号 Company of License Holder F M Technology GmbH Fraunhoferstraße 7 04178 Leipzig Tel 49 341 51998410 Manufacturer Information ShenZhen LiCheng Technology Co Ltd Add Xinghe World Phase...

Reviews: