


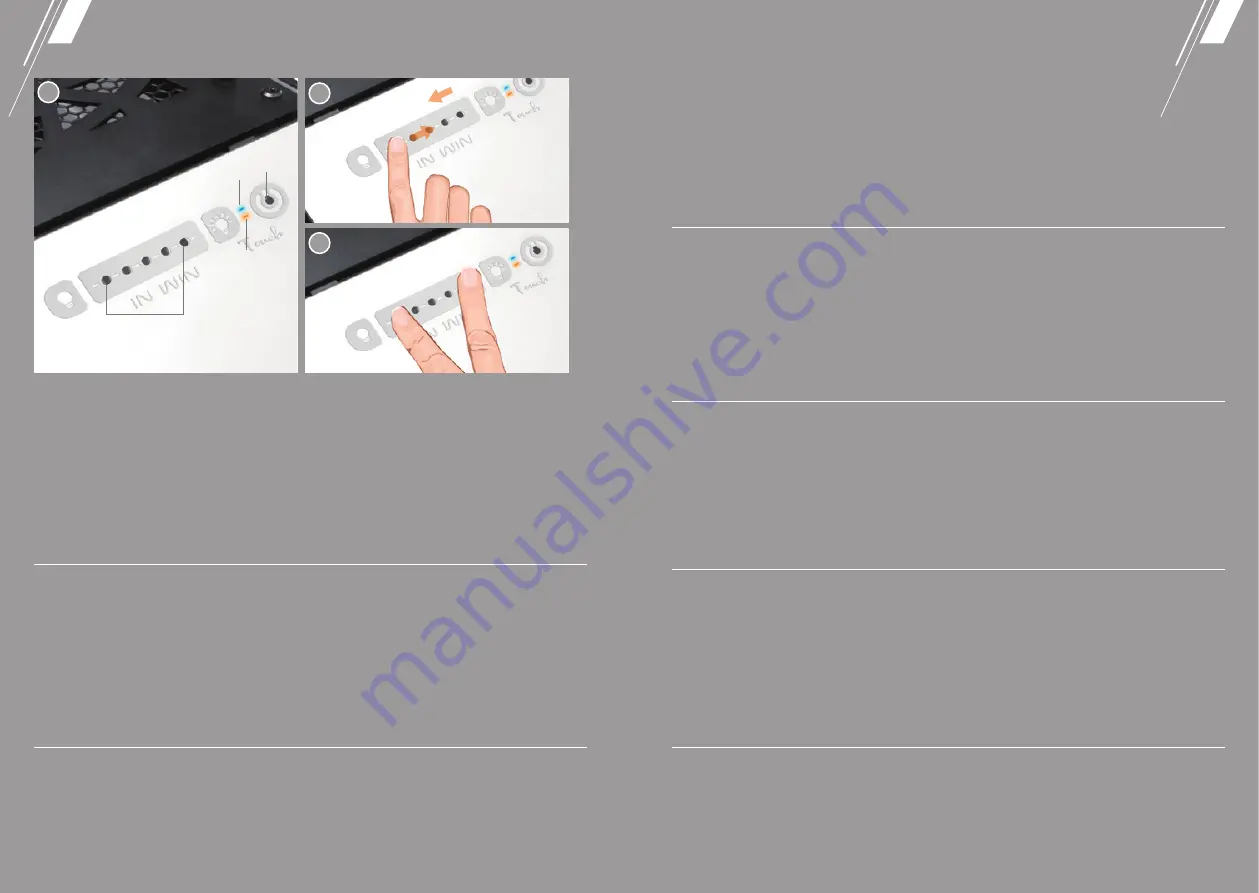
Glass Touch Panel Control Settings
1
2
1. Power Switch On/Off (1)
Press the power switch (1) to turn on/off the computer.
2. Light Control (2)~(6)
- Slide your finger from left to the right to increase the brightness.
- Slide your finger from right to the left to decrease the brightness.
* The amber light indicates the lighting adjustment.
3. Light Display Mode
Hold the button (2) and (6) for 3 seconds to activate display mode.
The LED light will adjust from bright to dark settings automatically.
* Slide your finger on the glass touch panel to turn off the light display mode.
* (7) Power LED
* (8) Sensor Indicator Ligh
Glass Touch Panel
Control Settings
1. Commutateur On/Off (1)
Appuyez sur la Touche Alimentation (1) pour allumer/éteindre l’ordinateur.
2. Contrôle Lumière (2)~(6)
- Faites glisser votre doigt de gauche à droite pour augmenter la luminosité.
- Faites glisser votre doigt de droite à gauche pour baisser la luminosité
* a lumière ambrée indique le réglage de la lumière.
3. Mode d' Affichage de la Lumière
Gardez la pression sur les touches (2) et (6) pendant 3 secondes pour activer le mode
d' affichage. La lumière LED passera automatiquement du réglage lumineux au sombre.
* Faites glisser votre doigt sur le panneau tactile en verre pour éteindre le
mode affichage lumière.
* (7) LED Alimentation
* (8) Voyant lumineux du capteur
Configuration du
Panneau tactile en verre
3
(1)
(7)
(2)~(6)
(8)
1. Power-Schalter An/Aus (1)
Drücken Sie den Power-Schalter (1) um das System an oder aus zu schalten.
2. Lichtsteuerung (2)~(6)
- Mit einer Zeigebewegung nach rechts erhöhen Sie die Helligkeit.
- Mit einer Zeigebewegung nach links vermindern Sie die Helligkeit.
* Das gelbe Licht zeigt die angepasste Beleuchtungsstufe an.
3. Licht-Display-Modus
Halten Sie die Taste (2) und (6) für 3 Sekunden, um den Display-Modus zu aktivieren. Die LED-Beleuchtung passt
sich dann automatisch von einer hellen zu einer dunkleren Beleuchtung an.
* Mit einer einfachen Zeigebewegung auf dem Glas-Panel lässt sich der Display-Modus ausschalten.
* (7) Power-LED
* (8) Sensor-Kontrollleucht
Touchscreen-Einstellungen
1. 電源スイッチのオン / オフ(1)
電源スイッチ(1)を押して、コンピュータの電源をオン / オフします。
2. ライティング制御(2)〜(6)
左から右に指をスライドして、明るさを上げます
右から左に指をずらして、明るさを下げます
* 黄色のライトは、照明の調整を示します
3. ライトディスプレイモード
ボタン(2)と(6)を 3 秒間押し続けるとディスプレイモードが有効になります。 LED ライトは、自動的に明るい設
定から暗い設定に調整されます
* ガラスのタッチパネルに指をスライドさせてディスプレイモードをオフにします
* (7) パワー LED
* (8) センサーインジケーターライト
ガラスタッチパネル設定
1. 電源開關 Power On/Off (1):
按電源開關 (1) 啓動電腦開機或將已開機狀態的主機關機。
2. 燈光開啓控制模式 (2)~(6):
- 向右滑動,內部 LED 燈條亮度增加
- 向左滑動,內部 LED 燈條亮度減少
* 滑動控制燈光時,感應指示燈 - 橘燈 (8) 亮起,顯示成功感應可控制燈光狀態。
3. 燈光展演模式
當同時按 (2) & (6) 按鈕約 3 秒,啓動自動展示模式,燈光會由明至暗變化,再由暗化明,持續循環。
* 解除方式 : 任意滑動玻璃觸控面板,即可解除燈光展演模式。
* (7) 系統開啓指示燈
* (8) 燈光感應指示燈
玻璃觸控面板操作設定
1. 电源开关 Power On/Off (1):
按电源开关 (1) 启动计算机开机或将已开机状态的主机关机。
2. 灯光开启控制模式 (2)~(6):
- 向右滑动,内部 LED 灯条亮度增加
- 向左滑动,内部 LED 灯条亮度减少
* 滑动控制灯光时,感应指示灯 - 橘灯 (8) 亮起,显示成功感应可控制灯光状态。
3. 灯光展演模式
当同时按 (2) & (6) 按钮约 3 秒,启动自动展示模式,灯光会由明至
暗变化,再由暗化明,持续循环。
* 解除方式 : 任意滑动玻璃触控面板,即可解除灯光展演模式。
* (7) 系统开启指示灯
* (8) 灯光感应指示灯
玻璃触控面板操作设定
25
26
Summary of Contents for tou 2.0
Page 1: ......
Page 11: ...Cable Information 19 20...
Page 17: ...Copyright 2016 In Win Development Inc All Rights Reserved 3RAMEE034900...