background image


-

 24 

-


5    Compatibility Lists 

To reach best performance and avoid system failure, InWin strongly recommends users choosing the 
components from InWin’s compatibility list. All the components are tested in InWin’s lab and assured 
the components are working well with InWin’s chassis. You can download the latest updated device 
compatibility list from InWin’s website: 

ipc.in-win.com/


Summary of Contents for IW-RS118-03

Page 1: ...IW RS118 03 User Manual...

Page 2: ...g and Installing the Fan 13 2 4 1 Removing the Fan 13 2 4 2 Installing the Fan 14 2 5 Removing and Installing the PSU 15 2 5 1 Removling the Redundant PSU Module 16 2 5 2 Installing the Redundant PSU...

Page 3: ...designed to operate in a typical office environment The location should be a clean dry and free of airborne particles a well ventilated room and away from sources of heat including direct sunlight an...

Page 4: ...r is a short length of conductor used to close open or bypass part of an electronic circuit Jumpers on InWin backplane have a small tab on top that you can pick up with your fingertips Grip the jumper...

Page 5: ...LED System LED HDD LED ID LED Front Control Panel Power On Off Reset NMI ID SW USB 3 0 x 1 Cooling Fan 40 x 56 mm PWM fan x 6 Expansion Slot Full height PCI slot x 1 Via riser card and bracket SAS 12...

Page 6: ...5 1 Product Introduction 1 1 Box Content When you open the carton box of IW RS118 03 the contents should include the following...

Page 7: ...open the top cover the structure of IW RS118 03 shows as follows Top cover 1U 1 1 Redundant or Single module power 18 x 2 5 7mm HDD tray Max PWM Fan 6 pcs ATX or CEB EEB M B Front Controls and indicat...

Page 8: ...e user define 3 Power ON OFF Button with LED Green Solid on System is powered on Off System is not powered on 4 Chassis ID Button with LED Blue Solid on Press the button to activate system identificat...

Page 9: ...indow is for installing single or redundant PSU please reference In Win compatibility list to select the compatible models 2 System I O depend on M B specification InWin offers a customized service fo...

Page 10: ...rives or SSDs for building system OS 2 1 1 Installing a Hard Drive Step 1 Press the release button then pull outward the disk tray Step 2 Release and pull the tray handle upward Place the 2 5 7mm hard...

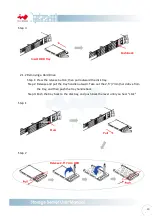
Page 11: ...sk tray Step 2 Release and pull the tray handle outward Take out the 2 5 7mm hard drive from the tray and then push the tray handle back Step 3 Push the tray back to the disk bay and push back the lev...

Page 12: ...then push backward the top cover Step 2 Lift the top cover to remove Step 3 To place the top cover place the cover on to the chassis and make sure the guide pins of the rear window are in the right lo...

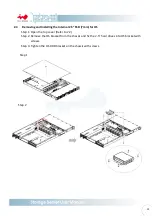
Page 13: ...rnal 2 5 SSD 7mm for OS Step 1 Open the top cover Refer to 2 2 Step 2 Remove the OS bracket from the chassis and fix the 2 5 hard drives into OS bracket with screws Step 3 Tighten the OS HDD bracket o...

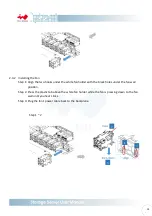
Page 14: ...s built in fan modules feature a tool less design which makes it easy to maintain 2 4 1 Removing the Fan Step 1 Unplug the fan s power cable on the backplane Step 2 Press the plastic tab above the whi...

Page 15: ...the white fan holder with the black holes under the fan wall position Step 2 Press the plastic tab above the white fan holder while the fan is pressing down to the fan wall until you hear clicks Step...

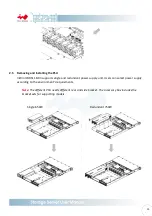
Page 16: ...single and redundant power supply unit Users can select power supply according to the environment s requirements Note The different PSU needs different rear and side bracket The accessory box includes...

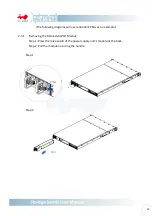
Page 17: ...ms will use redundant PSUs as an example 2 5 1 Removing the Redundant PSU Module Step 1 Press the release tab of the power supply unit s module at the back Step 2 Pull the module out using the handle...

Page 18: ...nsert any other brands of modules 2 The two PSU modules output wattage must be the same 2 6 Installing a Slide Rail InWin IW RS118 03 is a rackmount model which supports EIA RS310D standard cabinet an...

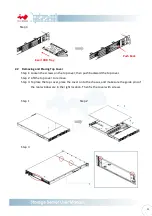
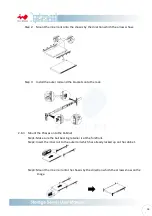
Page 19: ...and the brackets onto the rack 2 6 3 Mount the Chassis onto the Cabinet Step1 Make sure the ball bearing retainer is at the forefront Step2 Insert the inner rail to the outer rail which has already l...

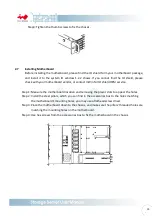
Page 20: ...in for IO shield OEM service Step 1 Measure the motherboard location and removing the plastic dots to appear the holes Step 2 Install the steel pillars which you can find in the accessories box to the...

Page 21: ...SD and are also backward compatible with SAS 6Gbps SATA 6Gps and SATA 3Gps HDD SSD Some of the backplanes support NVMe SSD through either OcuLink x4 or SlimSAS x4 connectors 2 8 1 Connecting Backplane...

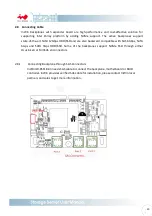
Page 22: ...r from the accessories box to connect No Connector Name Abbreviation Color Front IO Indication CN2 ID LED ID LED Red Black Chassis ID Button with LED CN3 System LED SYS LED Yellow Green System Fail LE...

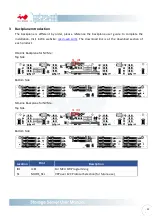
Page 23: ...ation Visit InWin website ipc in win com The download link is at the download section of each product OCuLink Backplane for NVMe Top Side Bottom Side SlimLine Backplane for NVMe Top Side Bottom Side L...

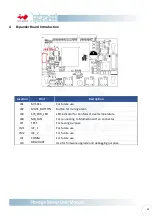
Page 24: ...utton for muting alarm JB3 SYS_ERR_LED LED indicator for Fan fails or over temperature JB4 MB_FAN For connecting to Motherboard Fan connector JT1 TEST For testing purpose JM1 I2C_1 For future use JM2...

Page 25: ...ongly recommends users choosing the components from InWin s compatibility list All the components are tested in InWin s lab and assured the components are working well with InWin s chassis You can dow...

Page 26: ...ssis support flash drive A Any SSD supports SAS or SATA and 4x NVMe connection can be attached to the InWin IW RS118 03 We recommend referencing InWin s compatibility list to check if your SSD is list...

Page 27: ...hat you can easily buy from many vendors You can buy the verified cable from InWin to eliminate the compatibility issues 7 Technical Support If you need help with installation or troubleshooting you c...

Reviews: