background image

2) Installing Cross Tubes


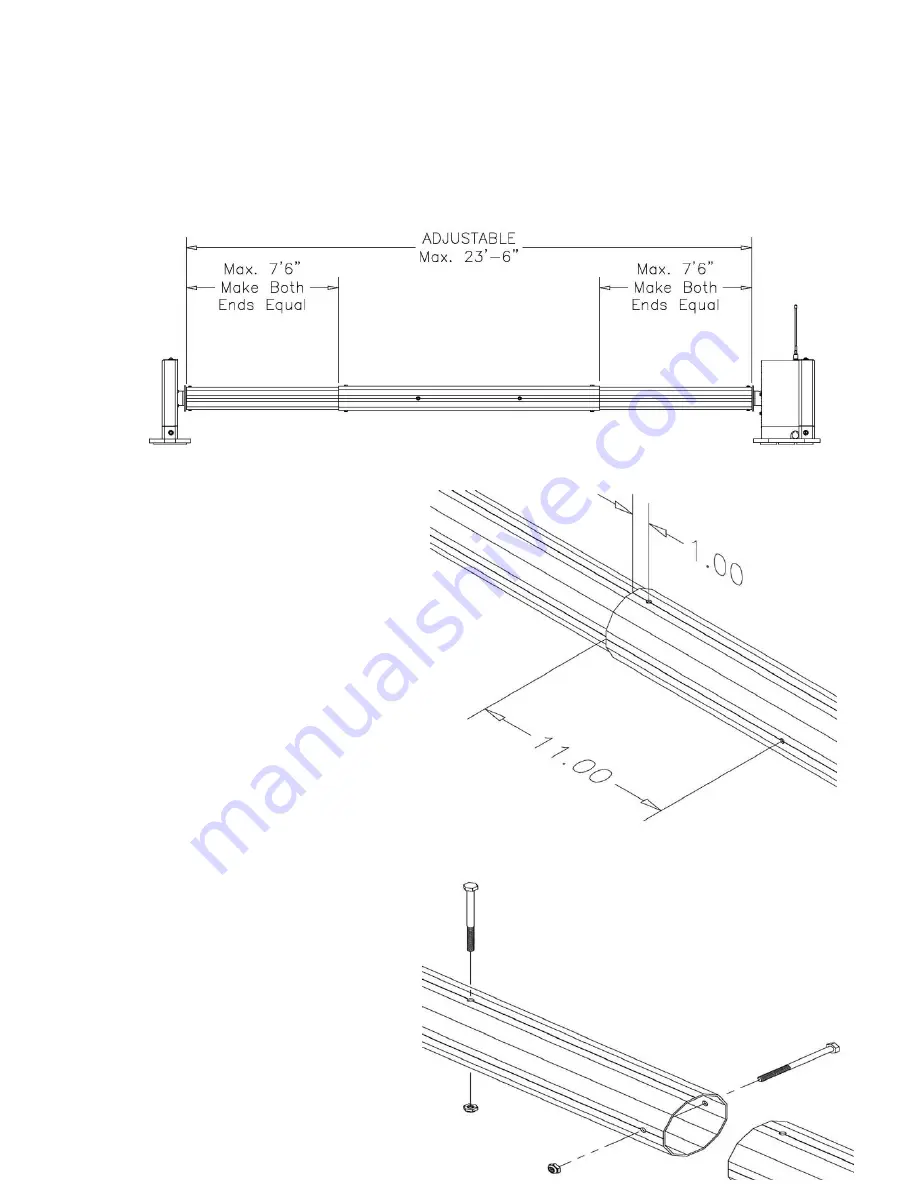
The cross tube assembly is adjustable to accommodate required widths from 17 to 23.5 feet. The cross 
tube assembly has three tube sections. Two smaller tubes telescope from each end of the larger 
diameter tube. 

1.  Slide a smaller diameter tube section into each end of the large tube. 
2.  Insert the drive and idler hubs into the ends of the cross tube assembly. 
3.  Center the middle tube section between the stands. 

Note:  

The cross tube is adjustable from 17ft to 23.5 ft. 


Install the Cross Bolts


This will fasten the three sections of the 
cross tube assembly together. 


Note: the cross tube sections have 
grooves. These grooves are used to 
help guide the drill bit during the drilling 
process. 


On one end of the large diameter tube: 
Measure one (1) inch in from the end of 
the large tube section and using the 
groove as a guide, drill a 1/4” hole. 
Insert a 1/4” bolt into the hole to keep 
the tubes from moving. Then drill 
another 1/4” hole one inch from the end 
of the large tube in the guide groove on 
the opposite side (180 degrees) from 
the first hole. Insert a bolt through both 
holes, install a nut, and tighten. 


Repeat this process by drilling two more 
holes at eleven (11) inches from the 
end of the large tube and at 90 degrees 
rotation from the first pair of holes. 


Perform this process on the other 
end of the large tube for a total of 
four (4) bolts.


Summary of Contents for Automatic Solar Blanket Reel System

Page 1: ... and Save this Instruction Manual In the Swim Solar Battery Powered Solar Blanket Reel is recommended for use on rectangular shaped pools with or without diving boards The In the Swim Solar Battery Powered Solar Blanket Reel system should only be used for the intended application INTRODUCTION PBITS001 ...

Page 2: ...tended to be stationary It is not designed to be mounted on a caster equipped stand Visually inspect the pool prior to retracting or extending the solar blanket The pool should be clear of occupants and other items that might conflict with the solar blanket Store the remote control and in a secure location in order to prevent unauthorized operation Do not attempt any technical repairs without prop...

Page 3: ...or sockets 2 Phillips screwdriver Drill 1 4 and 5 32 drill bits Flat blade screwdriver Select the Location Select a location at one of the narrow ends of the pool The location must be away from the ladder Typical Layout GETTING STARTED ...

Page 4: ...pool The stands come assembled in the middle of the height adjustment range Height adjustment The height of the reel system is adjustable through a wide range The height of the cross tube can be changed by moving the hub assemblies to different height settings Installation Drive Stand Pool Deck Level ...

Page 5: ...stand Position motor gearbox assembly at the desired height Insert and tighten bolts 3 Remove bolts and nuts that attach the idler hub and position hub to match the drive stand hub location 4 Reinstall bolts washers and nuts and tighten 5 Leave the drive stand cover off Install the idler stand cover if desired Example Highest Setting Example Lowest Setting ...

Page 6: ...Drive Stand Idler Stand Using a 5 16 wrench remove 4 mounting bolts Adjust stand height and reinstall bolts Using a 7 16 wrench remove 4 mounting bolts Adjust stand height and reinstall bolts ...

Page 7: ...ogether Note the cross tube sections have grooves These grooves are used to help guide the drill bit during the drilling process On one end of the large diameter tube Measure one 1 inch in from the end of the large tube section and using the groove as a guide drill a 1 4 hole Insert a 1 4 bolt into the hole to keep the tubes from moving Then drill another 1 4 hole one inch from the end of the larg...

Page 8: ...taching the cross tube assembly to the hubassemblies 1 Insert the drive and idler hubs into the crosstube 2 Drill a 5 32 pilot hole through the tube and into the hub approx 3 Insert the screw and tighten ...

Page 9: ... drive side stand or it may be mounted remotely away from the stand The mounting locating needs to be selected so that the solar charger is exposed to enough sunlight to keep the battery charged After selecting a location and mounting the solar charger route the cord to the drive side stand There is a hole in the bottom of the two sides to route the cord through Then simply locate the mating conne...

Page 10: ...ACT buttons on the remote control as well as to the direction you plan to wrap the solar blanket around the crosstube Depending on the desired installation configuration the operating direction of the reel may be opposite of the buttons on the remote To correct this install the supplied directional matching harness at the motor connection This will match motor direction on the remote control to th...

Page 11: ...s tube either direction 7 Install tether kit The tether kit attaches to the leading edge of the solar cover opposite the end that wraps onto the cross tube The tether is used to guide the cover during extension andretraction 1 Carefully wrap the edge of the cover around the tube after joining the two 5 ft pieces Ensure the wrap is even and square to the leading edge and center of the cover 2 Insta...

Page 12: ...activate and operation will cease To continue operation the remote must be activated again OPERATION Activate the remote control by pressing simultaneously and holding both the EXT and RET buttons for 2 seconds Note Activating the remote starts a 5 minute timer for systemoperation Operate the System To retract the solar blanket press and release the RETRACT RET button on the remote control To stop...

Page 13: ...ride isprovided 1 Remove the cover of the drive stand 2 Unplug the motor harness at the motor connector 3 Remove the cover of the idler stand 4 Use a inch wrench or socket to turn the reel in the desireddirection MANUAL OVERRIDE Use a Inch Wrench ...

Page 14: ...and stored where it cannot freeze It should be stored away from excessive heat and flame It may then be necessary for it to receive charge from the solar panel prior to it having enough charge to properly operate Remote Fob The remote control Fob is weather resistant It contains a button type battery CR 2032 The battery may require replacement at some time This battery CR 2032 is available at most...

Page 15: ...clusive de TouchTronics et sont susceptibles d être des marques déposées Toutes les autres marques sont la propriété exclusive de leurs détenteurs respectifs TouchTronics décline toute responsabilité en cas d erreurs dans ce manuel Les informations énoncées dans le présent document peuvent faire l objet de modifications sans avis préalable Déclaration FCC Cet équipement a été testé et déclaré conf...

Page 16: ...ANTIES INCLUDING ANY IMPLIED WARRANTY OF MERCHANTABILITY OR FITNESS FOR PURPOSE OR USE Days is not responsible for removal or installation costs UNDER NO CIRCUMSTANCES SHALL DAYS LIABILITY FOR ANY DEFECT IN THE PRODUCTS WHETHER BASED ON CONTRACT TORT WARRANTY STRICT LIABILITY OR ANY OTHER THEORY EXCEED THE PURCHASE PRICE OF THE DEFECTIVE PRODUCTS AND DAYS SHALL HAVE NO LIABILITY FOR CONSEQUENTIAL ...

Reviews: