background image

800-446-7488

20

www.in-situ.com

Configuring Alarms

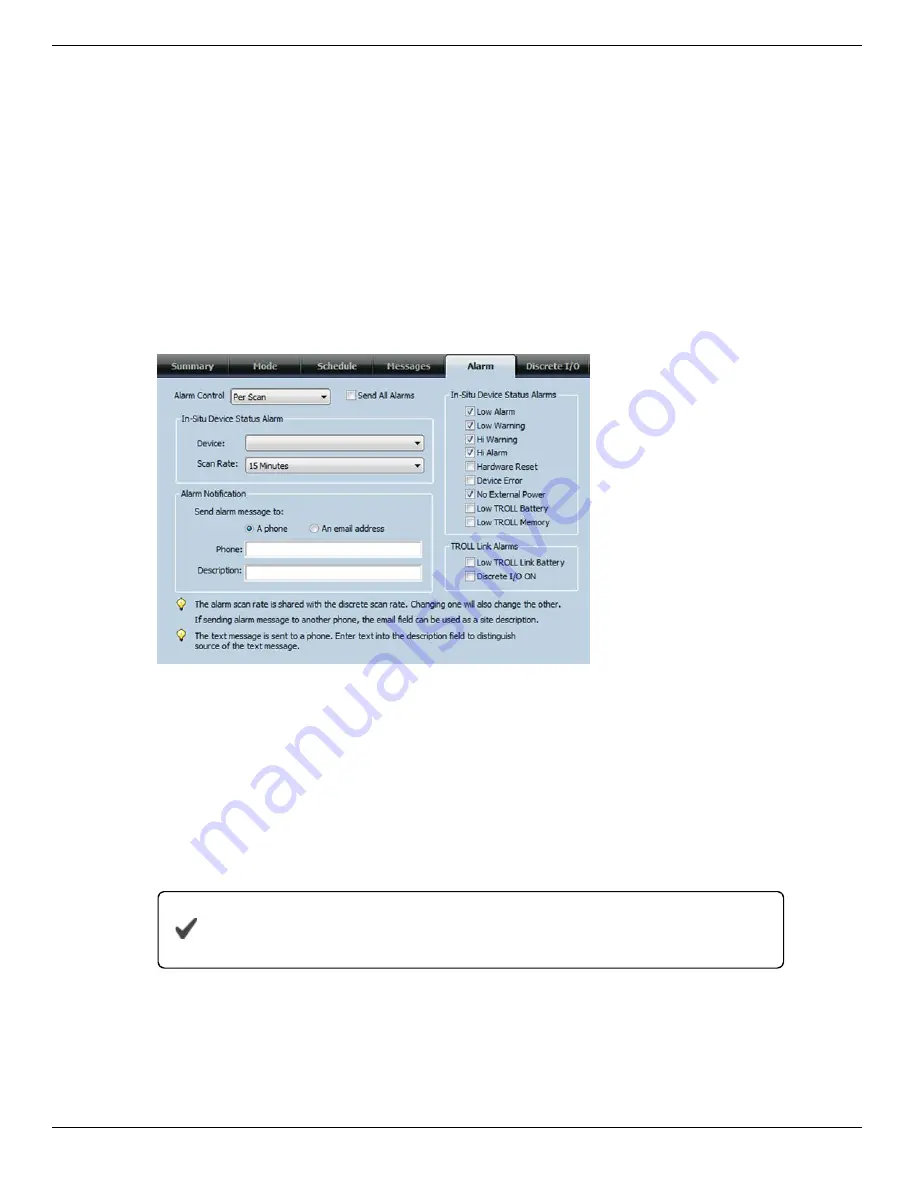
Configure device status alarms, TROLL Link Telemetry System alarms, the frequency
the device scans for alarm conditions, and how you are notified of alarms using the
Alarms tab.

Device alarms (alarms triggered by a pre-set low or high parameter value) are created
using Win-Situ 5 Software. You cannot set device alarm parameters using the TROLL
Link Setup Software. Device status alarms, such as Device Error and Low TROLL
Battery, do not need to be created in Win-Situ 5.

Alarms are based on the device status of the instrument, which is updated when
measurements are taken.

1. Click the

Alarms

tab.

2. Select the Alarm Control drop-down menu.

Disabled

—Alarms are disabled. Other options are disabled.

Per Scan

—Sends alarms based on the Scan Rate* (set below)

Per Event

—Sends alarms as they occur

3. Select an instrument from the Device drop-down menu.

4. Select a Scan Rate* (applies only when Per Scan is selected in the Alarm Control

drop-down menu).

The Scan Rate is independent of the SMS schedule set up in the
Schedule tab, and applies only to Alarms and Discrete I/O.

5. Select the desired device alarms from the In-Situ Device Status Alarms section.

6. Repeat steps 3-5 for remaining instruments.

7. Select the desired TROLL Link Telemetry System alarms from the TROLL Link

Alarms section.

Summary of Contents for TROLL 101

Page 1: ...0 Information subject to change without notice In Situ In Situ logo Baro Merge BaroTROLL HERMIT iSitu Pocket Situ RDO RuggedCable RuggedReader TROLL and Win Situ are trademarks or registered trademarks of In Situ Inc 2014 All rights reserved 0058312 Rev 008 11 2013 ...

Page 2: ...egistered trademarks of In Situ Inc Microsoft and Windows are registered trademarks of Microsoft Corporation Pentium is a registered trademark of Intel Tefzel and Delrin are registered trademarks of E I DuPont de Nemours and Company Viton is a registered trademark of DuPont Dow Elastomers Kellems is a registered trademark of Hubbell Inc Alconox is a registered trademark of Alconox Company Lime A W...

Page 3: ... TROLL Link to the PC 13 Configuring the TROLL Link Telemetry System 14 Defining the Mode of Operation 14 Configuring the Message Wake Schedule 16 Configuring the SMS Text Message Format 17 SMS Data Appearance 19 Configuring Alarms 20 SMS Alarm Messages 21 Configuring Discrete I O 21 Completing the TROLL Link Configuration 22 TROLL Link 100 Wiring Diagram 23 9 Retrieving Data from the TROLL Link 1...

Page 4: ... Address and Communication Settings 32 Selecting the Correct COM Port 33 Performing a Power Cycle Resetting the Modem 1 W Solar 34 Performing a Power Cycle Resetting the Modem 10 or 20 W Solar 34 Updating the Firmware TROLL Link 100 Only 35 Troubleshooting Table 36 14 Maintenance 38 Fuse Replacement 38 Enclosure Desiccant 38 Lead Acid Battery 38 Cleaning 38 15 Specifications 39 16 In Situ Data Cen...

Page 5: ...ce plan for the user Unpacking and Inspection All TROLL Link Telemetry Systems contain the following items l TROLL Link enclosure with mounting brackets l Battery 12 V 7 Ah l Antenna l Solar panel 1W 10W or 20W cable with female disconnects 2 and mounting bracket l U bolts 3 flat washers 6 split lock washers 6 and nuts 6 or hex nut hose clamps 2 You need to supply the following items l Mounting po...

Page 6: ...oduct model and serial number available 2 Be prepared to describe the problem including how the product was used and the conditions noted at the time of the malfunction 3 If Technical Support determines that service is needed they will ask your company to fill out the RMA form and pre approve a specified monetary amount for repair charges When the form and pre approval is received Technical Suppor...

Page 7: ... can be accessed anywhere you have an internet connection at http www isi data com SIM Card TROLL Link Telemetry System 100 and 101 units must have a SIM subscriber identity module card to allow communication over the wireless network TROLL Link 101 units have SIM cards pre installed by In Situ Inc TROLL Link 100 customers must obtain a SIM card from their service provider typically when purchasin...

Page 8: ...101 modems are shipped with SIM cards already installed Changing the Device Address When networking multiple Level TROLL Aqua TROLL Rugged TROLL or RDO PRO Instruments each device requires a unique device address Complete the following steps with the instrument connected to the software 1 Click the Device Setup tab 2 Click the Modbus Setup button 3 Select the Device Address box and change the numb...

Page 9: ...figure and test your TROLL Link Telemetry System in your home or office prior to installing it in the field Changing Modbus Communication Settings in Win Situ 5 Complete the following steps with the instrument connected to Win Situ 5 Software Change Modbus communication settings for each instrument 1 Click the Device Setup tab 2 Click the Modbus Setup button 3 Click the Baud drop down menu and sel...

Page 10: ... send and receive short messages also known as text messages or SMSs Typically you purchase a certain number of SMS messages from your service provider Messages sent or received beyond the purchased amount are charged at a different rate overages To purchase the appropriate service plan you need to know how many SMS messages you will send each month This is based on your desired data and sample ra...

Page 11: ...om Your Service Provider Before proceeding with setup and configuration ensure you have obtained the following items from your service provider A data plan A SIM card A gateway phone number required when you send SMS messages to an email address The items below are only required when you use TCP IP to connect to the TROLL Link Telemetry System APN Name APN User ID APN Password The following settin...

Page 12: ...situ com with the hardware key and your sales order number If you do not have your sales order number you will need to provide additional information 7 Technical Support will reply to your email with a license key and an activation code Write these numbers in the space provided below TROLL Link Setup Software License Key __________ __________ __________ __________ TROLL Link Setup Software Activat...

Page 13: ...with the terminals oriented toward the top of the enclosure 2 Plug the black negative leads into the black terminals of the batteries first Ensure that the terminal does not sit between the lead clip and the plastic sheath but that the lead clip encompasses the battery terminal 3 Plug the red positive leads into the red battery terminals Ensure that the terminal does not sit between the lead clip ...

Page 14: ...nsure the serial cable connections at the TROLL Link unit and at the PC are tight l Check the battery terminal connections Check the top of the modem to ensure the power light is on l If you have more than one serial port connection on your PC check that the correct COM port is selected in the drop down menu on the Select Connection window Configuring the TROLL Link Telemetry System Defining the M...

Page 15: ... modes If you select Wait for an Internet TCP IP connection from Win Situ you must determine the TROLL Link Modem IP and Port number These are displayed on the Summary Tab as Modem IP and Port Write these numbers in the space provided below Modem IP _________ _________ _________ _________ Port _________ 3001 is default 3 Select what type of instrument s are connected to the TROLL Link Choose the c...

Page 16: ...ning the battery Create a schedule by selecting and clearing Message Wake periods in the Message Wake field Another way to create a schedule is to adjust certain time parameters in the Create a Schedule field Once the parameters are adjusted all Message Wake periods that fall within those parameters are selected In Situ Inc recommends that you make each Message Wake period less than two hours 1 Cl...

Page 17: ...00 AM 7 30 AM 8 00 AM 8 30 AM 9 00 AM 9 30 AM 4 Click the Create button All Message Wake periods that satisfy the parameter values populate the Message Wake Schedule field 5 Use the Select All button to select all available Message Wake periods Use the Clear All button to remove all selected periods Select Message Wake periods based on when you are typically available to receive messages or have t...

Page 18: ...tries field enter the number of times the TROLL Link Telemetry System resends a message 1 to 10 times when communications fail 3 is the recommended number 4 In the TimeOut secs field enter the amount of time the TROLL Link Telemetry System attempts to send a message before it is considered failed 30 the default value is the recommended value 5 Click Add to set up individual messages 6 Select an in...

Page 19: ...age contains seven comma separated values Original Message From 9716906987 tmomail net mailto 9716906987 tmomail net Sent Thursday June 14 2012 2 46 PM To youremail youremailprovider com Subject Number Description 1 21 45 Time the data were measured 2 2 SMS message number set in the Messages tab 3 3 000 n n n n Parameter measurement values Numeric values equal actual measurements n equals no measu...

Page 20: ...he instrument which is updated when measurements are taken 1 Click the Alarms tab 2 Select the Alarm Control drop down menu Disabled Alarms are disabled Other options are disabled Per Scan Sends alarms based on the Scan Rate set below Per Event Sends alarms as they occur 3 Select an instrument from the Device drop down menu 4 Select a Scan Rate applies only when Per Scan is selected in the Alarm C...

Page 21: ... condition is satisfied The alarm message contains the time stamp and then a series of codes Refer to the alarm code descriptions in the table below Alarm Code Description AH High alarm WH High warning AL Low alarm WL Low warning CAL Sensor out of calibration SC Sensor changed PWRM Power management disabled OFLN Device offline DRST Device hardware reset DMAL Device malfunction XPWR No external pow...

Page 22: ...ct the parameter that triggers the relay 5 In the Discrete On box enter the value that once exceeded turns on the relay 6 In the Discrete Off box enter the value that once dropped below turns off the relay When the Discrete On value is less than the Discrete Off value the relay is on when the parameter is less than the Discrete On value Completing the TROLL Link Configuration 1 Click the Load Conf...

Page 23: ...S485 Bulkhead green wire 6 DC Bulkhead red wire fuse blue wire 7 Pulse Count 8 Pulse Count 9 Relay 10 Relay Retrieving Data from the TROLL Link 100 Receiving SMS Messages SMS messages are sent according to the Message Wake schedule Connecting to the TROLL Link 100 in Dial Up Mode Win Situ 5 Plus can only establish a connection to the TROLL Link Telemetry System during a scheduled Wake Message peri...

Page 24: ... disconnect button Connecting to the TROLL Link 100 in TCP IP Mode Win Situ 5 Plus can only establish a connection to the TROLL Link Telemetry System during a scheduled Wake Message period 1 Open Win Situ 5 Plus Software 2 Click No when prompted Connect to device now 3 Click Preferences 4 Click Comm Settings 5 Click the radio button next to IP Communications 6 Enter the IP Address and Port Number ...

Page 25: ... All 3 Click the Load Configuration button The modem no longer transmits messages but still draws power from the battery The directions below describe turning off SMS messages using a remote IP connection 1 Open the TROLL Link Setup Software 2 Click the Connect button 3 Click the radio button next to IP Connection 4 Enter the TROLL Link Telemetry System IP Address and IP Port number These numbers ...

Page 26: ...ries with the terminals oriented toward the top of the enclosure 2 Plug the black negative leads into the black terminals of the batteries first Ensure that the terminal does not sit between the lead clip and the plastic sheath but that the lead clip encompasses the battery terminal 3 Plug the red positive leads into the red battery terminals Ensure that the terminal does not sit between the lead ...

Page 27: ... components of the TROLL Link Telemetry System have power applied 2 From the Site Index click the site name 3 Click the first device listed 4 Select Manage Device under the Site Management heading in the left navigation bar 5 Select View Config Messages under the Device Config heading in the left navigation bar If data does not refresh at the expected rate or the site does not display the network ...

Page 28: ...4 Install the instrument in its deployment location Refer to the instrument Operator s Manual for any questions regarding proper connection or deployment 5 Ensure the cable does not apply excessive weight on the enclosure by securing the cable grip Installing the TROLL Link Telemetry System To mount the enclosure you may obtain a mounting tripod or install your own pole Install the pole before pro...

Page 29: ... The blade creates a current loop when in contact with both leads and shorts the solar panel Instead trim off the insulation then cut one wire at a time Connect a solar panel 1 Cover the solar panel so it will not receive any sunlight 2 Remove one of the dome connector caps on the outside of the enclosure Remove the port plug Save the plug for later use you can store the plug inside the enclosure ...

Page 30: ...d hose clamp to the bottom of the enclosure For U bolts place the smaller bracket over the open ends of the bolt Use split lock washers and nuts to tighten the assembly to the pole Connect the solar panel to the External Battery Kit enclosure 1 Cover the solar panel that will connect to the enclosure so it will not receive any sunlight 2 Remove a dome connector cap on the outside of the enclosure ...

Page 31: ...nto one dome connector cap and then through the battery kit enclosure 3 Connect the black lead negative of the cable to the BATT screw terminal of the battery box 4 Connect the white lead positive of the cable to the BATT screw terminal of the battery box 5 Insert the other side of the cable through the remaining dome connector cap There should be two dome connector caps on the cable oriented in o...

Page 32: ... device address or other communication settings you must change Win Situ Software communication settings to reconnect and communicate with the instrument 1 Connect the instrument to a laptop or PC 2 Open Win Situ Software When it asks Connect to device now click No 3 In the top menu bar click Preferences 4 Click Comm Settings 5 Enter instrument s device address into the Device Address box 6 Ensure...

Page 33: ... locate the USB Serial Port listing The number listed next to this entry is your COM port address Steps for Windows 7 systems 1 Minimize the Win Situ Software 2 Click the Windows Start button and open the Control Panel 3 Click Hardware and Sound and open the Device Manager 4 Click the arrow next to Ports COM and LPT and locate the USB Serial Port listing The number listed next to this entry is you...

Page 34: ...nect the white lead of the solar panel wire to the enclosure terminal labeled SOL 4 Reconnect the black lead to the black battery terminal Performing a Power Cycle Resetting the Modem 10 or 20 W Solar Improperly cycling power may cause electrical issues Follow the proper procedure step by step to avoid damaging equipment Procedures vary by solar panel type 1 Disconnect the black negative leads fro...

Page 35: ...he system off and then turning it back on resolves some issues 1 Connect the TROLL Link Telemetry System to your PC 2 Connect power to the TROLL Link 3 Launch the TROLL Link Setup Software 4 Click File and then click Update Firmware 5 Ensure the COM shown in the Port drop down menu is correct 6 Follow the onscreen instructions ...

Page 36: ...L Link Setup Software Ensure all communication settings on the instrument are correct See page 8 The modem REG light does not illuminate while in dial up or IP modes The modem REG light does not illuminate while in SMS mode The REG light illuminates only during a message wake interval dial up or IP mode and only illuminates during message transmission SMS mode Ensure the correct SIM card is instal...

Page 37: ...he APN information is entered correctly using the TROLL Link Setup Software See page 24 Unable to connect the TROLL Link Telemetry System to Win Situ 5 Plus Software in dial up mode Ensure the correct Modem number is selected See page 23 Ensure the correct phone number is entered See page 23 Ensure the correct Device Address is entered See page 23 Ensure the communication mode is set to ASCII See ...

Page 38: ...maintenance Desiccant life span is dependent on site conditions The enclosure contains one tube of desiccant that absorbs moisture as it enters the enclosure through the vent tube Keep the vent tube clear of obstructions Replace as needed An additional desiccant pack may be located at the top of the enclosure Replace or dry as needed Lead Acid Battery The battery is a sealed rechargeable lead acid...

Page 39: ...ass Dimensions 29 21 x 25 40 x 12 7 cm 11 5 x 10 x 5 in Operating Temperature Range 40 to 60 C 40 to 140 F NEMA Rating 4X Weight typical 6 8 kg 15 lbs with solar panel and battery Pole Mount 60 mm 2 375 in diameter Power Supply Solar Panel 1 10 or 20 W Battery 12 V 7 Amp hour ...

Page 40: ...m status 5 Click a site name to view more data from that site 6 Select a Device to view more data from that device If the next transmission interval has not occurred you should confirm that communication from all devices in the network has been successful 1 Ensure all components of the TROLL Link Telemetry System have power applied 2 From the Site Index click the site name 3 Click the first device...

Page 41: ... devices 2 Create and manage users and user privileges 3 Configure sites devices graphs and notifications 4 Configure contact information and device alarms 5 Click on a site name to retrieve the site summary 6 View the date and time of the most recent message received 7 View the number of devices at the site 8 View the alarm status 9 View a brief summary of the current page ...

Page 42: ... 446 7488 42 www in situ com Site Summary The Site Summary screen appears when you click on a specific site Number Description 1 Click to view the Site Summary Graph 2 Click a device to view device details ...

Page 43: ...hen you click Manage Site Number Description 1 Click to add data points to the top device on the site see below 2 Click to assign and update devices on the site see below 3 Click a device to manage the device 4 Add a new site delete a site and manage the images displayed 1 Site Index see image below ...

Page 44: ...ters l Click the green arrows to adjust the order of parameters l Click the red X to delete parameters Click the Add Point button to add a new summary data point 2 Assign Devices not shown l Check or clear the box to assign a device l Click Update Site Devices ...

Page 45: ...l screen appears when you click on a specific device Number Description 1 Click to select the data timeframe from the drop down list 2 Click the blue labels to select the view or export the data to CSV 3 Click the link to create and manage device specific reports ...

Page 46: ...ecific device from the Site Management screen Number Description 1 Edit device settings Description is used by In Situ to identify the system and should not be changed 2 Click to edit registers or copy existing registers to another device Click the Update Device button to save changes to the device ...

Page 47: ... Enter the new user data in the fields shown 3 Click the Set as site admin check box if the user requires site administration privileges 4 Click Create User Manage Users 1 Click Edit to edit user settings 2 Click Reset Password to reset a user password 3 Click the red X to delete a user ...

Page 48: ...800 446 7488 48 www in situ com ...

Page 49: ... the plus sign next to your site name the name may be Default The site menu expands and instruments in your site are displayed below the Assign Devices entry Instrument names may be a series of numbers 3 Click the first instrument listed 4 Click Over Air Commands under the Device Config heading in the left sidebar 5 Click the Add or Remove check box next to the parameter name to change the transmi...

Page 50: ...ce plan 5 Click the arrow next to Sample Rate Hyper mode and select None 6 Click the arrow next to Message Holding and select No Holding 7 Click the Send Config button at the bottom of the parameter list to finalize the configuration All other instruments are updated to transmit using these settings ...

Reviews: