IN-COMMAND NCSP3 Installation And Operation Manual Download Page 10

NCSP3

9

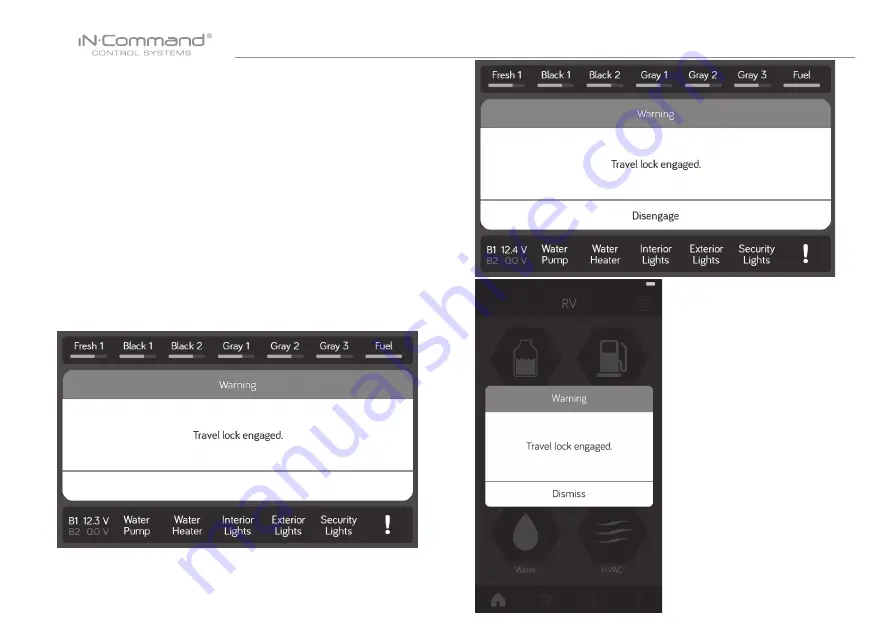
• TRAVEL LOCKOUT (Safety)

iN-Command is equipped with a Travel Lockout feature to ensure 

certain system functions are unavailable during transit. 

When the Brake Signal (Towable) or Ignition (Motorized) is activated, 

the iN-Command will lock down all motorized functions. The Display 

Commander (DC) and mobile devices will also display “Travel Lock 

Engaged” and the affected buttons will cease to activate.

The lights, water pump, water heater, generator and tanks sensors 

will continue to function. 

To turn the Travel Lock off, press "Disengage" on the Display 

Commander (DC), inside the RV, once the brake signal has been

removed.

Summary of Contents for NCSP3

Page 1: ...RV CONTROL AND MONITORING SYSTEM Patent D776 068 Patent D762 644 Patent US 9 679 735 NCSP3 Installation and Operation Manual...

Page 2: ......

Page 3: ...njury or property damage Operate only when you have a clear line of sight Do not operate any moving parts including but not limited to awnings jacks and slides unless you have a clear line of sight to...

Page 4: ...12 SETTINGS 12 Text Editing 12 Scroll List Editing 14 Triggers 15 Generator Fuel 15 Alarm Inputs 15 Passcode 15 Set Passcode Timer 16 Change Passcode 17 Clear Passcode 17 MOBILE DEVICES 18 Pairing iOS...

Page 5: ...ntrol Jacks non automatic function 4 Programmable Auxiliary 12V Triggers 4 Alarm Inputs 12V Monitor Battery Voltage with Low Voltage Alert Auto Generator Start HVAC Global Connect Precautions Use the...

Page 6: ...ounting Location Select a mounting location taking care to avoid the following Places exposed to heat radiating appliances such as electric heaters Adjacent to other equipment that radiates heat Poorl...

Page 7: ...TERIOR LIGHT GND 26 EXTERIOR LIGHT 12V 15A IN 25 EXTERIOR LIGHT SWITCH INPUT 12V 12 LIGHT GROUP 1 12V 15A OUT 11 LIGHT GROUP 1 GND 24 LIGHT GROUP 4 12V 15A OUT 23 LIGHT GROUP 4 GND 22 LIGHT GROUP 4 12...

Page 8: ...7 RV C SYSTEM LAYOUT End of Line terminator resister A A A...

Page 9: ...me Awnings Awning Light No Yes Awning 1 In Out Awning 2 In Out Slides Hydraulic In Out Slide 1 In Out Slide 2 In Out Slide 3 In Out Slide 4 In Out Slide 5 In Out Lights Light Group 1 No Yes Light Grou...

Page 10: ...tivated the iN Command will lock down all motorized functions The Display Commander DC and mobile devices will also display Travel Lock Engaged and the affected buttons will cease to activate The ligh...

Page 11: ...cker switch to select the motor Press up or down on the switch The switch is momentary and will activate the motor only while pressed in either direction The hydraulic overrides are located on the hyd...

Page 12: ...ter must be installed to provide a separation distance of at least 20 cm from all persons and must not be co located or operating in conjunction with any other antenna or transmitter No change to the...

Page 13: ...plan Control the brightness of the DC screen View iN Command s Legal documents and customer support information The Administration page is used by the manufacturer A passcode is required to access th...

Page 14: ...board to edit the name then press Ok 2 Press Edit to enter Edit page 3 Select the function to edit Note Editing the text on the DC will not change the text on a device s App 4 Long press the intended...

Page 15: ...NCSP3 14 3 Select the function to edit 2 Press Edit to enter Edit page Scroll List Editing 1 Select Settings 4 Use the Up and Down arrows next to the function to move the item in the list...

Page 16: ...d devices need to be correctly wired to the BCM to function Triggers In the Generator Page Gasoline or Propane can be selected for the fuel type Generator Fuel Alarm inputs can added to the system Not...

Page 17: ...Press Passcode to enter passcode setup 2 1 Enter the correct passcode to proceed 3 The passcode setup window will open Set Passcode Timer Press Set Timer select the idle time to activate the passcode...

Page 18: ...e to clear the passcode This will restart the App take the user to the End User License Agreement and have the user setup a new passcode 1 Press the Change Passcode button to change to a new passcode...

Page 19: ...iN Command at one time but only 1 iOS and 3 Android devices are able to be actively paired meaning 3 Android devices and 1 iOS device can all actively control the iN Command functions To use another...

Page 20: ...Mobile Device to DC 1 Enable Bluetooth in the system settings of the mobile device 2 From the DC Home page select Settings 2 1 Select the Bluetooth tab 2 2 Select Pairing to pair devices and view cur...

Page 21: ...bile device in the Unpaired Device list Select the device by pressing it 2 4 A Popup with the device name will apear on the display Press Pair 2 5 A Bluetooth Pairing request will appear on the DC and...

Page 22: ...displayed in the Paired devices list on the DC 2 9 The DC will be displayed on the mobile device list in the format NCSPDCXXXXX Press the DC on the mobile device to connect with it 2 10 The mobile dev...

Page 23: ...roid Mobile Device to DC 1 From the App Home Page select Settings 2 Select the Bluetooth tab 3 Press Scan to start scanning for Unpaired devices Locate the DC in the Unpaired Device list Select the de...

Page 24: ...NCSP3 23 4 A Bluetooth pairing request will appear on the DC and mobile device 4 1 Press OK on the mobile device 5 The mobile device will be displayed in the Paired devices list on the mobile App...

Page 25: ...ings menu page Loading the DC Floor Plan 2 Press DC Sync to Load the floor plan configuration from the DC The current settings will be lost replaced upon doing this When syncing via Global connect Whe...

Page 26: ...The page shows information of current active Bluetooth devices To disconnect a handheld device press Disconnect or simply shut down the device s App This function is used to disconnect a device that...

Page 27: ...ed can be switched between low medium and high 1 Select the desired Zone Press the Mode button to switch to Cool mode 2 Use the Set up and down arrows to set the desired temperature for the zone 3 Pre...

Page 28: ...button to switch between Off Low High and Auto Off is not available in Electric Heat Source Auto Mode will automatically switch between Cool and Heat modes to reach the desired Set temperature Heat M...

Page 29: ...the Generator and HVAC scheduling functions 1 Select Settings Date Time 2 Press Date time 3 In the Date Time page press the Edit tab to adjust the date and time 4 Use the Calendar to select the Date a...

Page 30: ...the HVAC home screen to enter the Schedule page HVAC Schedule AUTO GENERATOR START 1 Press the Generator icon 2 Press the Manual button to switch to Auto and activate Auto Gen Start 2 Use the Set up a...

Page 31: ...fails to start after the third attempt the system will turn off the Auto feature and display a Check Generator fault 4 If the generator is started the system will run the generator for 60 minutes Ther...

Page 32: ...edesigns and App version updates 1 Insert USB drive loaded with updated software into the USB port at the bottom of the DC 2 Select Settings The system will look for specific file names for software u...

Page 33: ...NCSP3 32 6 Framework Update 7 Press Confirm to continue 5 Press the DC Version to update the DC OS sytem Press Update 8 Press the BCM Version to update the BCM system Press Update...

Page 34: ...Plan to select a floor plan Press Load to select the floor plan If a software update is needed go to http www asaelectronics com in command If there is a software issue Call ASA Electronics Technical...

Page 35: ...onnect feature To setup a cloud account the device app first needs to be paired with the iN Command via Bluetooth Follow Bluetooth pairing instructions for your device 1 On the DC select Settings 2 Se...

Page 36: ...CSP3 35 4 From the App Home Page select Settings Select the Global Connect tab 5 Select the Account tab 6 Press on the white bar next to Account and Use the device keypad to enter a valid email addres...

Page 37: ...will appear Press Dismiss The account passcode will be pushed to the DC 9 You can set account passcode manually In Settings select the Global Connect tab 10 Enter the account and passcode that you cr...

Page 38: ...em Reset in the Settings page 3 Select one of the two options Floor Plan or Factory to restore to a previous state a Floor Plan restores to previous floor plan settings from RV manufacturer b Factory...

Page 39: ...38 TOUCH SCREEN CALIBRATION 1 Select Settings 2 Select Calibration 3 To calibrate the Touch Screen select Set Follow the instructions The DC will restart after calibration 4 Touch the center of the c...

Page 40: ...ks to set resistor reference value for every tank SYSTEM CALIBRATION From the Administration page the App Data can be deleted the Generator Hour Meter can be set and the Water Tanks can be calibrated...

Page 41: ...amming and troubleshooting purposes Should there be a calibration issue call ASA Electronics Technical Support at 1 877 845 8750 or email them at info asaelectronics com 6 Press the App Data Delete bu...

Page 42: ...f the DC Shut off all power to the DC and BCM Reconnect power wires to the DC Return power to the DC and BCM Press Reset button on the BCM Awnings do not move Check for 12VDC on Pin 88 Ensure the rela...

Page 43: ......

Page 44: ...www jensenrvdirect com 2016 ASA Electronics LLC MA 1705001A 1R...

Reviews: