background image

8  |  

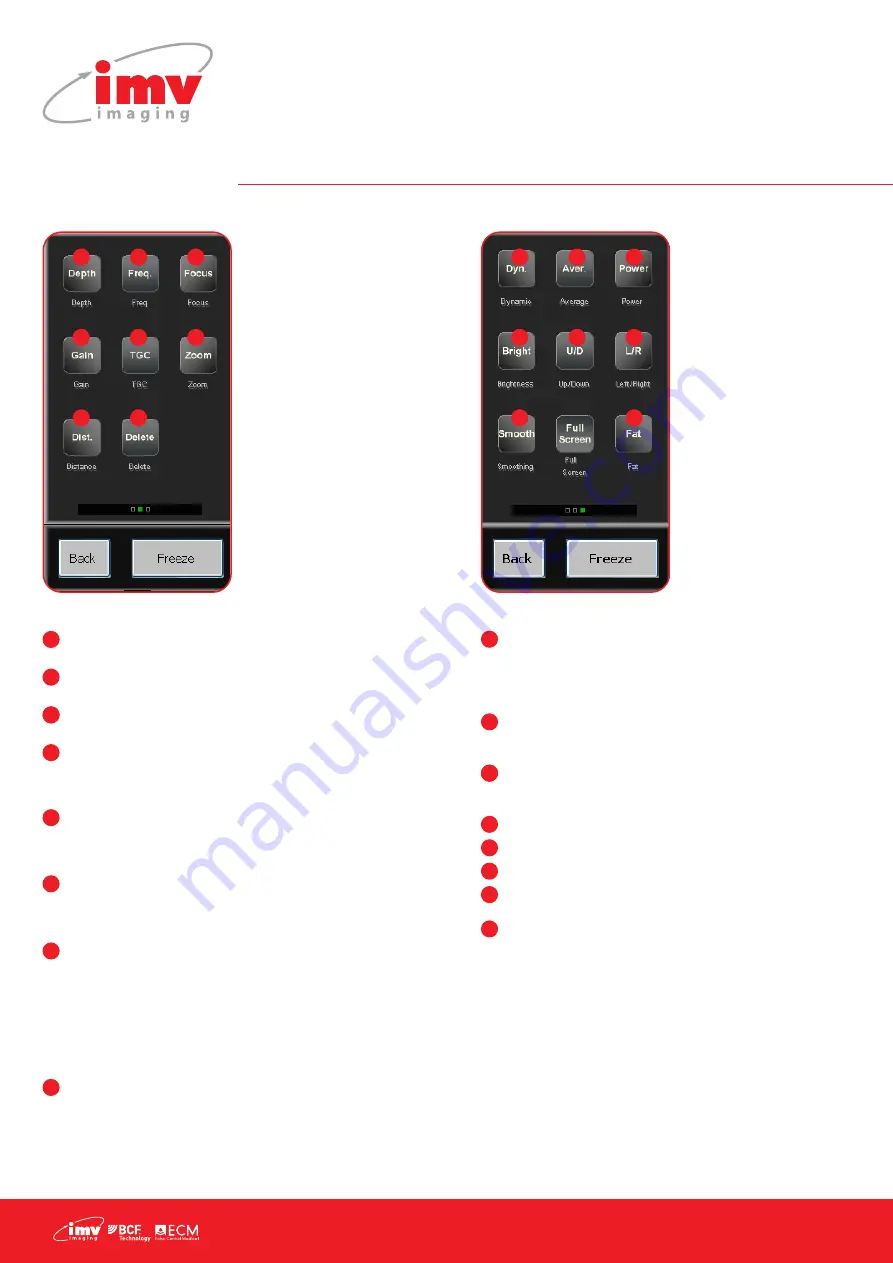
Depth: Access vertical cursor to change depth depending 
on current probe and application.

Frequency: Choice of 3 frequencies depending on probe 
you are using.  

Focus: Vertical cursor that gives you a choice of focus 
positions.  

Gain: Gain control is represented by a tuner button 
that is turned by pressing the white dot. It will be green 
when activated. Turn clockwise to increase gain and 
anticlockwise to decrease.

TGC: In TGC, 4 cursors will appear that correspond to 
different area of the screen. TGC allows you to chose gain 
by zone. Pulling cursor to the right will increase gain and to 
the left will decrease.

Zoom: To magnify a part of the screen, press Zoom and 
choose preferred window, x1.5, x2, x3. then position the 
window over the part of the screen you would like to 
magnify. Press B to return to normal imaging. 

Distance: Distance allows you to make measurements 
without having to freeze the picture. Position cursor 
with touchpad, press valid to start measurement and 
move second cursor. Toggle will switch sides on your 
measurement. Press Valid again to close the measurement. 
Distance will display at the bottom of the screen. You can 
do up to 7 measurements on the same image. 
You can put up to 7 measurements on the same image (4 
distances, 2 Ellipses, 1 trace). 

Delete: Delete any measurement on the screen (select the 
one(s) you want to delete using the key Select).

1

1

2

3

4

5

6

7

8

2

3

4

3

5

6

7

8

Dynamic range: This function allows you to create a harder 
or smoother picture. Press the Dynamic key and chose 
your dynamic range on the vertical cursor. The lower the 
dynamic is the harder is the picture and the higher the 
dynamic is the smoother is the picture. 

Average: This function allows you to adjust the persistence 
of the image among SLOW – SLOW MEDIUM – MEDIUM FAST 
& FAST. 

Power: You can modify the emission power of the probe. 
Press the Power key and choose your emission power in % 
on the vertical cursor.  

Brightness: Allows you to change the screen brightness. 

U/D: Reverse the image on the screen

L/R: Change the side of the picture

Smoothing: 3 levels are available ; level 3 is the highest ; 
level 2 is active as a standard feature. 

Fat: Automatic measurement of back fat (for pigs with 
sector or linear probes ; cattle or small ruminants with linear 
probe). Available in frozen mode also. 

1

1

2

3

4

5

6

7

8

2

3

4

3

5

6

7

8

Page 2

Page 3

3. Scanner menus

Summary of Contents for ImaGo

Page 1: ...Your complete animal imaging solution Instruction manual ...

Page 2: ...le the electrical safety of the probe may be compromised Do not immerse the probe connector in any liquid Immersion can destroy the electrical safety features 1 1 3 Ultrasound gel Some ultrasound gels and lotions can damage probes Agents containing the following chemicals are known to damage probes Acetone Methanol Denatured ethyl alcohol Mineral oil Iodine Any lotion or gel that contains perfume ...

Page 3: ...ts to touch the screen that could damage it 3 1 1 Simplified Interface When the device is initially started only the homepage is shown below left to facilitate the use of the device When in Freeze mode below right other functions are available To return to homepage press freeze again 3 1 2 Normal Interface After turning the scanner on 3 pages are available you always start on page 2 below center a...

Page 4: ...resets factory or user settings 1 2 3 4 1 2 3 4 Settings access to user s set up Review to vizualise images and clips saved Distance to make measurements on frozen image Brightness to be increased or lowered Freeze allows to come back to B image Cineloop allows to review the last registered images of the ultrasound session Store I allows to register an image Store C allows to register the last few...

Page 5: ...end of exam after finishing or the patient file will be erased when the system is turned off Report View a report while an exam is in progress This report can be exported to a USB in Review If no exam is in progress the report key remains inactive Review Access images and video clips that the user has previously recorded The review mode will access USB drive automatically if there is one connected...

Page 6: ...an record the 10 frequently used annotations for inserting comments in frozen images If Restore the last annotation is activated the last annotation will be automatically proposed 2 3 1 4 2 3 5 6 4 5 6 7 7 1 System Change date and time About Software version and manufacture date Auto Freeze add details USB If you have problems storing using USB drive activate this function Keypad Activate Azerty Q...

Page 7: ...t part of the menu Press Save when selection is finished Delete delete the selected User Protocol from the User Protocols list Save save the created User Protocol Tables display the current protocol table in data or graphical mode Data Graph control Next and Previous controls are used to review equivalent table with different authors if any Exit exit the User Protocol menu and return to the Settin...

Page 8: ...rement Distance will display at the bottom of the screen You can do up to 7 measurements on the same image You can put up to 7 measurements on the same image 4 distances 2 Ellipses 1 trace Delete Delete any measurement on the screen select the one s you want to delete using the key Select 1 1 2 3 4 5 6 7 8 2 3 4 3 5 6 7 8 Dynamic range This function allows you to create a harder or smoother pictur...

Page 9: ...nnotations on a frozen picture or choose an annotation that you have previously recorded in the settings menu Settings Preset the machine to your own convenience and have access to the user protocols 1 1 2 3 4 5 6 2 3 4 5 6 7 FREEZE page 1 7 Distance Make a measurement on a frozen image Ellipse This allows to draw an ellipse on a frozen picture Trace This allows to draw a trace on a frozen picture...

Page 10: ...the list of cineloops Back to main menu of freeze Return to B mode menu and unfreezes the image 1 2 3 4 5 6 3 2 1 4 5 6 3 2 3 Moving from Normal to Simplified interface Within Settings function When in simplified mode only the essential functions will be displayed In simplified mode you can select three different presets P1 P2 P3 Choose for each from factory presets or your own user presets Once s...

Page 11: ...sinfection solutions have been tested for their compatibility with the components of the probes Alkazyme Klenzyme Cidezyme Nu Cidex Anioxyde Gigasept FF Steranios Cidex OPA It is strongly recommended to use one of these solutions in order to avoid any deterioration during the cleaning and disinfection procedure Warning Do not pour liquid directly on to the scanner Before closing the case ensure th...

Page 12: ...70 ireland imv imaging com www imv imaging ie United Kingdom HQ IMV imaging Imaging House Phoenix Crescent Strathclyde Business Park Bellshill ML4 3NJ Scotland UK 44 0 1506 460 023 info imv imaging com www imv imaging co uk France IMV imaging 126 Boulevard de la République 16000 Angoulême France 33 5 45 92 03 57 france imv imaging com www imv imaging fr North America IMV imaging 2900 43rd Street N...

Page 13: ...Instruction manual www imv imaging com 13 ...

Page 14: ...acebook com IMVimaging twitter IMVimaging www imv imaging com info imv imaging com 44 0 1506 460023 Contact us now IMV imaging V 1 July 2019 Instruction manual ImaGo Your complete animal imaging solution ...

Reviews: