background image

ASSEMBLY INSTRUCTION 

Tools Required Assembling the Machine:  Two Adjustable Wrenches and Allen Wrenches.  
NOTE:  It is strongly recommended two or more people assembling this machine to avoid 
possible injury. 


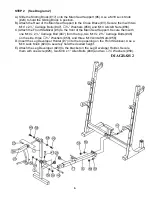
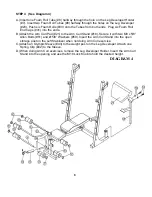
STEP 1     (See Diagram 1) 

A.) Attach an Upright Beam (#4) to the Left Stabilizer (#1).  Then attach the Cross Brace (#3) to 

the Upright Beam.  Align the holes and secure them with two M10 x 3” Carriage Bolts (#45), 
two 

 ¾” Washers (#58), and two M10 Aircraft Nuts (#56).  Repeat the same procedure to 

install the other side. 

B.) Attach the Backrest Flat Base (#11) to the Cross Brace (#3).  Secure it with one M10 x 3” 

Allen Bolt (#50), two Ø ¾” Washers (#58), and one M10 Aircraft Nut (#56).  Do not over 
tighten the nut and bolt. The Base needs to be able to swivel on the bolt.  Flip the Base up 
when setting the Backrest Board at the flat position. 

C.) Attach the two Squat Bar Catches (#22) to the two Upright Beams. Use two 3 ½” L-shaped 

Pins (#26) to hold them in position. 

D.) Insert the Left & Right Bar Catches (#14 & 13) and the Safety Catches (#15 & 16) into the 

Upright Beams.  


Summary of Contents for MARCY PRO 6

Page 1: ...are Pack Assembly Instruction Parts List Warranty Ordering Parts Model PRO 6 Retain This Manual for Reference 07 26 03 OWNER S MANUAL MARCY WEIGHT BENCH PRO 6 IMPEX FITNESS PRODUCTS 14777 DON JULIAN R...

Page 2: ...using the machine As a manufacturer we are committed to provide you complete customer satisfaction If you have any questions or find there are missing or damaged parts we guarantee you complete satisf...

Page 3: ...DO NOT wear robes or other clothing that could become caught in the machine Running or aerobic shoes are also required when using the machine 7 Use the machine only for its intended use as described...

Page 4: ...HARDWARE PACK 3...

Page 5: ...HARDWARE PACK 4...

Page 6: ...ashers 58 and two M10 Aircraft Nuts 56 Repeat the same procedure to install the other side B Attach the Backrest Flat Base 11 to the Cross Brace 3 Secure it with one M10 x 3 Allen Bolt 50 two Washers...

Page 7: ...nt Stabilizer 5 to the front of the Main Seat Support Secure them with one M10 x 2 Carriage Bolt 47 from the top two M10 x 2 Carriage Bolts 46 on the side three Washers 58 and three M10 Aircraft Nuts...

Page 8: ...Backrest Board 20 onto the Backrest Supports Secure it with four M6 x 1 3 8 Hex Bolts 53 and Washers 60 D Push two Bushings 44 into the bottom of Backrest Incline Support 10 and attach it to the brack...

Page 9: ...Arm Curl Pad 21 to the Arm Curl Stand 18 Secure it with two M8 x 5 8 Allen Bolts 51 and 5 8 Washers 59 Insert the Arm Curl Stand into the open storage post on the Left Stabilizer when not doing Arm C...

Page 10: ...9...

Page 11: ...26 3 L shaped Pin 2 27 4 L shaped Pin 1 28 2 3 8 Axle Bushing 2 29 Rubber Bumper 2 30 Foam Roll 6 31 Foam Roll End Cap 6 32 2 Sleeve 2 33 1 x 2 3 8 End Cap 2 34 2 x 2 End Cap 6 35 1 Cone shaped End Ca...

Page 12: ...or other damages with respect to any economic loss loss of property loss of revenues or profits loss of enjoyments or use costs of removal installation or other consequential damages or whatsoever na...

Reviews: