background image

16


OPERATING YOUR 

SMARTSCOOT™ 


SmartScoot™


was designed to make everyday mobility 

easy. However, there are still certain risks that users 
should be aware of when operating a 

SmartScoot™ such 

as injury from loss of control, tipping over, collisions or 
falls. It is your responsibility to learn how to safely ride the 
Smar

tScoot™


to potentially reduce these risks. Our 

website and support materials outline the potential 
hazards of driving the 

SmartScoot™.  Prior to riding the 

SmartScoot™ take time to read and understand all 
support materials including this Users Instruction Manual 
which contains safety instructions. 

Any questions 

regarding any information contained in this Manual, 
our website, any support materials or any other 
general questions should be sent in writing to 
[email protected] or called in to our customer 
service representatives at (855) 726-6866 (855-
SCOOT66).


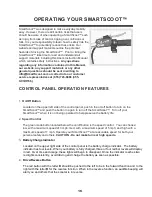
CONTROL PANEL OPERATION FEATURES


1.  

On/Off Button


Located on the upper left side of the control panel, push in the on/off button to turn on the 
SmartScoot™


and push the button in again to turn off the 

SmartScoot™.  Turn off your 

SmartScoot™


when it is not being operated to help preserve the battery life.


2.  

Speed Control


The green mode button located below the on/off button is the speed control.  You can choose: 
low, with a maximum speed of 3 mph; med, with a maximum speed of 5 mph; and high with a 
maximum speed of 7 mph. Operate your 

SmartScoot™


at a reasonable speed for both your 

personal safety and others. 

CAUTION - Do not make turns at high speeds.


3.  

Battery Charge Indicator


Located on the upper right side of the control panel is the battery charge indicator.  The battery 
indicator has four levels. When your battery is fully charged, three or four red bar levels will display 
in red.  Over time and usage, these lights will begin to disappear. Once the indicator reaches two 
red lights consistently, avoid driving and charge the battery as soon as possible. 


4.  

Drive/Reverse Button


The red button with the letter 

should be pushed to the left to be in the forward function and to the 

right with the letter 

for the reverse function. When in the reverse function, an audible beeping will 

alert you and others that the scooter is in reverse. 


Summary of Contents for SmartScoot

Page 1: ...USERS INSTRUCTION MANUAL Version 1 8 IMP HOLDINGS LLC WWW SMARTSCOOT COM...

Page 2: ...our customer service representatives at 855 726 6866 855 SCOOT66 DISCLAIMER ENSURE THAT THE PRODUCT IS RIGHT FOR YOU A mobility scooter is not a toy It is an electrically powered scooter and failure...

Page 3: ...rmation contained in this Manual or other questions in general should be sent in writing to info SmartScoot com or called in to our customer service representatives at 855 726 6866 855 SCOOT66 CONTENT...

Page 4: ...Do not mount or dismount the SmartScoot unless it is resting at a complete stop parking brake engaged and is turned off Comply with all local laws and regulations while operating the SmartScoot Check...

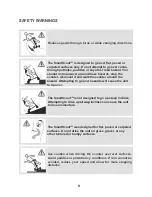
Page 5: ...round the hazard Attempting to go over hazards will cause the unit to tip over The SmartScoot is not designed to go up steep inclines Attempting to drive up steep inclines can cause the unit to lose m...

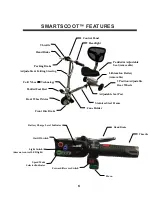
Page 6: ...olding Steering Column Fold N Lock Technology Padded Foot Rest Front Disc Brake Stainless Steel Frame Front Wheel Motor Cane Holder Hand Brake Parking Brake Throttle Headlight Control Panel Hand Brake...

Page 7: ...carefully packaged to ensure that the SmartScoot arrives in perfect condition 1 Using scissors carefully cut the white wire ties from the product CAUTION Do not cut the black wire ties These are used...

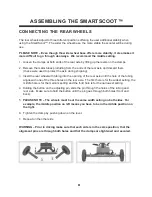
Page 8: ...tubing into the opening of the rear axle until the hole of the tubing aligns with one of the three holes on the rear axle The first hole is for the widest setting the middle hole is for the medium se...

Page 9: ...in from the post To remove the pin continually press down the small knob on the end of the pin until the pin is removed completely from the system See Figure 2 3 Insert the seat into the attached seat...

Page 10: ...enclosed Allen wrench 2 Sitting on the scooter place your right hand on the throttle 3 Next lift the hand brake to a comfortable position on the handlebars The recommended position is just below level...

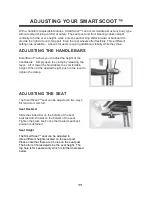
Page 11: ...t the height of the handlebars Simply open the clamp by releasing the lever Lift or lower the handlebars to a comfortable height When at the desired height push in the lever to tighten the clamp ADJUS...

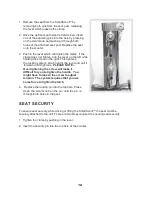
Page 12: ...he locking system Grab hold of the lever and pull it forward until it tightens PLEASE NOTE Over tightening the screw will make it difficult for you to tighten the handle You might have to loosen the s...

Page 13: ...he axle represent the narrowest position of the wheels The wheelbase gets longer as you move towards the outer two holes PLEASE NOTE Once you have determined the position of the wheels it must be the...

Page 14: ...ch and clamp With one hand on the steering column use one finger from your opposite hand to slide the latch sideways until the steering column releases 3 Do NOT attempt to lift the scooter by the stee...

Page 15: ...easily into as many as three lighter pieces The heaviest piece weighs only 27 pounds and even better no tools are required to disassemble the scooter Users can choose to remove just the seat or both...

Page 16: ...turn on the SmartScoot and push the button in again to turn off the SmartScoot Turn off your SmartScoot when it is not being operated to help preserve the battery life 2 Speed Control The green mode...

Page 17: ...erated with the right hand To slow or come to a complete stop release the throttle and squeeze the brake inward 8 Parking brake The parking brake is a small black lever located above the far left hand...

Page 18: ...it in the lowest speed 4 Learn to use the throttle and brake With your right hand apply pressure to the hand brake Releasing the hand brake slowly turn the handle throttle and move the scooter forward...

Page 19: ...f an elevator While in reverse limit turns or changes in directions 7 Avoid steep inclines and hills The SmartScoot is not designed to be driven up steep inclines or hills However the SmartScoot shoul...

Page 20: ...surfaces Occasionally you may find yourself negotiating a curve or corner too fast and the inner rear wheel starts to lift off the ground If this happens immediately reduce your speed lessen the stee...

Page 21: ...coot and walk the product either up or down the incline Go very slowly while driving down a ramp In fact you can drive down the ramp in neutral without using the throttle Keep your hand on the disc br...

Page 22: ...erally permitted to use the SmartScoot inside of buildings airports shopping malls stores theaters etc Doors can be a challenge when using the SmartScoot We recommend when using the SmartScoot indoors...

Page 23: ...ooter and you should confirm that the scooter will be brought up to you on the jetway upon your arrival at your destination Passengers with mobility devices are usually asked to board the airplane fir...

Page 24: ...of the metal handlebars Place the basket on the left side of the handlebars and slide towards the middle 3 Use fastening screws to secure the basket to the handlebars 4 Collapse the basket by folding...

Page 25: ...ger or the spare charger from SmartScoot Use of any other chargers may damage the battery and will void the warranty Your SmartScoot battery can be charged connected to the SmartScoot or disconnected...

Page 26: ...as directed in this Manual HOW TO INTERPRET THE BATTERY INDICATOR LIGHTS ON THE CONTROL PANEL The battery indicator has four levels indicated by red lights When your battery is fully charged there wi...

Page 27: ...losion fire or shock Do not heat open puncture mutilate expose to water rain moisture or dispose of the battery in fire Do not leave the battery in direct sunlight for an extended period of time or le...

Page 28: ...earance Battery Battery Certification Battery Charger Battery Charging Time Frame Materials Brakes Drive Details 39 H x 38 L x 22 W 30 5 H x 38 L x 22 W 17 H x 38 L x 22 W 39 5lbs Heaviest part 27 lbs...

Page 29: ...horized repairs alterations modifications failure to follow instructions in the User s Instruction Manual and battery Operating Instruction or other causes that are not defects in materials and workma...

Page 30: ...y heard as a class action private attorney general action or in any other proceeding in which either party acts or proposes to act in a representative capacity If any provision herein is found to be i...

Page 31: ...atch down through the notch and clamp With one hand on the steering column use one finger from your opposite hand to slide the latch sideways until the steering column releases 2 Use a 6mm Allen wrenc...

Page 32: ...the nut 10mm and using a 3mm Allen wrench turning the screw very slightly clockwise Note very small adjustments 1 8 to turns should be made so that you do not provide too much braking pressure Spinnin...

Page 33: ...releasing it 2 Check to see if there is a speed indicated on the speed control If there is no speed indicated choose a speed by pressing the green mode button COMMENTS ON THE BATTERY Your SmartScoot c...

Reviews: