Immergas 3.025780 Instruction Booklet And Warning Download Page 27

1

2

3

3

3

4

5

6

7

6 8

9

A

10

11

12

12

24

A

B

A
C

25

27

INS

TALLER

US

ER

MAINTEN

AN

CE TECHNI

CI

AN

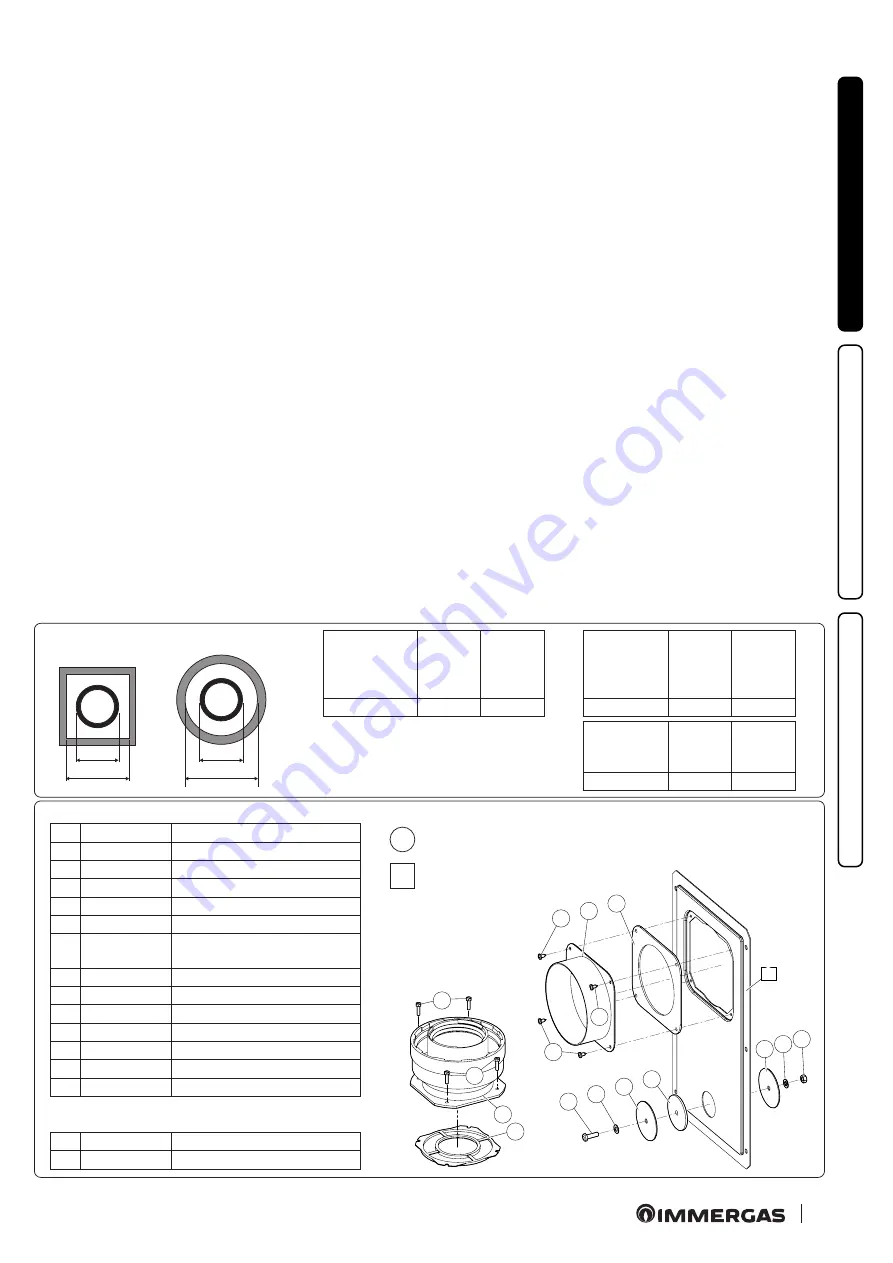
1.17 ADAPTOR C9 KIT INSTALLATION.

This kit allows an Immergas boiler to be installed in “C

93

” config-

uration, with combustion air intake directly from the shaft where 

the flue gas exhaust is, obtained by means of a ducting system.

System composition.

The system must be combined with the following components 

(sold separately) to be functional and complete:

- kit C

93

 Ø 100 or Ø125 version;

- rigid ducting Ø 60 and Ø 80 and flexible Ø 50 and Ø 80 kit;
- flue exhaust kit Ø 60/100 or Ø 80/125 configured according to 

the installation and type of boiler.

Kit Assembly.

- Mount the components of kit “C9” on the door (A) of the ducting 

system (Fig. 25).

- (Version Ø 125 only) mount the flanged adaptor (11) interposing 

the concentric gasket (10) on the boiler, fitting it with the screws 

(12).

- Mount the ducting system as described in the relative instruc-

tions fiche.

- Calculate the distances between the boiler drain and the bend 

of the ducting system.

- Prepare the boiler flue system, making sure that the internal pipe 

of the concentric kit is fitted up to the end stop in the ducting 

system curve (Quota “X” Fig. 26), whereas the external pipe must 

reach the end stop of the adapter (1).

 N.B.:

 to encourage the removal of possible condensate forming 

in the exhaust pipe, tilt the pipes towards the boiler with a min-

imum slope of 1.5%.

- Mount the cover (A) complete with adaptor (1) and caps (6) on 

the wall and assemble the flue system to the ducting system.

N.B.:

 (version Ø 125 only) before assembly check the gaskets are 

in the right position. In the event component lubrication (already 

carried out by the manufacturer) is not sufficient, remove the 

residual lubricant using a dry cloth, then to ease fitting coat the 

parts with common or industrial talc.
Once all components have been assembled properly, the exhaust 

fumes will be expelled via the ducting system; the combustion 

air for normal boiler operation will be aspirated directly by the 

shaft (Fig. 26).

Kit composition:

Ref.

Qty

Description

1

1

Door adaptor Ø 100 or Ø 125

2

1

Door gasket made of neoprene

3

4

Screws 4.2 x 9 AF

4

1

Hex headed screw M6 x 20

5

1

Flat nylon washer M6

6

2

Door hole closure metal-sheet 

plate plug

7

1

Plug gasket made of neoprene

8

1

Toothed washer M6

9

1

Nut M6

10 1 (kit 80/125) Concentric gasket Ø 60-100
11 1 (kit 80/125) Flanged adapter Ø 80-125)
12

4 (kit80/125) Hex headed screws M4 x 16 slotted

-

1 (kit 80/125) Bag of lubricating talc

Installation drawings key:

Unique identification of the component in 

the kit
Identification of the component not supplied 

in this kit

1

A

Supplied separately:

Ref.

Qty

Description

A

1

Ducting kit door

Rigid Ø 80 

ducting  

(A) mm

SHAFT

(B) mm

SHAFT

(C) mm

86

126

146

Flexible Ø 80 

ducting  

(A) mm

SHAFT

(B) mm

SHAFT

(C) mm

90

130

150

Ducting  

Ø 60 Rigid and  

Ø 50 Flexible  

(A) mm

SHAFT

(B) mm

SHAFT

(C) mm

66

106

126

Summary of Contents for 3.025780

Page 1: ...VICTRIX EXA 24 X 1 ERP IE Instruction booklet and warning Installer User Maintenance Technician 1 041695ENG...

Page 2: ...2...

Page 3: ...nd maintenance instructions 38 2 1 General warnings 38 2 2 Cleaning and maintenance 40 2 3 Control panel 40 2 4 Using the boiler 41 2 5 Troubleshooting 42 2 6 Information menu 44 2 7 Boiler shutdown 4...

Page 4: ...ovide important safety indications for installation use and maintenance stages In compliance with the legislation in force the systems must be designed by qualified professionals within the dimensiona...

Page 5: ...hazards HOT SURFACES The symbol indicates the appliance s very hot components that can cause burns SHARP SURFACES The symbol indicates the appliance s components or parts that can cause cuts if touche...

Page 6: ...boiler if installed using the relevant terminal for air intake directly from the room in which the boiler has been installed Type C boiler if installed using concentric pipes or other types of pipes e...

Page 7: ...ected area is one in which the boiler is not exposed to the direct ac tion of the weather rain snow hail etc This type of installation is only possible when permittedbythelawsinforceintheappliance s c...

Page 8: ...in after a few minutes operation check that this no lon ger occurs This means that the drain trap is filled with condensate to the correct level preventing the passage of flue gas ATTENTION type B ope...

Page 9: ...ON DISTANCES Key V Electrical connection G Gas supply RU Storage tank unit return optional MU Storage tank unit flow optional RR System filling SC Condensate drain minimum internal diameter 13 mm R Sy...

Page 10: ...y using an accessory that is supplied on request antifreeze kit comprising two electric heating elements the relevant wir ing and a control thermostat carefully read the installation instructions cont...

Page 11: ...tream from the pipes connecting the system to the appliance according to the manufacturer s instructions The Immergas connection unit supplied as an optional kit also includes the gas cock whose insta...

Page 12: ...lead to the deposit of lime scale installation of the polyphosphate dispenser kit is recommended ATTENTION if the boiler is used for room central heating only without connecting an ex ternalstorageta...

Page 13: ...blemustbeconnect ed to a 230V 10 50Hz mains supply respecting L N polarity and earth con nection this network must also have a multi pole circuit breaker with class III overvoltage category in complia...

Page 14: ...o thermostats are connected with 2 wires only Carefully read the user and assembly instructions contained in the accessory kit ATTENTION disconnect power to the appliance be fore any electrical connec...

Page 15: ...l probe always operates when connected regardless of the presence or type of room chrono thermostat used and can work in combination with Immergas chrono thermostats The correlation between system flo...

Page 16: ...or allowed corresponds to the resistance encountered with the maximum allowed pipe length for each type of Terminal Kit This information allows calcula tions to be made to verify the possibility of se...

Page 17: ...80 125 3 0 1 4 Concentric bend 45 80 125 2 1 1 Terminal complete with concentric horizontal intake exhaust 80 125 2 8 1 3 Terminal complete with concentric vertical intake exhaust 80 125 3 6 1 7 90 co...

Page 18: ...60 100 Intake and Exhaust 16 3 m 2 5 Intake m 18 7 Exhaust m 4 9 m 7 7 Exhaust m 13 6 Concentric vertical intake exhaust terminal 60 100 Intake and Exhaust 9 m 1 4 Intake m 10 3 Exhaust m 2 7 m 4 3 Ex...

Page 19: ...boiler taking care to insert the gasket supplied with the kit and tighten by means of the screws provided Install the upper cover fixing it using the 4 screws present in the kit positioning the releva...

Page 20: ...cover kit includes N 1 Thermoformed cover N 1 Gasket clamping plate N 1 Gasket N 1 Gasket tightening strap N 1 Intake hole covering plate The terminal kit includes N 1 Gasket N 1 Discharge flange 80 N...

Page 21: ...oiler flange and tighten using the screws present in the kit Fit the 60 100 3 concentric terminal pipe with the male side smooth to the female side of the bend 2 up to the end stop making sure that th...

Page 22: ...centric terminal 60 100 3 N 1 Internal wall sealing plate 4 N 1 External wall sealing plate 5 The adaptor kit includes N 1 Gasket 1 N 1 Adaptor 80 125 2 The Kit 80 125 includes N 1 Concentric bend 80...

Page 23: ...eached a special anti freeze kit is available that can be installed as an alternative to the standard kit Extensions for vertical kit 60 100 Fig 18 The kit with this configuration can be extended to a...

Page 24: ...ate 3 N 1 Aluminium tile 4 N 1 Int exhaust concentric pipe 60 100 5 N 1 Fixed half shell 6 N 1 Mobile half shell 7 The adaptor kit includes N 1 Gasket 1 N 1 Adaptor 80 125 2 The Kit 80 125 includes N...

Page 25: ...screws Fit the male side smooth to the bends 5 in the female side of the flanges 3 and 4 Fit the intake terminal 6 with the male side smooth in the female side of the bend 5 up to the end stop ensuri...

Page 26: ...asket 2 N 1 Female intake flange 3 N 1 Female drain flange 4 N 2 Bend 90 80 5 N 1 Intake terminal 80 6 N 2 Internal wall sealing plates 7 N 1 External wall sealing plate 8 N 1 Drain pipe 80 9 to compl...

Page 27: ...the pipes towards the boiler with a min imum slope of 1 5 Mount the cover A complete with adaptor 1 and caps 6 on the wall and assemble the flue system to the ducting system N B version 125 only befo...

Page 28: ...00 1 90 ducted bend 60 and the roof terminal for ducting To determine the C93 flue system in configurations other than that described Fig 26 one must consider that 1 metre of ducted pipeaccordingtothe...

Page 29: ...verage atmospheric and environmental conditions according to current regulations absence of combustion prod ucts dusts or gases that can alter the normal thermophysical or chemical conditions existenc...

Page 30: ...nditions established by the regulations in force have been verified 1 21 FLUES CHIMNEYS CHIMNEY POTS AND TERMINALS The flues chimneys and chimney pots for the evacuation of com bustion products must b...

Page 31: ...ntion time check activation of the main switch located upstream from the boiler and in the boiler check that the intake and or exhaust terminals if fitted are not blocked The boiler must not be starte...

Page 32: ...event accidental modifications to lock the control panel it is necessary to press button 1 longer than 10 seconds during which the current configuration flashes the active lock is signalled by all LED...

Page 33: ...V3 Total head available to the system with pump at speed 3 V4 Total head available to the system with pump at speed 4 A2 Power absorbed by the pump at speed 2 A3 Power absorbed by the pump at speed 3...

Page 34: ...peration mode must be selected according to the following table Circulating pump LED Description G Y Y Y G Do not use G Y Y Y G Do not use G Y Y Y G Do not use G Y Y Y G Do not use G Y Y Y G Do not us...

Page 35: ...W Flow rate l h Flow rate l h Head kPa Head kPa Closed bypass Open bypass Key V1 Total head available to the system with pump at speed 1 V2 Total head available to the system with pump at speed 2 V3...

Page 36: ...penser reduces the formation of lime scale and preserves the originalheatexchangeanddomestichotwaterproductioncondi tions The boiler is prepared for application of the polyphosphate dispenser kit Rela...

Page 37: ...ensation module 12 System expansion vessel 13 Flue probe 14 Manual air vent valve 15 Sample points air A flue gas F 16 Negative signal pressure point 17 Positive signal pressure point 18 Heat exchange...

Page 38: ...qualified technician checks efficiency of the ducting or other devices Nevercleantheapplianceorconnectedparts with easily flammable substances Never leave containers or flammable sub stances in the s...

Page 39: ...ches plugs door bells telephones or intercom devices in the building call an authorised company ATTENTION if you smell burning or see smoke coming out of the appliance switch it off disconnect the pow...

Page 40: ...on button 5 Domestic hot water temperature selector 6 Central heating temperature selector 7 Boiler manometer 8 DHW production phase operating mode active 9 Boiler in block requiring unblock via RESET...

Page 41: ...appear on the display The boiler regulation parameters can be set via the CARV2 control panel and the reset button 3 remains active on the boiler control panel along with the switch off button 1 off...

Page 42: ...re switch fault Air flue gas pressure switch set point not reached with fan powered The boiler does not start 1 12 Storage tank probe anomaly optional If the board detects an anomaly on the boiler pro...

Page 43: ...ntinuous flame signal This occurs if the Flame signal loss error occurs many times in a row within a preset period 38 Press the Reset button before restarting the boiler will run a post ventilation cy...

Page 44: ...via the letter d plus the num ber of the parameter that is being displayed and the value of the parameter itself Id Parameter Description d1 Displays the flame signal uA x 10 approximate d2 Displays t...

Page 45: ...scharge the pressure from the circuit 2 11 ANTIFREEZE PROTECTION The boiler has an antifreeze function that switches the burner on automatically when the temperature falls below 4 C standard protectio...

Page 46: ...sulted for extraordinary maintenance contact the Authorised After Sales Service 3 2 INITIAL CHECK To commission the boiler ensure that the type of gas used corresponds to the boiler settings check con...

Page 47: ...rial that clog condensate passage also check that the entire condensate drain circuit is clear and efficient In the event of obstructions dirt sediment etc with con sequent leakage of condensate in th...

Page 48: ...ual air vent valve 17 Heat exchanger safety thermal fuse 18 Air sample point 19 p gas pressure point 20 Flue sample point 21 Fumes hood 22 Safety thermostat 23 Delivery probe 24 Ignition electrodes 25...

Page 49: ...lectrode E4 Safety thermostat E13 Heat exchanger safety thermofuse G2 Igniter M1 Boiler circulator pump M20 Fan M30 Three way valve R5 Domestic hot water temperature trimmer R6 Central heating tempera...

Page 50: ...in cap that there are no residues of material blocking the flow of condensate Noise due to air in the system Check opening of the special air vent valve cap Part 14 Fig 35 Make sure the system pressur...

Page 51: ...minimum DHW power output maximum DHW power output minimum central heating output maximum central heating output Ignition power 3 10 CO2 ADJUSTMENT Attention the CO2 verification operations must be ca...

Page 52: ...oten tiality to the effective heating demand of the house Therefore the boiler works normally in a variable gas pressure field between minimum and maximum power depending on the system heat load setti...

Page 53: ...fect the correct functioning of this boiler model 0 30 sec onds 0 P2 Pump function ing The pump can function in two ways 0intermittent in winter mode the circulator is managed by the room thermostat o...

Page 54: ...systems with motorised thermostatic valves etc it could be necessary to delay switch on with 10 step 0 600 sec onds 0 t3 Display lighting Establishes the display lighting mode 0Automatic the display l...

Page 55: ...domestic hot water central heating phase the boiler is equipped with a function that starts the three way motorised group 24 hours after it was last in operation running it for a full cycle so as to...

Page 56: ...e the grid 1 Front panel Fig 41 3 Remove the cover caps 3 and loosen the screws 4 4 Tilt the control panel 5 towards you Casing Fig 42 5 Remove the screws 6 that lock the front casing 7 and the two si...

Page 57: ...WER BURNER GAS FLOW RATE PRESS BURNER NOZZLES BURNER GAS FLOW RATE PRESS BURNER NOZZLES kW kcal h m3 h mbar mm H2 O kg h g s mbar mm H2 O MAX 23 7 20382 2 56 2 29 23 4 1 88 0 52 2 88 29 4 MIN 5 5 4730...

Page 58: ...Central heating circuit max operating pressure bar MPa 3 0 0 3 Maximum heating temperature C 90 Adjustable central heating temperature max operation field C 20 85 System expansion vessel total volume...

Page 59: ...Number CHK Check Code PIN PIN code Type Type of installation ref CEN TR 1749 Qnw min Minimum DHW heat input Qn min Central heating minimum heat input Qnw max DHW maximum heat input Qn max Central heat...

Page 60: ...t nominal heat output in high temper ature mode 4 88 4 At 30 of nominal heat output in a low temperature mode P1 7 8 kW At 30 of nominal heat output in a low temperature mode 1 97 0 Auxiliary electric...

Page 61: ...sumption for the domestic hot water function AEC Annual fuel consumption for the domestic hot water function AFC Seasonal space heating energy efficiency s 92 Water heating energy efficiency wh For pr...

Page 62: ...m the heat pump board Solar contribution and supplementary heat pump Select the lowest value Boiler and supplementary heat pump installed with low temperature heat emitters at 35 C From the board of t...

Page 63: ...ot reflect the actual energy efficiency after installation since such efficiency is affected by additional factors such as the heat loss in the distribution system and the size of the products compare...

Page 64: ...ad profile Solar contribution From the board of the solar device 1 I 2 1 1 x I 10 x II III I Auxiliary electricity 3 G F E D C B A A A A 27 27 27 28 27 27 27 28 30 30 30 32 33 34 35 36 36 37 38 40 39...

Page 65: ...ate conditions Colder 0 2 x Hotter 0 4 x Stated load profile Solar contribution From the board of the solar device 1 _____ 2 1 1 x _____ 10 x _____ ____ ______ Auxiliary electricity 3 G F E D C B A A...

Page 66: ...66...

Page 67: ...67...

Page 68: ...Fax 0522 680617 IMMERGAS SPA ITALY CERTIFIED COMPANY UNI EN ISO 9001 2015 Design manufacture and post sale assistance of gas boilers gas water heaters and related accessories This instruction booklet...

Reviews: