background image

9

Additional Functions

9.1 Switching off the IR receiver

To protect the spotlight against inadvertent opera-
tion via the infrared remote control, switch off the
infrared receiver:

1) Call up the menu item 

.

The display will indicate the current setting: 

: IR reception switched on 
: IR reception switched off

2) Use the button UP or DOWN to select the option

desired, and then press the button ENTER to
save your selection. 

Note:

Irrespective of this setting, infrared reception will

always be blocked during the DMX mode. 

9.2 Showing the firmware version

To show the version number of the firmware (oper-
ating software of the unit): 

1) Call up the menu item 

(

ver

sion). The ver-

sion number will appear on the display for a few
seconds. Then it will disappear again.

2) Use the control buttons to go back to the operat-

ing mode desired.

10 Specifications

Control protocol:   . . . . . . . DMX 512

Number of 
DMX channels:   . . . . . . . . 1, 4, 5 or 8

Light source:  . . . . . . . . . . 12 × 8 W RGBW LEDs 

Beam angle:   . . . . . . . . . . 25°

Ambient temperature:   . . . 0 – 40 °C

Power supply:  . . . . . . . . . 230 V~ / 50 Hz

Power consumption:  . . . . 100 VA max. 

Dimensions: . . . . . . . . . . . 265 × 190 × 130 mm

Weight:  . . . . . . . . . . . . . . 2.1 kg

17

GB

Summary of Contents for PARL-12RGBW

Page 1: ...ONICS FOR SPECIALISTS PARL 12RGBW Bestellnummer 38 6890 BEDIENUNGSANLEITUNG INSTRUCTION MANUAL MODE D EMPLOI ISTRUZIONI PER L USO GEBRUIKSAANWIJZING MANUAL DE INSTRUCCIONES INSTRUKCJA OBSŁUGI SIKKERHEDSOPLYSNINGER SÄKERHETSFÖRESKRIFTER TURVALLISUUDESTA DMX LED Scheinwerfer DMX LED Spotlight ...

Page 2: ...n inadap tée Conservez la notice pour pouvoir vous y reporter ultérieurement La version française se trouve page 20 Prima di accendere Vi auguriamo buon divertimento con il vostro nuovo apparecchio di img Stage Line Leggete attentamente le istruzioni prima di mettere in fun zione lʼapparecchio Solo così potete conoscere tutte le funzionalità evitare comandi sbagliati e proteggere voi stessi e lʼap...

Page 3: ...3 5 6 7 8 5 9 10 1 2 3 4 ...

Page 4: ...ignal Eingang 3 pol XLR zum An schluss eines Lichtsteuergerätes Pin 1 Masse 2 DMX 3 DMX 5 Feststellschrauben für die Montagebügel 6 Mikrofon zur Musiksteuerung 7 Bedientasten Taste MENU zum Verlassen eines Untermenüs Tasten UP und DOWN zur Wahl eines Menü punktes und zum Ändern einer Einstellung Taste ENTER zum Aufruf des Menüpunktes für den Weitersprung zum nächsten Parameter und zum Speichern ei...

Page 5: ...ren Mischfarben Außerdem sind Farb überblendungen und Stroboskop Effekte möglich Der Scheinwerfer ist für die Steuerung über ein DMX Lichtsteuergerät ausgelegt 1 4 5 oder 8 DMX Steuerkanäle wählbar Er kann aber auch allein oder im Verbund mehrerer PARL 12RGBW Master Slave Modus betrieben werden Dabei kann der Scheinwerfer bequem über die mitgelie ferte Infrarotfernbedienung bedient werden Zu sätzl...

Page 6: ...unktionen der Fernbedienung sind in Kapitel 1 1 aufgeführt Gegen unbeabsichtigte Bedienung lässt sich der Infrarot Empfang über das Menü des Scheinwerfers ausschalten Kap 9 1 3 Lässt die Reichweite der Fernbedienung nach die Batterien auswechseln Dazu auf der Rück seite der Fernbedienung den kleinen Riegel mit der Kerbe nach rechts drücken und gleichzeitig den Batteriehalter herausziehen Batterieh...

Page 7: ...ER speichern 3 Wenn gewünscht die Einstellung des Strobo skopeffekts ändern Mit der Taste UP oder DOWN die Blitzfrequenz zwischen Dauer licht und ca 10 Hz einstellen und mit der Taste ENTER speichern 7 2 Automatisch ablaufende Programme Zwei Programme können ausgewählt werden AUTO 1 Farbfolge mit Überblendungen AUTO 2 Farbfolge ohne Überblendungen 1 Das gewünschte Programm mit der Fernbedie nung T...

Page 8: ...geschlossen sind 3 Um Störungen bei der Signalübertragung aus zuschließen sollte bei langen Leitungen bzw bei einer Vielzahl von hintereinandergeschalte ten Geräten der DMX Ausgang des letzten DMX Gerätes der Kette mit einem 120 Ω Widerstand 0 3 W abgeschlossen werden In die DMX Ausgangsbuchse einen entspre chenden Abschlussstecker z B DLT 123 von img Stage Line stecken 8 2 Anzahl der DMX Kanäle e...

Page 9: ...nschte Option wählen und zum Speichern die Taste ENTER drücken Hinweis Unabhängig von dieser Einstellung ist der Infra rot Empfang während des DMX Betriebs immer blockiert 9 2 Anzeige der Firmware Version Um die Versionsnummer der Firmware Betriebs software des Gerätes anzuzeigen 1 Den Menüpunkt version aufrufen Das Display zeigt für einige Sekunden die Versions nummer an Danach erlischt es 2 Mit ...

Page 10: ...40 244 Farbe 49 245 249 Farbe 50 250 255 Farbe 51 DMX Wert Funktion Kanal 1 Dimmer 0 255 Gesamthelligkeit Kanal 2 Rot Anteil 0 255 Helligkeit Rot Kanal 3 Grün Anteil 0 255 Helligkeit Grün Kanal 4 Blau Anteil 0 255 Helligkeit Blau Kanal 5 Weiß Anteil 0 255 Helligkeit Weiß Kanal 6 Automatische Programme Musiksteuerung 0 50 Einstellung über die Kanäle 1 5 51 101 Programm AUTO 1 102 152 Programm AUTO ...

Page 11: ...Kanäle 5 Kanäle 4 Kanäle 1 Kanal Infrarot Empfang ein aus Firmware Version Farbstrahlerbetrieb mit vorgegebenen Farben Farbe Colour Co01 Co51 Stroboskop Blitzfrequenz St01 St99 Farbstrahlerbetrieb Helligkeit Rot Helligkeit Grün Helligkeit Blau Helligkeit Weiß Stroboskop Blitzfrequenz St01 St99 Automatikbetrieb Modus Aut1 2 Geschwindigkeit Speed SP 1 SP 9 Stroboskop Blitzfrequenz St01 St99 Musikste...

Page 12: ...e same type 3 Mounting brackets 4 DMX signal input 3 poles XLR to connect a light controller pin 1 ground 2 DMX 3 DMX 5 Setscrews for the mounting brackets 6 Microphone for music control 7 Control buttons Button MENU to exit a submenu Buttons UP and DOWN to select a menu item and to change a setting Button ENTER to call up a menu item to go to the next parameter and to save a setting 8 Display 9 M...

Page 13: ...oured light created from additive colour mix ing Crossfading from one colour to another and stroboscope effects are also supported The spotlight is designed for control by means of a DMX light controller 1 4 5 or 8 DMX channels available but may also be operated on its own or in combination with multiple spotlights PARL 12RGBW master slave mode The spotlight can be conveniently controlled by means...

Page 14: ...tion switch off infrared reception via the menu of the spotlight chapter 9 1 3 If the range of the remote control decreases replace the batteries On the rear side of the remote control push the small latch with the groove to the right and pull out the battery sup port at the same time Pulling out the battery support Two 1 5 V button cells of the type LR54 are required Observe the right polarity wh...

Page 15: ...light and approx 10 Hz and then press the button ENTER to save the setting 7 2 Automatic programs Two programs are available AUTO 1 colour sequence with crossfading AUTO 2 colour sequence without crossfading 1 On the remote control press the appropriate button AUTO 1 or AUTO 2 to switch on the pro gram desired Alternatively on the menu of the spotlight call up the menu item and press the button EN...

Page 16: ...t number of units connected in series terminate the DMX output of the last DMX unit in the chain with a 120 Ω resistor 0 3 W Connect an appropriate ter minating plug e g DLT 123 from img Stage Line to the DMX output jack 8 2 Setting the number of DMX channels To operate the PARL 12RGBW by means of a light controller set the DMX start address chapter 8 3 and the number of DMX channels The number of...

Page 17: ...e of this setting infrared reception will always be blocked during the DMX mode 9 2 Showing the firmware version To show the version number of the firmware oper ating software of the unit 1 Call up the menu item version The ver sion number will appear on the display for a few seconds Then it will disappear again 2 Use the control buttons to go back to the operat ing mode desired 10 Specifications ...

Page 18: ...55 brightness blue Channel 5 white component 0 255 brightness white DMX value Function Channel 1 red component 0 255 brightness red Channel 2 green component 0 255 brightness green Channel 3 blue component 0 255 brightness blue Channel 4 white component 0 255 brightness white DMX value Function 0 4 Colour 1 red 5 9 Colour 2 green 10 14 Colour 3 blue 15 19 Colour 4 20 24 Colour 5 25 29 Colour 6 30 ...

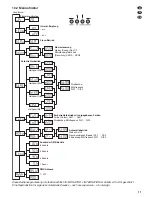
Page 19: ...nnels 4 channels 1 channel Infrared reception on off Firmware version Colour spotlight mode with predefined colours Colour Colour Co01 Co51 Stroboscope flash frequency St01 St99 Colour spotlight mode brightness red brightness green brightness blue brightness white Stroboscope flash frequency St01 St99 Automatic mode Mode Aut1 2 Speed Speed SP 1 SP 9 Stroboscope flash frequency St01 St99 Music cont...

Page 20: ... de montage 4 Entrée signal DMX XLR 3 pôles pour brancher un contrôleur Pin 1 masse 2 DMX 3 DMX 5 Vis de fixation pour les étriers de montage 6 Microphone pour une gestion par la musique 7 Touches de commande Touche MENU pour quitter un sous menu Touches UP et DOWN pour sélectionner un point du menu et modifier un réglage Touche ENTER pour appeler un point du menu pour aller au paramètre suivant e...

Page 21: ...il possède 12 LEDs RGBW 8 W très claires Avec les LEDs on peut diffuser une lumière de couleur dans les trois couleurs pri maires rouge vert et bleu et blanc ainsi que les couleurs de mixage De plus des transitions de couleurs et des effets stroboscope sont possibles Le projecteur est conçu pour une gestion via un contrôleur DMX au choix 1 4 5 ou 8 canaux DMX Il peut également fonctionner seul ou ...

Page 22: ...rarouge pour éviter toute utili sation non voulue chapitre 9 1 3 Si la portée de la télécommande diminue chan gez les batteries Pour ce faire poussez sur la droite le petit levier sur la face arrière de la télé commande et simultanément retirez le support de batterie Retirer les batteries Deux piles bouton 1 5 V de type LR54 sont nécessaires Veillez à respecter la polarité repère et dans le suppor...

Page 23: ...e de lʼeffet strobo scope avec la touche UP ou DOWN réglez la fréquence des éclairs entre lumière conti nue et 10 Hz environ et mémorisez avec la touche ENTER 7 2 Programmes à défilement automatique Vous pouvez sélectionner deux programmes AUTO 1 suite de couleurs avec transition AUTO 2 suite de couleurs sans transition 1 Activez le programme voulu avec la télécom mande touche AUTO 1 ou AUTO 2 A l...

Page 24: ...âbles ou pour une multitude dʼappareils branchés les uns derrière les autres de terminer la sortie DMX du dernier appareil DMX de la chaîne avec une résistance 120 Ω 0 3 W mettez un bou chon par exemple DLT 123 de img Stage Line dans la prise de sortie DMX 8 2 Réglage du nombre de canaux DMX Pour pouvoir utiliser le PARL 12RGBW avec un contrôleur il faut régler l adresse de démarrage DMX chapitre ...

Page 25: ...ception infrarouge est bloquée pendant le fonctionnement DMX 9 2 Affichage de la version Firmware Pour afficher le numéro de version du Firmware software de fonctionnement de l appareil 1 Appelez le point de menu version Lʼaffi chage indique pendant quelques secondes la numéro de la version puis il sʼéteint 2 Avec les touches de commande revenez sur le mode de fonctionnement souhaité 10 Caractéris...

Page 26: ... 234 couleur 47 235 239 couleur 48 240 244 couleur 49 245 249 couleur 50 250 255 couleur 51 Valeur DMX Fonction Kanal 1 Dimmer 0 255 luminosité totale Canal 2 part de rouge 0 255 luminosité rouge Canal 3 part de vert 0 255 luminosité vert Canal 4 part de bleu 0 255 luminosité bleu Canal 5 part de blanc 0 255 luminosité blanc Canal 6 programmes automatiques gestion par la musique 0 50 réglages via ...

Page 27: ...aux 1 canal Réception infrarouge marche arrêt Version Firmware Mode projecteur de couleurs avec couleurs données Couleur Co01 Co51 Fréquence éclairs stroboscope St01 St99 Mode projecteur de couleurs luminosité rouge luminosité vert luminosité bleu luminosité blanc Fréquence éclairs stroboscope St01 St99 Mode automatique Mode Aut1 2 Vitesse Speed SP 1 SP 9 Fréquence éclairs stroboscope St01 St99 Ge...

Page 28: ...l collegamento di un unità di comando luce pin 1 massa 2 DMX 3 DMX 5 Viti di bloccaggio per le staffe di montaggio 6 Microfono per il comando tramite la musica 7 Tasti funzione Tasto MENU per uscire da un sottomenu Tasti UP e DOWN per selezionare una voce del menu e per modificare un impostazione Tasto ENTER per aprire una voce del menu per saltare al parametro successivo e per salvare un impostaz...

Page 29: ...lati Inoltre sono possibili delle dissolvenze cromatiche e effetti stro boscopici Il proiettore è previsto per il comando tramite un unità DMX di comando luce a scelta 1 4 5 o 8 canali di comando DMX Tuttavia può essere impiegato anche da solo oppure insieme a più PARL 12RGBW modo master slave In questo caso il proiettore può essere comandato comoda mente tramite il telecomando a infrarossi in dot...

Page 30: ...ore la ricezione infra rossa può essere disattivata per escludere dei comandi involontari Cap 9 1 3 Se la portata del telecomando si riduce occorre sostituire le batterie Per fare ciò spingere verso destra la piccola linguetta sul retro del teleco mando e contemporaneamente sfilare il porta batterie Sfilare il portabatterie Sono richieste due batterie bottone di 1 5 V del tipo LR54 Inserendo le ba...

Page 31: ...zione dell ef fetto stroboscopico Con il tasto UP or DOWN impostare la frequenza dei lampi fra luce continua e ca 10 Hz e salvare con il tasto ENTER 7 2 Programmi a svolgimento automatico Si possono scegliere due programmi AUTO 1 Sequenza di colori con dissolvenze AUTO 2 Sequenza di colori senza dissolvenze 1 Attivare il programma desiderato con il teleco mando tasto AUTO 1 o AUTO 2 In alternativa...

Page 32: ...nel caso di linee lunghe o di un gran numero di apparecchi collegati in serie l uscita DMX dell ultimo apparecchio DMX della catena dovrebbe essere terminata con una resi stenza di 120 Ω 0 3 W Inserire nella presa d uscita DMX un terminatore p es DLT 123 di img Stage Line 8 2 Impostare il numero dei canali DMX Per poter comandare il PARL 12RGBW con un unità di comando luce occorre impostare l indi...

Page 33: ... rice zione IR è sempre bloccata durante il funzionamento DMX 9 2 Visualizzazione della versione del firmware Per visualizzare il numero della versione del firm ware software operativo dell apparecchio 1 Aprire la voce version del menu Il display visualizza per alcuni secondi il numero della ver sione Quindi si spegne 2 Con i tasti funzione ritornare al modo desiderato del funzionamento 10 Dati te...

Page 34: ...9 245 249 Colore 50 250 255 Colore 51 Valore DMX Funzione Canale 1 Dimmer 0 255 Luminosità globale Canale 2 Componente rosso 0 255 Luminosità rosso Canale 3 Componente verde 0 255 Luminosità verde Canale 4 Componente blu 0 255 Luminosità blu Canale 5 Componente bianco 0 255 Luminosità bianco Canale 6 Programmi automatici comando tramite musica 0 50 Impostazione tramite i canali 1 5 51 101 Programm...

Page 35: ...4 canali 1 canal Ricezione infrarossi on off Versione firmware Funzionamento proiettore a colori con colori preimpostati Colore Co01 Co51 Frequenza lampi dello stroboscopio St01 St99 Funzionamento proiettore a colori Luminosità rosso Luminosità verde Luminosità blu Luminosità bianco Frequenza lampi dello stroboscopio St01 St99 Funzionamento automatico Modo Aut1 2 Velocità Speed SP 1 SP 9 Frequenza...

Page 36: ... type 3 Montagebeugel 4 DMX signaalingang 3 pol XLR voor het aan sluiten van een lichtregelaar pen 1 massa 2 DMX 3 DMX 5 Vastzetschroeven voor de montagebeugel 6 Microfoon voor muzieksturing 7 Bedieningstoetsen Toets MENU om een submenu te verlaten Toetsen UP en DOWN om een menu item te selecteren en een instelling te wijzigen Toets ENTER om het menu item op te roepen naar de volgende parameter te...

Page 37: ...n wit uitgestraald worden evenals in de mengkleuren ervan Bovendien zijn kleurovergangen en stroboscoopeffecten mogelijk De schijnwerper is ontworpen voor het besturen via een DMX lichtregelaar keuze uit 1 4 5 of 8 DMX besturingskanalen Hij kan echter ook auto noom of in verbinding met andere PARL 12RGBW apparaten master slavemodus gebruikt worden Daarbij kunt u de schijnwerper via de meegele verd...

Page 38: ...bediening vindt u terug in hoofdstuk 1 1 U kunt de infraroodontvangst via het menu van de schijnwerper tegen onbedoelde bediening uitschakelen hoofdstuk 9 1 3 Als de reikwijdte van de afstandsbediening afneemt moet u de batterijen vervangen Duw hiervoor aan de achterzijde van de afstandsbe diening de kleine grendel met de groef naar rechts en trek de batterijhouder er tegelijk uit Batterijhouder v...

Page 39: ...P of DOWN de gewenste kleur tot en sla op met de toets ENTER 3 Wijzig desgewenst de instelling van het strobos coopeffect Stel met de toets UP of DOWN de flitsfrequentie in tussen continu licht en ca 10 Hz en sla op met de toets ENTER 7 2 Automatisch lopende programmaʼs U hebt de keuze tussen twee programmaʼs AUTO 1 kleursequentie met overgangen AUTO 2 kleursequentie zonder overgangen 1 Schakel he...

Page 40: ...ngen bij de signaaloverdracht te vermij den moet u bij lange leidingen of bij een veel voud van aaneengesloten apparaten de DMX uitgang van het laatste DMX apparaat in de ketting afsluiten met een weerstand van 120 Ω 0 3 W Steek een geschikte afsluitstekker bv DLT 123 van img Stage Line in de DMX uitgangsbus 8 2 Aantal DMX kanalen instellen Om de schijnwerper met een lichtregelaar te kunnen bedien...

Page 41: ... de infra roodontvangst tijdens het DMX bedrijf steeds geblok keerd 9 2 De firmwareversie weergeven Om het versienummer van de firmware bedrijfs software van het apparaat weer te geven 1 Open het menu item versie Op het dis play wordt het versienummer enkele seconden weergegeven Daarna gaat het uit 2 Schakel met de bedieningstoetsen terug naar de gewenste bedrijfsmodus 10 Technische gegevens Bestu...

Page 42: ... 240 244 kleur 49 245 249 kleur 50 250 255 kleur 51 DMX waarde Functie Kanaal 1 Dimmer 0 255 totale helderheid Kanaal 2 Roodaandeel 0 255 Helderheid rood Kanaal 3 Groenaandeel 0 255 Helderheid groen Kanaal 4 Blauwaandeel 0 255 Helderheid blauw Kanaal 5 Witaandeel 0 255 Helderheid wit Kanaal 6 Automatische programmaʼs muzieksturing 0 50 Instelling via de kanalen 1 5 51 101 Programma AUTO 1 102 152 ...

Page 43: ...urenstralerbedrijf Helderheid rood Helderheid groen Helderheid blauw Helderheid wit Stroboscoop flitsfrequentie St01 St99 Automatische bediening Modus Aut1 2 Snelheid Speed SP 1 SP 9 Stroboscoop flitsfrequentie St01 St99 Muzieksturing Modus Sound Sou1 2 Microfoongevoeligheid Sensitivity SEN0 SEN9 Deze gebruiksaanwijzing is door de auteurswet beschermde eigendom van MONACOR INTERNATIONAL GmbH Co KG...

Page 44: ...es de montaje 4 Entrada de señal DMX 3 polos XLR para conectar a un juego de luces Pin 1 masa 2 DMX 3 DMX 5 Tornillos de cierre para los soportes de montaje 6 Micrófono para el control por música 7 Botones de control Botón MENU para salir de un submenú Botones UP y DOWN para seleccionar un objeto del menú y para cambiar un ajuste Botón ENTER para activar un objeto de menú para ir al siguiente pará...

Page 45: ...artir de la mezcla de los colores También se pue den hacer fundidos de un color a otro y efectos estroboscópicos El proyector está diseñado para controlarse mediante un controlador DMX 1 4 5 u 8 canales DMX disponibles pero también puede funcionar por sí mismo o en combinación con varios proyec tores PARL 12RGBW modo Master Slave El proyector se puede controlar según convenga mediante el control r...

Page 46: ...el proyector contra el funciona miento involuntario desconecte la recepción IR mediante el menú del proyector apartado 9 1 3 Si el rango del control remoto disminuye cam bie las baterías En la parte posterior del control remoto presione la pequeña pestaña con la ranura hacia la derecha y al mismo tiempo tire del soporte de la batería Tirar del soporte de la batería Se necesitan dos pilas botón de ...

Page 47: ...DOWN para seleccionar el color deseado a y luego pulse ENTER para guardar su selección 3 Si lo desea cambie el ajuste del efecto de estro boscopio Utilice el botón UP o DOWN para ajustar la frecuencia de destellos entre luz permanente y 10 Hz aprox y luego pulse el botón ENTER para guardar el ajuste 7 2 Programas automáticos Hay dos programas disponibles AUTO 1 secuencia de colores con fundidos AU...

Page 48: ...cte la entrada DMX IN 4 a la salida DMX del controlador 2 Conecte la salida DMX OUT 10 a la entrada DMX del siguiente aparato DMX Conecte la salida del segundo aparato DMX a la entrada del siguiente aparato etc hasta que todos los aparatos controlados por DMX estén conecta dos en cadena 3 Para prevenir interferencias en la señal de transmisión En cableados largos o para un gran número de aparatos ...

Page 49: ...conectada Recepción IR desconectada 2 Utilice el botón UP o DOWN para seleccionar la opción deseada y luego pulse el botón ENTER para guardar su selección Nota Independientemente de este ajuste la recepción IR siempre se bloqueará durante el modo DMX 9 2 Mostrar la versión del firmware Para indicar el número de la versión de firmware software de funcionamiento del aparato 1 Active el objeto de men...

Page 50: ...lor 50 250 255 Color 51 Valor DMX Función Canal 1 dimmer 0 255 Brillo total Canal 2 componente rojo 0 255 Brillo del rojo Canal 3 componente verde 0 255 Brillo del verde Canal 4 componente azul 0 255 Brillo del azul Canal 5 componente blanco 0 255 Brillo del blanco Canal 6 programas automáticos control por música 0 50 Ajuste mediante canales 1 5 51 101 Programa AUTO 1 102 152 Programa AUTO 2 153 2...

Page 51: ...ción IR conectada desconectada Versión del firmware Modo proyector de color con colores predefinidos Color Co01 Co51 Frecuencia de destello del estroboscopio St01 St99 Modo proyector de color Brillo del rojo Brillo del verde Brillo del azul Brillo del blanco Frecuencia de destello del estroboscopio St01 St99 Modo automático Modo Aut1 2 Velocidad Speed SP 1 SP 9 Frecuencia de destello del estrobosc...

Page 52: ...montażowe 4 Wejście DMX 3 pin XLR do podłączania kon trolera pin 1 masa 2 DMX 3 DMX 5 Regulatory uchwytów montażowych 6 Wbudowany mikrofon do sterownia muzyką 7 Przyciski operacyjne Przycisk MENU do wychodzenia z danego poziomu menu Przyciski UP oraz DOWN do wyboru pozycji i zmiany ustawień Przycisk ENTER do aktywacji poleceń w menu do przechodzenia do kolejnego parametru oraz do zapisywania ustaw...

Page 53: ... podstawo wych kolorach czerwonym zielonym i niebieskim oraz w kolorach powstających przez zmiksowanie tych barw Ponadto możliwe jest płynne przecho dzenie pomiędzy kolorami oraz efekt stroboskopu Reflektor przystosowany jest do sterowania syg nałem DMX z kontrolera za pomocą 1 4 5 lub 8 kanałów DMX do wyboru ale może również pra cować bez niego lub w połączeniu z innymi reflek torami PARL 12RGBW ...

Page 54: ...mniejszy się należy wymienić baterię W tym celu wcisnąć mały pasek na tylnej stronie pilota i zsunąć pokrywę komory bateryjnej Zdejmowanie pokrywy komory bateryjnej Pilot współpracuje z dwiema 1 5 V bateriami pastylkowymi typu LR54 Zwrócić uwagę na odpowiednią polaryzację wskazanie oraz w komorze bateryjnej Jeżeli pilot nie będzie przez dłuższy czas używany należy wyjąć z niego baterie aby zapo bi...

Page 55: ...ć ustawie nie 7 2 Programy automatyczne Dostępne są dwa programy AUTO 1 sekwencja kolorów z płynnym przecho dzeniem AUTO 2 sekwencja kolorów bez płynnego prze chodzenia 1 Wcisnąć odpowiedni przycisk na pilocie sterują cym AUTO 1 lub AUTO 2 aby włączyć żądany program Alternatywnie w menu reflektora wywołać polecenie menu i wcisnąć przycisk ENTER aby zatwierdzić wybór lub 2 Wcisnąć przycisk SPEED na...

Page 56: ... wielu urządzeń na wyj ście DMX ostatniego z podłączonych paneli podłączyć opornik 120 Ω 0 3 W lub użyć gotowy wtyk terminujący np DLT 123 marki img Stage Line 8 2 Ustawianie liczby kanałów DMX W celu sterowania reflektorem PARL 12RGBW za pomocą kontrolera konieczne jest ustawienie adresu startowego DMX rozdz 8 3 oraz liczby wykorzystywanych kanałów DMX Liczba kanałów DMX zależy od żądanej funkcjo...

Page 57: ...e od tego ustawienia odbiornik IR zostaje wyłączony podczas sterowania sygnałem DMX 9 2 Wyświetlanie wersji firmwareʼa W celu wyświetlenia wersji firmwareʼa system ope racyjny urządzenia 1 Wywołać polecenie menu version Na wyświetlaczu przez kilka sekund zostanie poka zany numer wersji Po chwili wyświetlacz zgaś nie 2 Za pomocą przycisków sterujących powrócić do żądanego trybu pracy 10 Specyfikacj...

Page 58: ... 244 Kolor 49 245 249 Kolor 50 250 255 Kolor 51 Wartość DMX Funkcja Kanał 1 ściemniacz 0 255 całkowita jasność Kanał 2 kolor czerwony 0 255 jasność czerwonego Kanał 3 kolor zielony 0 255 jasność zielonego Kanał 4 kolor niebieski 0 255 jasność niebieskiego Kanał 5 kolor biały 0 255 jasność białego Kanał 6 programy automatyczne sterowanie muzyką 0 50 ustawienie przez kanały 1 5 51 101 program AUTO 1...

Page 59: ...Kanałów 4 Kanały 1 Kanał Odbiornik IR wł wył Wersja firmwareʼa Kolorowy reflektor z gotowymi kolorami Kolor Colour Co01 Co51 Częstotliwość błysków stroboskopu St01 St99 Kolorowy reflektor jasność czerwonego jasność zielonego jasność niebieskiego jasność białego Częstotliwość błysków stroboskopu St01 St99 Tryb automatyczny Tryb Aut1 2 Prędkość Speed SP 1 SP 9 Częstotliwość błysków stroboskopu St01 ...

Page 60: ...hushållssoporna S 60 Læs nedenstående sikkerhedsoplysninger grundigt igennem før ibrugtagning af enheden Bortset fra sikkerhedsoplysnin gerne henvises til den engelske tekst Vigtige sikkerhedsoplysninger Denne enhed overholder alle nødvendige EU direktiver og er som følge deraf mærket Vær altid opmærksom på følgende G ADVARSEL Se ikke direkte mod lyskilden under brug dette kan med føre skader på ø...

Page 61: ...valtuute tussa huollossa G Älä koskaan irrota virtajohtoa pistorasiasta johdosta vetä mällä G Laitteen ulkopuoliseen puhdistamiseen käytä ainoastaan kuivaa puhdasta kangasta älä käytä kemikaaleja tai vettä G Laitteen takuu raukeaa eikä valmistaja maahantuoja tai myyjä ota vastuuta mahdollisista välittömistä tai välillisistä vahingoista jos laitetta on käytetty muuhun kuin alkuperäi seen käyttötark...

Page 62: ...MONACOR INTERNATIONAL GmbH Co KG Zum Falsch 36 28307 Bremen Germany Copyright by MONACOR INTERNATIONAL All rights reserved A 1567 99 01 06 2014 ...

Reviews: