background image

4

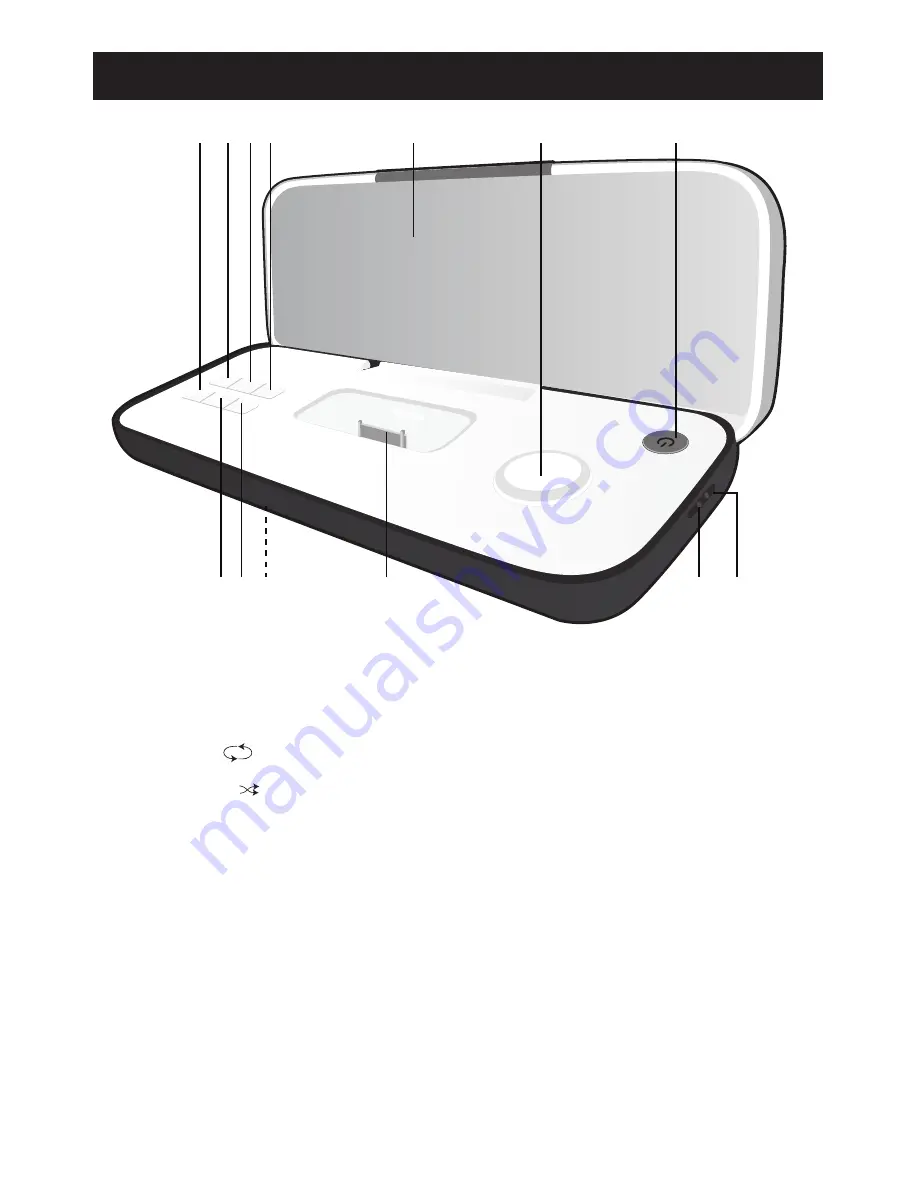
LOCATION OF CONTROLS

1

8

2 3 4

5

6

7

9 10

11

12 13

1.

Skip/Search Backward 

o

Button

2.

Repeat 

Button

3.

Random 

Button

4.

Line In Button

5.

Speaker

6.

Volume Control

7.

Power Button

8.

Play/Pause 

®p

Button

9.

Skip/Search Forward 

Button

10. Battery Compartment (on

bottom of unit)

(bATTERY COVER PART
NO. MP-IM02F00500-b*)

11. iPod/iPhone Compartment

with Connector (for use with
Universal Docks)

12. Line In Jack
13. DC IN Jack 

(AC ADAPTER PART NO.
WHITE: ET-A240V03900-b*
bLACK: ET-A240V04100-b*)

*Consumer  Replaceable  Part
(See page 12 to order.)

Summary of Contents for UNIVERSAL DOCKS

Page 1: ...an equilateral triangle is intended to alert the user to the presence of important operating and maintenance servicing instructions in the literature accompanying the appliance FCC WARNING This equipm...

Page 2: ...and receiver Connect the equipment into an outlet on a circuit different from that to which the receiver is connected Consult the dealer or an experienced radio TV technician for help The rating infor...

Page 3: ...achments accessories specified by the manufacturer 12 Use only with a cart stand tripod bracket or table specified by the manufacturer or sold with the apparatus When a cart is used use caution when m...

Page 4: ...l 7 Power Button 8 Play Pause p Button 9 Skip Search Forward n Button 10 Battery Compartment on bottom of unit bATTERY COVER PART NO MP IM02F00500 b 11 iPod iPhone Compartment with Connector for use w...

Page 5: ...llows 1 Open the Battery Compartment door by pressing in on the tab and then lifting it off 2 Insert four AAA batteries into the Battery Compartment as shown Be sure to observe the polarity markings w...

Page 6: ...aced Replace only with the same or equivalent type 2 Use only the size and type of batteries specified 3 Be sure to follow the correct polarity when installing the batteries as indicated in the Batter...

Page 7: ...iPhone A into the Universal Dock B as shown Gently push down so the connector on the iPod iPhone slides onto the connector on this unit A B 2 NOTES When the iPod iPhone is connected to this unit and i...

Page 8: ...ate the Volume control 2 clockwise to increase the volume or counter clockwise to decrease the volume 1 2 3 To skip forward or backward on the iPod iPhone Press the Skip Search o 1 or n 2 button to sk...

Page 9: ...ack press the REPEAT button until the Repeat indicator disappears from the iPod display 2 REPEAT PLAYbACK To randomly play the tracks or albums on the iPod with an iPod inserted press the Random butto...

Page 10: ...corresponding Universal Dock and your iPhone into the unit as described on page 7 iPhone Type Memory Univ Dock No 8 to 32 GB 4 to 16 GB iPhone 3G S iPhone 3G iPhone No 15 Part No White MP IM02A00600...

Page 11: ...ling for service SYMPTOM CAUSE SOLUTION No sound Volume is set to Increase volume as minimum shown on page 8 Incorrectly connected Check the connection see page 7 Line In button not set Press until it...

Page 12: ...e without notice FOR ADDITIONAL SET UP OR OPERATING ASSISTANCE PLEASE VISIT OUR WEbSITE AT WWW MEMOREX COM FOR CONSUMER REPLACEAbLE PART S VERIFY PART NUMbER S ON PAGES 4 AND 10 AND THEN CONTACT OUR P...

Reviews: