

Shell+ 12 Wall Mounted Tablet Enclosure
Instructions
+44 (0) 1202 892 863 |
1-888-858-9778 |
sales
@imageholders.com
Unit B8, Arena Business Centre, Nimrod Way, Wimborne, Dorset. BH21 7UH.
©
image
HOLDERS
Ltd. All rights reserved
017_12_161
Applicable To:
Enclosure and Tablet Fitting
C
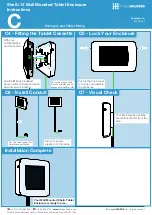
C3 - Tablet Loading and Cable Routing
C2b - External Power Brick
C2a - Rear Enclosure Mounting
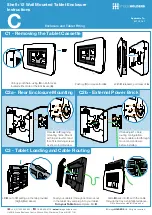
C1 - Removing the Tablet Cassette
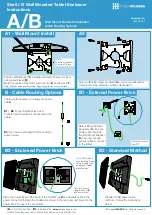
Place
A
on
F,
aligning
mounting holes. Mount
with top screw first and
then fit remaining screws
as shown in detail view.
Push up
C
to release from
A
.
With
C
released, pull clear of
A
.
Unlock your Shell+ using
D
on both locks
located either side of the Enclosure (
A
).
If following
B1
cable
routing configuration.
Ensure cable is fed through
mount and enclosure
before installing.
Lift
B
out of
C
pulling up the tab provided.
(Highlighted above)
Feed your cable(s) through central cut-out
in the tablet tray and plug into your tablet.
Turn your Tablet on
and place into
B
.
Slide
B
back into
C
, with the cable
through the tray as highlighted above.
Note: Ensure your tablet is turned on!