background image

Portable DVD Player                                                               i1155_V11M11_IM_EN_10052007 

www.i-Luv.com 

- 15 -

BASIC OPERATION 


Watching Your iPod Videos on the 8.4” LCD Screen 

To power the unit on, slide the 

POWER

 switch on the left side of the unit to the 

ON

 position.. To 

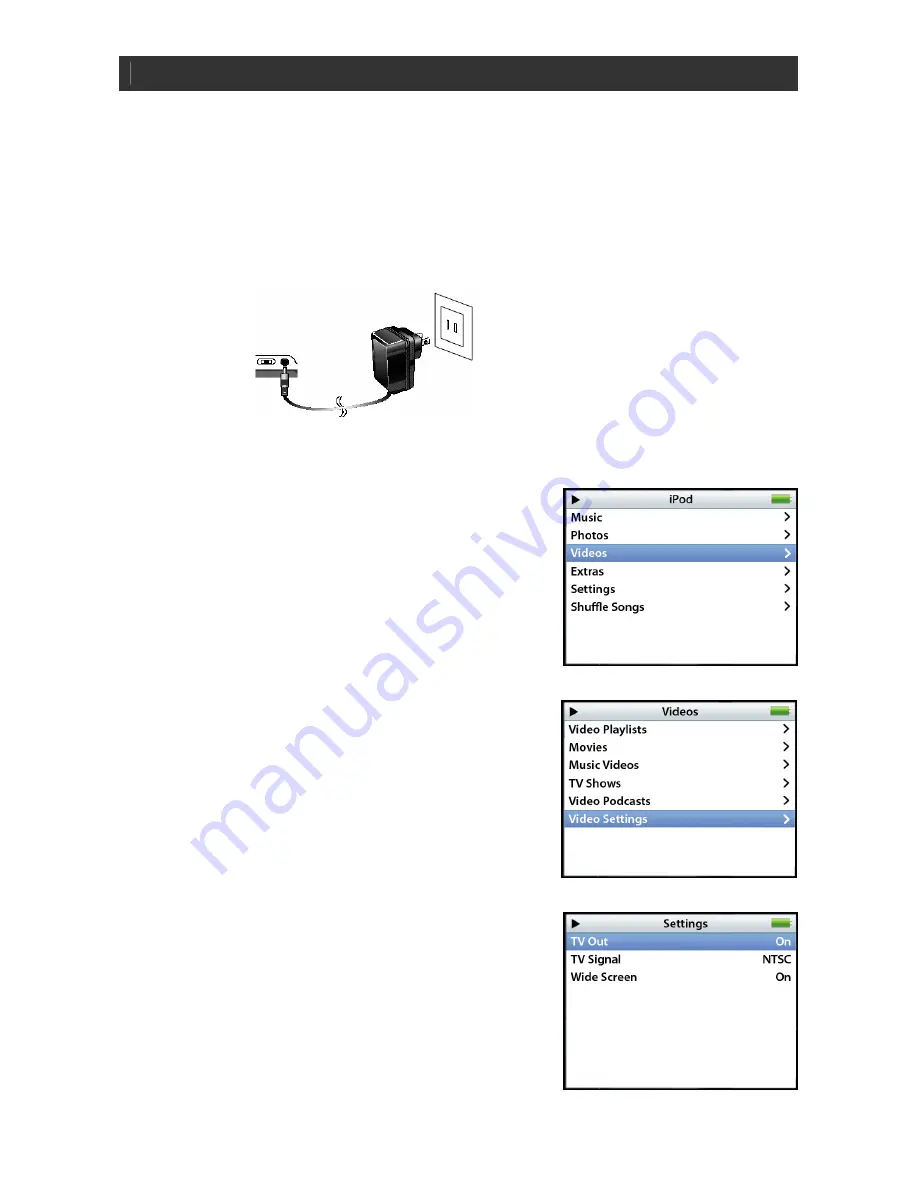
see your favorite iPod videos on the 8.4” LCD screen, follow the instructions below:  
1. 

Before setting, insert your iPod  into the dock carefully and close the dock cover. 

 
2. 

Connect the AC adapter to the main unit and slide the 

POWER

 button on the left side of 

the main unit to the 

ON

 position. 


3. Press 

the 

DVD/iPod

 button to select iPod mode on right of the main unit. 

 
4. 

On the menu screen of your iPod, select the “

Videos

” 

option. 


5. 

On the next menu screen, select the “

Video Settings

” 

option. 


6. 

On the next menu screen, select the “

TV Out

” option 

and set it on. 


Summary of Contents for i1155

Page 1: ... Tablet Style DVD Player with 8 4 Active Matrix TFT LCD Screen Instruction Manual Model i1155 Please read this manual carefully before operating and save it for future reference Have a question Please visit www i Luv com ...

Page 2: ...Portable DVD Player i1155_V11M11_IM_EN_10052007 www i Luv com 1 ...

Page 3: ...t WARNING To prevent fire or shock hazard do not expose this appliance to rain or moisture CLEANING Always disconnect unit from power supply before attempting to clean it Use soft cloth moistened with soapy water and wipe gently Do not use solvents or abrasive materials LASER SAFETY This unit uses laser technology Only a qualified professional should remove the cover or attempt to service this dev...

Page 4: ...instructions should be observed 4 FOLLOW INSTRUCTIONS All operating and use instructions should be followed 5 WATER AND MOISTURE The appliance should not be used near water For example near a bathtub kitchen sink laundry tub and or swimming pool 6 VENTILATION The appliance should be situated so that its location and position does not interfere with its proper ventilation For example the appliance ...

Page 5: ...is product may contain lead and or mercury Disposal of these materials may be regulated by your local authorities due to environmental considerations For more detailed disposal or recycling information please contact your local authorities or the EIA Electronic Industries Alliance http www eiae org IC NOTICE Canada Since digital circuitry may cause interference to other radio or television tuners ...

Page 6: ...w battery indication 13 Charging your iPod 13 Connecting headphones 14 Connecting the DVD player to a TV set by AV cable 14 Connecting the DVD player to a TV set by S Video cable 14 BASIC OPERATION Watching your iPod videos on the 8 4 LCD screen 15 Watching your iPod videos on your TV 16 Viewing your iPod photos on the 8 4 LCD screen 17 Viewing your iPod photos on your TV 17 Playing a DVD VCD Audi...

Page 7: ... Cleaning the unit 26 TROUBLESHOOTING GUIDE Q A about the product 27 SPECIFICATIONS Technical Information 29 This product incorporates copyright protection technology that is protected by method claims of certain U S patents and other intellectual property rights owned by Macrovision Corporation and other rights owners Use of this copyright protection technology must be authorized by Macrovision C...

Page 8: ...Portable DVD Player i1155_V11M11_IM_EN_10052007 www i Luv com 7 ...

Page 9: ...he amount of correction available In some cases the DVD player may skip some tracks or parts of tracks on a disc during disc play This problem may be caused by defects such as scratches on the disc being played which are too large for the error compensation circuits to handle If you encounter this problem try a new disc before having this unit serviced If the DVD player operates normally the skipp...

Page 10: ...ar adapter Integrated dock for your iPod with video 30GB 60GB 80GB iPod classic 80GB 160GB Optional dock for your iPod nano 3 rd Generation Sold separately Features for DVD Player Play DVD videos on the 8 4 widescreen TFT LCD Watch your favorite videos on your TV through S Video or AV output Enhanced user interface with detailed controls Convenient OSD On Screen Display Multiple subtitle angle and...

Page 11: ...DOWN BUTTON 15 VOLUME UP BUTTON 16 AUDIO BUTTON 17 MENU PBC BUTTON 18 ANGLE BUTTON 19 SEARCH BUTTON 20 PAUSE STEP BUTTON 21 STOP BUTTON 22 SEARCH FORWARD BUTTON 23 PLAY BUTTON 24 ZOOM BUTTON 25 A B BUTTON 26 REPEAT BUTTON 27 PROGRAM BUTTON 28 RANDOM BUTTON 29 MODE BUTTON 30 DISPLAY BUTTON 31 MUTE BUTTON 32 STANDBY ON OFF BUTTON IMPORTANT NOTE The included remote control can control your iPod Point...

Page 12: ...ack white Front View 8 Power On Off Switch 9 8 4 TFT LCD Screen 10 iPod Dock Compartment 11 Navigation Up Control 12 Menu Control 13 Navigation Skip Forward Control 14 Navigation Down Control 15 Play Pause Control 16 Navigation Skip Reverse Control 17 Setup Control 18 Disc Dock Cover 19 Disc Mode Indicator 20 iPod Mode Indicator 21 Battery Indicator 22 Remote Control Sensor 23 Open Button Back Vie...

Page 13: ...at right 2 Place one battery CR 2025 as shown at right Match the polarity of battery with the marks inside the unit 3 Insert battery holder into its compartment as shown at right Note Do not attempt to recharge short circuit disassemble heat or throw batteries into a fire Using the AC Adapter 1 Insert the DC plug at the end of the adapter cord into the DC IN jack on the back of the player 2 Plug t...

Page 14: ...rge will start While the battery is charging the BATTERY indicator on the front will light RED When charging is complete the BATTERY indicator will light GREEN 3 Disconnect the AC adapter plugs from both the player and the AC outlet when charging is complete or not necessary Note The built in battery can be charged in both the power on and power off modes in power on mode the charge time will be l...

Page 15: ...rning Hearing experts have found that using headphones at high volume over an extended time may cause damage to or loss of hearing Connecting the DVD Player to a TV Set by AV Cable Use the AV cable 3 5 mm to RCA to connect the DVD player to a TV set and amplifier The yellow plug is used for Video The white plug and red plug are for Audio Connecting the DVD Player to a TV Set by S Video Cable not i...

Page 16: ...the instructions below 1 Before setting insert your iPod into the dock carefully and close the dock cover 2 Connect the AC adapter to the main unit and slide the POWER button on the left side of the main unit to the ON position 3 Press the DVD iPod button to select iPod mode on right of the main unit 4 On the menu screen of your iPod select the Videos option 5 On the next menu screen select the Vi...

Page 17: ... through the AV output To do so follow the instructions below 1 Connect the 3 5 mm plugs mono for video and stereo for audio of the supplied AV cable to the audio and video jacks located at the right of the i1155 2 Connect the RCA plugs yellow white red of the AV cable to the audio and video input jacks on your TV The yellow RCA plug is used for the video connection and the white and red RCA plugs...

Page 18: ...SETUP touch key again to start slide show Viewing Your iPod Photos on Your TV You can also view your favorite iPod photos as a slideshow on your TV through the AV output To do so follow the instructions below 1 Follow instructions 1 to 3 in the section called Watching Your iPod Videos on Your TV 2 Follow the instructions in the section Viewing Your iPod Photos on the 8 4 LCD Screen to play your iP...

Page 19: ... to play 5 Adjust the volume to a comfortable sound level by pressing VOLUME controls 6 Press the STOP button once on remote control while playing a DVD and the indication PRE STOP will appear on the screen The player then memorizes the point where you stopped Touch the PLAY PAUSE X control again to resume playing the movie from where it was stopped 7 Touch and hold the PREV IIW or NEXT XII key fo...

Page 20: ...he CD have been displayed one time 3 Touch the PAUSE control to hold the current picture on the screen To continue the slide show touch the PLAY X control again 4 Use the SKIP buttons to move to the previous or next picture 5 Press the STOP button on remote control to stop the slide show and return to the menu folder 6 Pressing the REPEAT button twice will display the current image constantly on t...

Page 21: ...he inserted disc or in the selected mode Please note that some functions depend on the disc type and the media on the disc Title Feature Press the TITLE button to make the title menu on the disc appear on the screen Use the NAVIGATION W X S T buttons to select the desired option and press the ENTER button to confirm Some discs may not support this feature Menu PBC Feature When playing a DVD press ...

Page 22: ...ill appear on the LCD screen Once all tracks have been played randomly the unit will enter the STOP mode To cancel the random function press the RANDOM button a second time The indication RANDOM OFF will appear on the LCD screen Note DVDs will not support random play function Skip and Search Functions 1 SKIP REVERSE and SKIP FORWARD buttons Use these buttons to go to the previous or next chapter o...

Page 23: ...eature is not available on MP3 CDs To perform programmed playback 1 Press the PROGRAM button The program window will appear on the screen 2 Press the NUMERIC buttons and enter two numbers for each track one for title another for chapter Upon entering two numbers use the NAVIGATION T button to move to the next program track or chapter 3 Repeat step 2 until all titles and chapters have been programm...

Page 24: ...screen A B Repeat Function This player can play a specific section of a track or chapter repeatedly 1 While in the PLAY mode press the A B button to choose the starting point of the desired section 2 Press the A B button again to choose the end of the desired section The player will now play the selected section continuously 3 To cancel the A B REPEAT mode press the A B button again until the indi...

Page 25: ...About 4 3 LB a When wide screen video is played in this mode on a conventional screen black bands appear at the top and bottom of the screen 3 About 16 9 a This is the correct mode for playing wide screen videos on a wide screen 4 The visible picture size is preset on the DVD Therefore the playback picture of some DVDs may not conform to the picture size you select 5 When DVDs recorded in the 4 3 ...

Page 26: ...m or press the SETUP button again Speaker Setup 1 Press the SETUP button in the stop mode 2 Use the NAVIGATION X button to select SPEAKER SETUP Use the NAVIGATION S T button to select DOWNMIX 3 Use the NAVIGATION S T buttons to selected either MONO LT RT or STEREO 4 To exit the SETUP MENU and return to a normal screen select EXIT SETUP and confirm or press the SETUP button again LCD Setting 1 Pres...

Page 27: ...olding it carefully by the edges Fingerprints and dust should be carefully wiped from the disc s recorded surface with a soft cloth Unlike conventional records CDs have no grooves to collect dust and microscopic debris Gently wiping with a soft cloth should remove most particles Cleaning the Unit To prevent fire or shock hazard disconnect the unit from the AC power source when cleaning The finish ...

Page 28: ...VD VCD and CD formats The disc may be dirty and require cleaning The disc may be improperly loaded Be certain it has been loaded with the label side up No picture on the LCD screen Ensure that the disc or iPod mode is properly set Ensure that the iPod is properly connected No sound or distorted sound Ensure that the disc or iPod mode is properly set Ensure that the iPod is properly connected Ensur...

Page 29: ... button of the unit for 3 seconds to release the key lock function No PBC play This function works only for Video CDs with playback control Audio and or subtitle language are not shown on the disc or not in the setup menu If the audio and or subtitle language does not exist on the language selected in the setup menu it will not be seen or heard No subtitles Subtitles are not available on all discs...

Page 30: ... Operating Humidity Range 5 to 90 no condensation Battery Charging Time Approximately 2 5 3 hours Battery Life Fully charged 3 hours Types of Discs Played o DVD VIDEO Disc 12 cm single sided single layer 12 cm single sided dual layer 12 cm double sided single layer 8 cm single sided single layer 8 cm single sided dual layer o Compact Disc 12 cm disc 8 cm disc Video Output Level 1Vpp Audio Output L...

Page 31: ...Portable DVD Player i1155_V11M11_IM_EN_10052007 www i Luv com 30 ...

Page 32: ... Corp All rights reserved No portion of this printed material or product enclosed herewith including design shape and graphics may be reproduced or transmitted in any form without the expressed written consent of jWIN Electronics Corp by any means electronic or mechanical including photocopying recording or use of an information storage retrieval system Any unauthorized distribution or reproductio...

Reviews: