background image

Chapter 4 
Installation & Setting-up Operation 

ITW Dynatec 


Apex Slot Die Applicator, Manual #40-47, Rev. 10.16 

Page 35


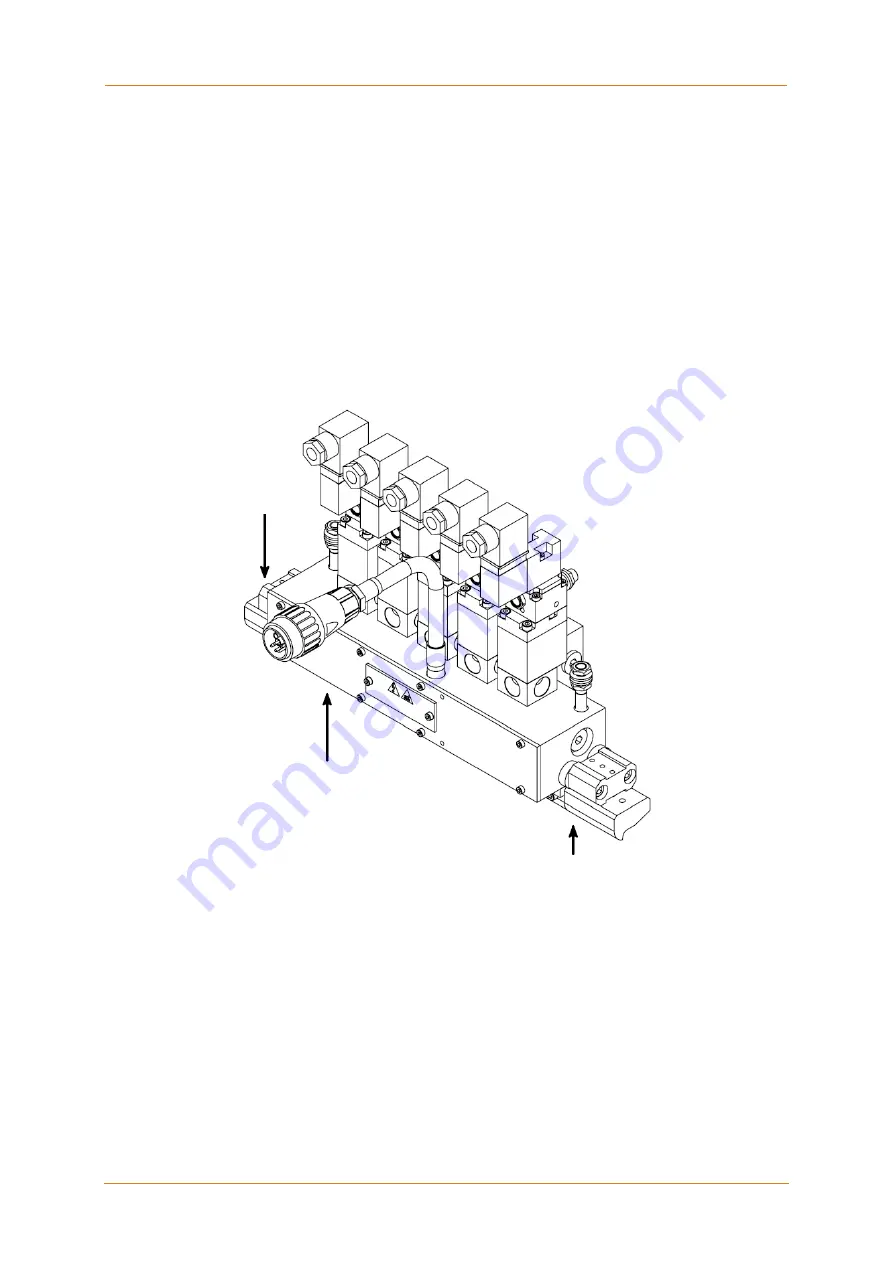
Installation of Optional Wing Assemblies 


Wing assemblies are attached to either side of an Apex applicator in order to give 
additional stability to a moving substrate. Two wing assemblies are required per 
application, either a right and left pair, or two universal wing assemblies. 


1.  Assemble each of the two wing assemblies for the applicator. 


2.  Align the wing assemblies with the die lips of the Apex slot die. 


3.  Attach wing assemblies by tightening the M6 bolts. Use a 0.010 feeler gauge to set 

clearance between the die lips and the end of the wing. The feeler gauge should slip 
between the two assemblies after tightening all bolts. 
 

4.  Tighten the M4 bolts. 


Left Wing 

Right Wing 

APEX Slot Die Applicator 

Summary of Contents for ITW Dynatec APEX SLOT DIE APPLICATOR

Page 1: ...Adhesive Application Solutions ISO 9001 certified APEX SLOT DIE APPLICATOR Technical Documentation No 40 47 Rev 10 16 ITW Dynatec An Illinois Tool Works Company www itwdynatec com...

Page 2: ...o itwdynatec com service itwdynatec com ITW Dynatec Industriestrasse 28 40822 Mettmann Germany Tel 49 2104 915 0 info itwdynatec de service itwdynatec de ITW Dynatec Unit2 B1 Building No 9 Weixin Road...

Page 3: ...6 Chapter 3 Description and Technical Specs 17 3 1 Applicable Safety Regulations 17 Intended Use 17 Unintended Use Examples 17 Residual Risks 17 Technical changes 18 Using foreign components 18 Settin...

Page 4: ...lable Options Accessories 57 Heater Cartridges 57 RTD Sensors 57 Blank Shims 57 Filters 58 Cable Assemblies 58 Recommended Spare Parts List 58 Chapter 8 Component Illustrations and Bill of Materials 5...

Page 5: ...ors Electrical Schematics 89 DynaControl Dynamini or PLC Platinum RTD Control Scheme PN 103117 89 Microprocessor Temperature Control MCV or CompuVision Control Scheme PN 045X144 89 Upgrade Nickel RTD...

Page 6: ...ITW Dynatec Index Page 6 Apex Slot Die Applicator Manual 40 47 Rev 10 16 This page intentionally left blank...

Page 7: ...Chapter 1 Declaration of Incorporation Conformity ITW Dynatec Apex Slot Die Applicator Manual 40 47 Rev 10 16 Page 7 Chapter 1 Declaration of Incorporation Conformity...

Page 8: ...ITW Dynatec Chapter 1 Declaration of Incorporation Conformity Page 8 Apex Slot Die Applicator Manual 40 47 Rev 10 16 This page intentionally left blank...

Page 9: ...hazardous situations 4 Inspect the machine for unsafe conditions daily and replace all worn or defective parts 5 Keep work area uncluttered and well lit Remove all material or things not needed for th...

Page 10: ...es should be spaced apart from each other not making direct contact 3 Do not use adhesive that is dirty or that may be chemically contaminated Doing so can cause system clogging and pump damage 4 When...

Page 11: ...n the presence of moisture care must be taken to prevent them from curing inside ITW Dynatec equipment If PUR adhesive solidifies in a unit the unit must be replaced Always purge old PUR adhesive from...

Page 12: ...ging the defective components immediately Lockout Tagout Switch the unit voltage free before working Main switch OFF 1 Follow OSHA 1910 147 Lockout Tagout Regulation for equipment s lockout procedures...

Page 13: ...ped air can remain within it causing hot adhesive and pressure to escape without warning when a filter cap or a hose or hydraulic connection is loosened or removed For this reason always wear eye prot...

Page 14: ...loosened during the repair or maintenance if they are tight again 8 Replace the air hoses in preventive maintenance regularly even if they have got no viewable damages Adhere to the manufacturers ins...

Page 15: ...ian and or an emergency medical technician immediately Let the burns medicate by a medic immediately Measures in case of fire 1 Please heed that not covered hot parts of the engine and molten hot melt...

Page 16: ...als have to be fulfilled 2 Keep attention that during installations repairs or maintenance matters hazardous to water like adhesive adhesive scrap lubricating grease or oil hydraulic oil coolant and c...

Page 17: ...In a potentially explosive atmosphere With unsuitable operating processing materials When the values stated under Specifications are not complied with The APEX Slot Die Applicator may not be used to...

Page 18: ...sing foreign components ITW Dynatec takes no responsibility for consequential damages caused by using foreign components or controllers that have not been provided or installed by ITW Dynatec ITW Dyna...

Page 19: ...allows for only one temperature control point on models less than 390mm Models longer than 390mm have two heat zones and control points The APEX module s is mounted onto either a steel or aluminium se...

Page 20: ...000 cycles minute depending on application On Off times 3 ms OFF 3 ms ON Adhesive viscosity 100 to 20 000 mPa sec centipoise Adhesive pressure range 7 bar 100 psi to 68 bar 1000 psi Noise emission 30...

Page 21: ...cs ITW Dynatec Apex Slot Die Applicator Manual 40 47 Rev 10 16 Page 21 Dimensions APEX 50 mm with MAC Valve Applicator shown is a 50 mm slot die with Mac valve 40 mm pattern and optional filter manifo...

Page 22: ...hnical Specs Page 22 Apex Slot Die Applicator Manual 40 47 Rev 10 16 Dimensions APEX 50 mm with Festo Valve Applicator shown is a 50 mm slot die with Festo valve 40 mm pattern and optional filter mani...

Page 23: ...tec Apex Slot Die Applicator Manual 40 47 Rev 10 16 Page 23 Dimensions APEX 50 mm with MAC Valve tube mount Applicator shown is a 50 mm slot die with MAC valve tube mount 40 mm pattern and optional fi...

Page 24: ...hnical Specs Page 24 Apex Slot Die Applicator Manual 40 47 Rev 10 16 Dimensions APEX 76 2 mm with MAC Valve Applicator shown is a 76 2 mm slot die with Mac valve 50 mm pattern and optional filter mani...

Page 25: ...s ITW Dynatec Apex Slot Die Applicator Manual 40 47 Rev 10 16 Page 25 Dimensions APEX 110 mm with MAC Valve Applicator shown is a 110 mm slot die with Mac valve 40 mm pattern and optional filter manif...

Page 26: ...hnical Specs Page 26 Apex Slot Die Applicator Manual 40 47 Rev 10 16 Dimensions APEX 150 mm with MAC Valves Applicator shown is a 150 mm slot die with Mac valves 80 mm pattern and optional filter mani...

Page 27: ...ITW Dynatec Apex Slot Die Applicator Manual 40 47 Rev 10 16 Page 27 Dimensions APEX 190 mm with MAC Valves Applicator shown is a 190 mm slot die with Mac valves 120 mm pattern and optional filter man...

Page 28: ...hnical Specs Page 28 Apex Slot Die Applicator Manual 40 47 Rev 10 16 Dimensions APEX 270 mm with MAC Valves Applicator shown is a 270 mm slot die with Mac valves 200 mm pattern and optional filter man...

Page 29: ...ITW Dynatec Apex Slot Die Applicator Manual 40 47 Rev 10 16 Page 29 Dimensions APEX 390 mm with MAC Valves Applicator shown is a 390 mm slot die with Mac valves 320 mm pattern and optional filter man...

Page 30: ...hnical Specs Page 30 Apex Slot Die Applicator Manual 40 47 Rev 10 16 Dimensions APEX 470 mm with MAC Valves Applicator shown is a 470 mm slot die with Mac valves 420 mm pattern and optional filter man...

Page 31: ...ction Necessary electrical connection has to be provided See electrical schematics Never connect or disconnect plug and socket connections under load The service block s incoming electrical power and...

Page 32: ...he applicator on bracketry using the M8 screws and insulators provided Allow access to the optional filter if installed Be sure that the weep holes are visible for periodic inspection 2 Before making...

Page 33: ...pplicator This can be done through the temperature readout of the adhesive supply unit Surface temperature may be checked with a separate pyrometer and surface probe or with a dial thermometer Turn th...

Page 34: ...ff roll Installation Notes on Proper Off roll Installation Support the web as the two rollers are supporting it in the illustration below within a few inches of each side of the slot nozzle Contact mu...

Page 35: ...quired per application either a right and left pair or two universal wing assemblies 1 Assemble each of the two wing assemblies for the applicator 2 Align the wing assemblies with the die lips of the...

Page 36: ...ntenance unit for compressed air conditioning with a filter 40 m Keep the quality class 5 4 2 according to ISO 8573 1 Classification of Quality Classes According to ISO 8573 1 Class 1 Particulate Mate...

Page 37: ...Risk of electric shocks Risk of injury Mortal danger The unit components are getting very hot during operation Risk of burns The adhesive is very hot and pressurized Risk of burns and risk of injury A...

Page 38: ...f one manufacturer the unit has to be cleaned respectively purged to avoid possible chemical reactions Set the temperatures of the particular heating zones in the controller according to the adhesive...

Page 39: ...nually open the solenoids using the controller or by pushing with a small screwdriver or other tool the purge button located on the solenoid coil Continue to hold in the purge button until all air and...

Page 40: ...ntinue production 4 5 Shut Down Procedure CAUTION RISK OF BURNS AND INJURY Parts of the unit can be hot long after switching off Always wear heat resistant protective gloves and safety goggles Molten...

Page 41: ...of heavy burns High adhesive temperature and adhesive pressure Risk of injury or heavy burns Always assume that the system is under pressure proceed with caution Keep a cool pack or bucket of clean wa...

Page 42: ...rse sequence of the disassembly procedures However the following cautions should be followed whenever they apply for proper re assembly CAUTION In general all O RINGS AND SEALS must be replaced whenev...

Page 43: ...dhesive with a clean cloth while still hot at the end of each shift taking care not to damage the shim Inspect the applicator periodically as outlined in the following table Maintenance plan Operating...

Page 44: ...d modules is factory set to 0 3 mm 0 05 mm 0 012 0 002 and for high flow module to 0 6 mm 0 05 mm 0 012 0 002 NOTE For the replacement see module illustrations in Chapter 8 1 The Applicator must be at...

Page 45: ...p motor OFF 13 Switch the unit voltage free and pressureless 14 Guard the unit against unauthorized restarting 15 Place a heat resistant catchment container underlay under the Applicator Hot adhesive...

Page 46: ...seated firmly taking care not to cut the O ring After finishing the maintenance or repair works Remove all materials and tools used during the repair or maintenance from the workspace of the unit Conn...

Page 47: ...Components and adhesive are hot when this procedure is being done Take every precaution to prevent the material and hot surfaces from contacting the skin To replace a shim 1 The Applicator must be at...

Page 48: ...h of the assembly Tighten the screws to hold the components together Remove the flat bar 12 If required wrap a piece of 400 grit sandpaper around a flat file and going from end to end sand the entire...

Page 49: ...FF 2 Disconnect the electrical cable assembly from the hose 3 Remove the wire access cover plate and the gasket via two holding screws 4 If replacing heater only Cut the wires of the heater cartridge...

Page 50: ...ITW Dynatec Chapter 5 Maintenance and Repair Notes Page 50 Apex Slot Die Applicator Manual 40 47 Rev 10 16 This page intentionally left blank...

Page 51: ...ectrical power that can be life threatening and hot melt adhesives that can cause serious burns Only qualified persons should perform service on the ASU WARNING HOT SURFACE Severe burns can occur if u...

Page 52: ...ing properly Problem Possible Cause Solution Module does not open 1 Temperature adjustment of head is too low 2 Inoperative solenoid valve 1 Check temperature adjustment 2 Push the solenoid s manual b...

Page 53: ...ir escapes from module 1 Inoperative piston O ring 2 O rings located between module and service block are inoperative 1 Replace module 2 Remove module from block and replace O rings Application patter...

Page 54: ...rtridge a The resistance value Ohms of your heater cartridge may be calculated using the formula Volts Ohms Watts To determine wattage see heater cartridges chart in Chapter 7 b Measurements For DynaC...

Page 55: ...83 176 80 4 19 194 90 135 194 90 192 194 90 4 76 212 100 139 212 100 201 212 100 5 27 230 110 142 230 110 210 230 110 5 81 248 120 146 248 120 219 248 120 6 36 268 130 150 268 130 229 268 130 6 91 284...

Page 56: ...ITW Dynatec Chapter 6 Troubleshooting Page 56 Apex Slot Die Applicator Manual 40 47 Rev 10 16 This page intentionally left blank...

Page 57: ...90 mm 3 803960 200W 4 270 mm 5 803960 200W 6 390 mm 8 803960 200W 8 470 mm 10 803960 200W 10 Add wattage of all segments on your applicator to determine total wattage of applicator RTD Sensors Control...

Page 58: ...240 V 104523 DynaPro Plus 240 V Recommended Spare Parts List Part Number Description Quantity See order Filter Basket 2 803960 Heater 240V 200W m x 0 5 N07958 RTD Sensor Pt 100 in cable 1 110427 APEX...

Page 59: ...eld for each module position 100 mesh filter should be used with 0 010 shim and larger Application Width Modules Zones 05 50mm single module 1 zone 07 76 2mm single module 1 zone 11 110mm single modul...

Page 60: ...54 Screw M4x10mm 1 09 813185 Cover plate 50mm 1 10 106137 Screw M3x8mm 4 11 104228 Ferrule wire 16AWG not shown 4 12 107324 Lube anti seize not shown A R 13 107881 Terminal block 2 pos ceramic 1 17 N0...

Page 61: ...ion Quantity 01 813188 Die Adapter 50mm 1 02 813341 Blank shim 50mm 3 03 814407 Die plate 50mm 1 04 808171 Dowel pin 4x20mm 1 05 N00178 O ring 011 70 Duro Viton 1 06 109745 Screw M4x20mm 4 07 808172 D...

Page 62: ...3x5mm 1 07 803960 Heater 10x40mm 240V 200W 2 08 N07354 Screw M4x10mm 1 09 812326 Cover plate 48x76 2mm 1 10 106137 Screw M3x8mm 4 11 104228 Ferrule wire 16AWG not shown 4 12 107324 Lube anti seize not...

Page 63: ...3 Item No Part Number Description Quantity 01 See order Extruder assembly 76 2mm 1 02 812327 Service block 76 2mm 1 03 101247 Filter basket 100 mesh 1 04 103467 Cable assembly BF 240V DCL 9 0 1 05 812...

Page 64: ...28 Ferrule Wire 16 Awg 2 7 not shown 4 12 107324 Anti Seize Lube not shown A R 13 107881 Terminal Block 2 Pos Ceramic 1 14 105060 Nut M8 4 15 106321 Washer Flat M8 4 16 107536 Screw M8x60mm 2 17 N0430...

Page 65: ...Chapter 8 Component Illustrations and Bill of Materials ITW Dynatec Apex Slot Die Applicator Manual 40 47 Rev 10 16 Page 65 Illustration Typical APEX 100mm Service Block Assembly PN 111092...

Page 66: ...10 APEX 1 30 111093 Pattern Shim 110 APEX 040 5 31 111094 Die Plate 100 APEX 040 1 32 808171 Dowel Pin 4 x 20mm 1 33 N00178 O ring 011 1 34 107531 Screw M4x20mm 10 35 808172 Dowel Pin 5 x 20mm 1 36 00...

Page 67: ...1 104228 Ferrule Wire 16 Awg 2 7 not shown 4 12 001U002 Lube Dow Corning 112 not shown A R 13 107881 Terminal Block 2 Pos C 1 14 105060 Nut M8 4 15 106321 Washer Flat M8 4 16 107536 Set screw M8x60mm...

Page 68: ...ITW Dynatec Chapter 8 Component Illustrations and Bill of Materials Page 68 Apex Slot Die Applicator Manual 40 47 Rev 10 16 Illustration Typical APEX 150mm Service Block Assembly PN 111082...

Page 69: ...150mm 1 30 111083 Pattern Shim 150mm 80mm pattern 5 31 111084 Die Plate 150mm 1 32 808171 Dowel Pin 4 x 20mm 1 33 N00178 O ring 011 2 34 107531 Screw M4x20mm 13 35 808172 Dowel Pin 5 x 20mm 1 36 001U...

Page 70: ...nterchangeable shown for reference only 1 13 107881 Terminal Block 2 Pos Ceramic 1 14 107536 Screw M8x60mm 2 15 107324 Anti Seize Lube not shown A R 16 106321 Washer Flat M8 4 17 106303 Cap Filter 1 1...

Page 71: ...Chapter 8 Component Illustrations and Bill of Materials ITW Dynatec Apex Slot Die Applicator Manual 40 47 Rev 10 16 Page 71 Illustration Typical APEX 190mm Service Block Assembly PN 111289...

Page 72: ...190mm 1 30 810006 Pattern Shim 190mm 120mm pattern 5 31 810005 Die Plate 190mm 1 32 808171 Dowel Pin 4 x 20mm 1 33 N00178 O ring 011 3 34 107531 Screw M4x20mm 12 35 808172 Dowel Pin 5 x 20mm 1 36 001...

Page 73: ...Ferrule Wire 16 Awg 2 7 not shown 4 12 107324 Anti Seize Lube not shown A R 13 107881 Terminal Block 2 Pos Ceramic 1 14 105060 Nut M8 4 15 106321 Washer Flat M8 4 16 107536 Screw M8x60mm 2 17 N04302 W...

Page 74: ...and Bill of Materials Page 74 Apex Slot Die Applicator Manual 40 47 Rev 10 16 Illustration Typical APEX 270mm Service Block Assembly PN 111087 Note Items 3 and 4 are interchangeable depending on how m...

Page 75: ...270mm 1 30 111088 Pattern Shim 270mm 200mm pattern 5 31 111089 Die Plate 270mm 1 32 808171 Dowel Pin 4 x 20mm 1 33 N00178 O ring 011 5 34 107531 Screw M4x20mm 16 35 808172 Dowel Pin 5 x 20mm 1 36 001...

Page 76: ...angeable shown for reference only 8 13 107881 Terminal Block 2 Pos Ceramic 2 14 107536 Set screw M8x60mm 2 15 107324 Anti Seize Lube not shown A R 16 106321 Washer Flat M8 4 17 106303 Cap Filter 1 18...

Page 77: ...Chapter 8 Component Illustrations and Bill of Materials ITW Dynatec Apex Slot Die Applicator Manual 40 47 Rev 10 16 Page 77 Illustration Typical APEX 390mm Service Block Assembly PN 111318...

Page 78: ...ntity 29 N00178 O ring 011 8 30 001U002 Lube Dow Corning 112 not shown A R 31 808172 Dowel Pin 5 x 20mm 1 32 808171 Dowel Pin 4 x 20mm 1 33 107531 Screw M4x20mm 23 34 111321 Die Plate 390mm 1 35 10732...

Page 79: ...e only 9 13 107881 Terminal Block 2 Pos Ceramic 2 14 107536 Set screw M8x60mm 2 15 107324 Anti Seize Lube not shown A R 16 106321 Washer Flat M8 4 17 106303 Cap Filter 1 18 106137 Screw M3x4mm 10 19 1...

Page 80: ...ITW Dynatec Chapter 8 Component Illustrations and Bill of Materials Page 80 Apex Slot Die Applicator Manual 40 47 Rev 10 16 Illustration Typical APEX 470mm Service Block Assembly PN 810489...

Page 81: ...cription Quantity 30 N00178 O ring 011 8 31 001U002 Lube Dow Corning 112 not shown A R 32 808172 Dowel Pin 5 x 20mm 1 33 808171 Dowel Pin 4 x 20mm 1 34 107531 Screw M4x20mm 22 35 810495 Die Plate 470m...

Page 82: ...Slot Die Module with MAC solenoid valve Item No Part Number Description 1 110427 APEX Slot Die Module Stem stroke 0 3 mm with MAC Solenoid valve 24V 9 3W PN 810028 1 814049 APEX Slot Die Module High...

Page 83: ...21 APEX Slot Die Module Stem stroke 0 3 mm with MAC Solenoid valve 24VDC 4 02 1 8 HIR PN 100054 2 811137 APEX Slot Die Module Stem stroke 0 3 mm with MAC Solenoid valve 4 12 1 8 HIR 120VAC 60HZ 110VAC...

Page 84: ...m tube fitting PN 115055 2 820868 APEX Slot Die Module Stem stroke 0 3 mm No solenoid valve Illustrations Item 1 Item 2 APEX Slot Die Module square stand off with Festo solenoid valve Item No Part Num...

Page 85: ...8269 O ring 14x2mm 1 2 808268 O ring 16x2mm 1 3 809955 Module plug 1 4 102446 Screw M4x10mm 4 Illustration Block Off Module square base PN 809956 Block Off Module rectangle stand off spacing 25mm PN 8...

Page 86: ...Left Hand 1 812373 Wing 25mm Right Hand 1 810549 Wing 50mm Universal 1 812107 Wing 55mm Universal 1 3 106512 Screw M6 1x35 2 4 810548 Wing Mount block 1 5 L00006 Insul Spacer 2 exploded view shown bel...

Page 87: ...Chapter 8 Component Illustrations and Bill of Materials ITW Dynatec Apex Slot Die Applicator Manual 40 47 Rev 10 16 Page 87 8 1 Specific APEX Extruder...

Page 88: ...ITW Dynatec Chapter 8 Component Illustrations and Bill of Materials Page 88 Apex Slot Die Applicator Manual 40 47 Rev 10 16...

Page 89: ...ter 9 Schematics Pin Connectors Electrical Schematics Note Pin connectors are viewed from the exposed end Pins not shown on schematics are not used DynaControl Dynamini or PLC Platinum RTD Control Sch...

Page 90: ...90 Apex Slot Die Applicator Manual 40 47 Rev 10 16 Upgrade Nickel RTD Control Scheme PN 104551 Upgrade J type Thermocouple Control Scheme Upgrade Platinum RTD Control Scheme NOTE Pin out numbers are...

Page 91: ...divided into sections for easy reference Section 1 PN 100054 24 VDC MAC solenoid valve 4 02 1 8 HIR Section 2 PN 810028 24 V MAC solenoid valve 9 3W Section 3 PN 115055 24 VDC Festo high speed soleno...

Page 92: ...y 1 8 NPT ports with non locking recessed manual operator Connections IN Inlet EX Exhaust A Open side of module B Close side of module Typical Setup Apply full air pressure 80 90 psi to IN port of sol...

Page 93: ...n Direct acting poppet valve 4 way surface mount with non locking recessed manual operator Connections Within valve Typical Setup Apply full air pressure 80 90 psi to IN port of solenoid valve Use air...

Page 94: ...n line solenoid Connections Port 1 Inlet Port 2 Close side of module Port 3 Exhaust Port 4 Open side of module Port 5 Exhaust Typical Setup Apply full air pressure 80 90 psi to Port 1 of solenoid valv...

Page 95: ...er Description Quantity 1 N06438 Nylon Tubing 250 Dia 10 2 N00318 Cable Tie 09 x 3 62 Lg 10 3 100380 Filter Assembly 1 4 Solenoid Valve Assembly 1 5 N04264 Cable Tie Anchor 3 6 N06504 Push in Union Te...

Page 96: ...Item No Part Number Description Quantity 1 N02774 Filter Regulator 1 4 NPT 1 2 100081 Filter coalescing 1 4 NPT 1 3 072X228 Fitting pipe nipple 1 4 NPT 1 4 Plug flush 1 8 NPT 1 5 Pressure gauge 1 6 Mo...

Page 97: ...Chapter 10 Appendix ITW Dynatec Apex Slot Die Applicator Manual 40 47 Rev 10 16 Page 97 This page intentionally left blank...

Page 98: ...3634 info itwdynatec com service itwdynatec com ITW Dynatec Industriestrasse 28 40822 Mettmann Germany Tel 49 2104 915 0 info itwdynatec de service itwdynatec de ITW Dynatec Unit2 B1 Building No 9 We...

Reviews: