background image

INSTRUCTION MANUAL

IT188B

Contents

Warnings and Precautions ............................................................................... 2

Important Safety Instructions ............................................................................ 3

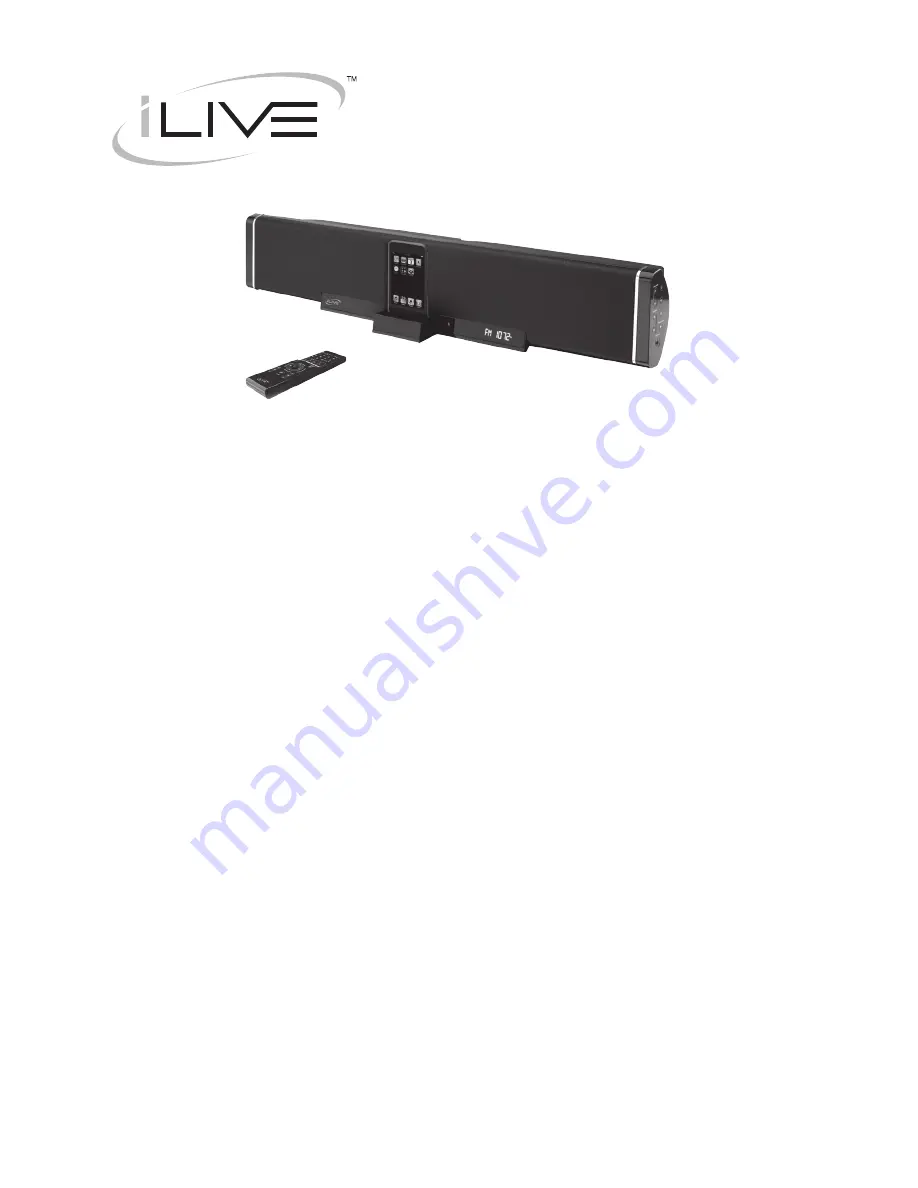
In the Box & Features ....................................................................................... 4

Powering the Unit & Changing the Remote Battery ......................................... 5

Setting the Clock .............................................................................................. 6

Docking and Playing an iPod............................................................................ 7

Tuning the AM/FM Radio & Saving Radio Stations to the Units Memory ......... 8

Composite Video Output & Stereo RCA Output ............................................... 9

Using the Stereo RCA Inputs.......................................................................... 10

Mounting the Unit to a Wall ....................................................................... 11-14

Location of Controls & Control Definitions ................................................. 15-22

Service Information......................................................................................... 24

Summary of Contents for IT188B

Page 1: ... Unit Changing the Remote Battery 5 Setting the Clock 6 Docking and Playing an iPod 7 Tuning the AM FM Radio Saving Radio Stations to the Units Memory 8 Composite Video Output Stereo RCA Output 9 Using the Stereo RCA Inputs 10 Mounting the Unit to a Wall 11 14 Location of Controls Control Definitions 15 22 Service Information 24 ...

Page 2: ...may cause harmful interference to radio communications However there is no guarantee that interference will not occur in a particular installation If this equipment does cause harmful interference to radio or television reception which can be determined by turning the equipment off and on the user is encouraged to try to correct the interference by one or more of the following measures Reorient or...

Page 3: ... Important Safety Instructions ...

Page 4: ...bwoofer built in Built in Amplifier Digital Tune AM FM Radio Direct Access Tuning 10 Station Memory Presets Digital Clock with Adjustable Timer LCD Display with White Backlight Video Out Jack for iPod photo video versions RCA type Line In jack for other Audio Players 3 5mm 2 Aux In jacks for other Audio Players Subwoofer Output Jack A V Output Remote Control Full Feature Remote Control operates Un...

Page 5: ...ff in the direction of the arrow above the word Open 2 Replace the old battery with an equivalent new battery AAA Batteries WARNING Danger of explosion if the remote control s batteries are incorrectly installed Replace only with the same or equivalent battery AAA Battery AAA Battery AC 120V 60Hz ...

Page 6: ...ll begin to blink indicating that it can be adjusted 2 Press the FWD and REV Buttons to adjust the hour 3 Press the Time Set Button The minute will begin to blink indicating that it can be adjusted 4 Press the FWD and REV Buttons to adjust the minute 5 Press the Time Set Button to save the set time ...

Page 7: ...Press the Power Button to turn the unit on 3 Press the Source Button to switch the unit to iPod Mode 4 Press the Play Pause Button to begin playing the docked iPod 5 Turn the Volume Buttons to increase or decrease the volume of the unit 6 Press the REV and FWD Buttons to skip tracks Press and hold the REV and FWD Buttons to search through individual tracks 7 Press the Chapter Album or Playlists Bu...

Page 8: ...ay will show MEM 01 MEM will flash 3 Press the Play Button repeatedly to select from MEM 01 to MEM 10 4 Press and hold the Play Button to save the current radio frequency to the selected memory station 5 Press the Play Button repeatedly to select stored radio stations Saving AM FM Radio Stations using the Remote 1 Tune the AM FM Radio to the desired radio frequency 2 Press and hold the Menu Button...

Page 9: ...ed through the unit will now be seen and heard on the connected television Audio In Video In Line Input 1 Plug one end of a 3 5 mm mini phono cable not included or a 3 5 mm mini phono to RCA cable not included into the Line Input on the unit 2 Plug the other end of the cable into the audio output headphone output on an Mp3 Player or Other Audio Source 3 Press the Power Button to turn the unit on 4...

Page 10: ...on the unit and the stereo RCA outputs on a television or sound system 2 Turn the unit on by pressing the Power Button 3 Press the Source Button to change the unit to AV1 if the stereo RCA cable is connected to IN1 Change the unit to AV2 if the stereo RCA cable is connected to IN2 4 Audio played through the connected television or sound system will now be heard through the unit Television DVD Play...

Page 11: ...ure 6 below I II III IV V Step 1 Decide whether or not to use spacers behind the wall mount brackets Step 2 Locate 2 studs in the wooden wall Most houses have the studs spaced on 16 inch centers Details see figure 7 Step 3 Screw the wall mount brackets or spacer and filling pieces into two parallel studs using two screw in each wall mount bracket Details see figure 8 and any one of figures 2 to 6 ...

Page 12: ... Mounting the Unit to a Wall 1 Mounting accessories Figure 1 Figure 2 2 Screw combination See below figures 2 to 6 for details ...

Page 13: ...Mounting the Unit to a Wall Figure 3 Figure 4 Figure 5 Figure 6 ...

Page 14: ... Mounting the Unit to a Wall WOODEN STUD 3 Mounting steps See below figures 7 to 10 for details Figure 7 Figure 8 Figure 9 Figure 10 ...

Page 15: ...Location of Controls 1 5 2 3 4 6 7 8 9 ...

Page 16: ...er audio source player to the unit The unit must be in AV 2 mode for the Line Input to work 5 LCD Display The LCD Display displays all of the system and menu information 6 Power Button Press the Power Button to turn the unit off and on 7 Source Button Press the Source Button to switch between AM FM radio iPod AV1 and AV2 modes 8 Play Pause Button Press the Play Pause Button to play or pause an iPo...

Page 17: ... Location of Controls 10 12 11 13 15 14 RESET 16 ...

Page 18: ...on to receive FM radio reception on the unit 13 Stereo RCA Outputs Use the Stereo RCA Outputs to connect an audio system to the unit and to play audio from the unit through the connected audio system 14 Subwoofer Output Use the Subwoofer Output to connect an external subwoofer to the unit 15 Stereo RCA Inputs Use the Stereo RCA Inputs to connect a TV DVD player camcorder or game system to the unit...

Page 19: ... Location of Controls REPEAT ST VOLUME MENU TIME SET MUTE SLEEP BASS TREBLE CLOCK VIEW DIMMER SOURCE iPod DRAWER 19 18 22 24 23 17 25 26 27 29 20 21 28 ...

Page 20: ...od s menus Press the REV and FWD Buttons to skip backwards and forwards through media on a docked iPod Press and hold the REV and FWD Buttons to search through an individual media file on a docked iPod Press the TUN Buttons to tune the AM or FM radio 24 Treble Buttons Press the Treble Buttons to adjust the treble of the unit 25 Source Button Press the Source Button to switch between AM FM radio iP...

Page 21: ... Location of Controls REPEAT ST VOLUME MENU TIME SET MUTE SLEEP BASS TREBLE CLOCK VIEW DIMMER SOURCE iPod DRAWER 31 33 32 30 34 ...

Page 22: ...e LCD Display Press the Random Button to play songs randomly in iPod mode 32 Select Button Press the Select Button to make selections on a docked iPod 33 Bass Buttons Press the Bass Buttons to adjust the bass of the unit 34 Play Pause Time Set Buttons Press the Play Pause Button to play or pause an iPod With the unit powered off press the Time Set Button to set the clock Use the REV and FWD Button...

Page 23: ...fo dpi global com To download this Instruction Manual in English Spanish or French visit the Support section at www ilive net Para descargar este manual de instrucción en inglés español o francés visite la sección de la ayuda en www ilive net Pour télécharger ce manuel d instruction en anglais espagnol ou le Français visitez la section de soutien à www ilive net 2008 Digital Products International...

Reviews: