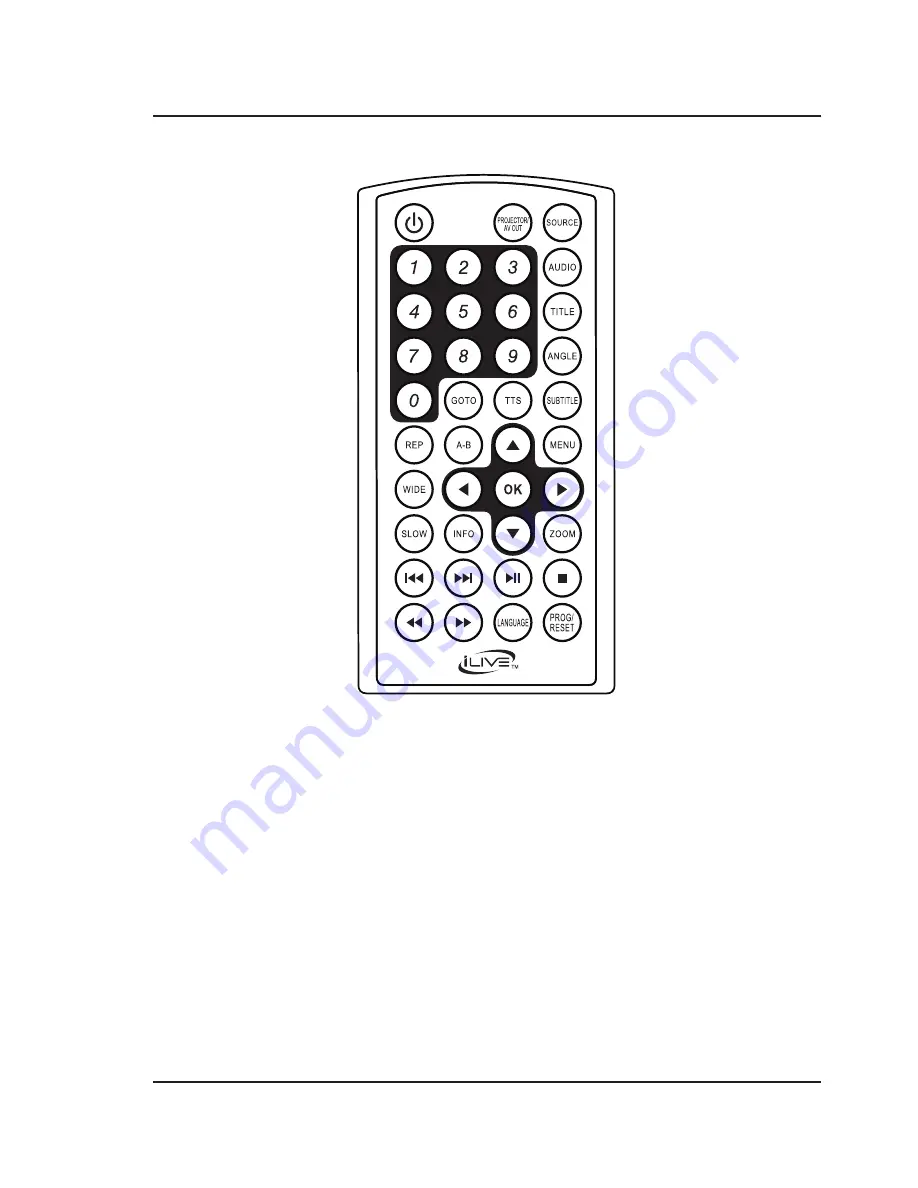
background image

8

Remote

Overview

Power

Press to power ON or OFF.

Number Keypad

Use to enter channel 

or track numbers.

Go To

On a loaded CD/DVD, 

press to quickly go to a 

specific track or chapter. 

Use the Arrow/OK buttons to 

enter and confirm your selection.

Rep (Repeat)

Press to repeat the current 

selection or track.

A-B

Create a repeating loop on 

a CD, DVD, or media file.

Press to set A point (start), press 

again to set B point (end).

Press a third time to cancel.

Wide

Press to switch between 

4:3 LB, 4:3 PS, and 16:9.

Slow

Press to select slow 

motion play speed.

Info

Press to view chapter and 

track info on a loaded DVD.

Skip Back/Forward

Press to skip between 

chapters or tracks.

Reverse/Fast Fwd

Press to search through an 

individual chapter or track 

(does not apply to CD+Gs).

Projector / AV Out

Press to play from the projector 

or AV Outputs. Selecting AV Out 

will power OFF the projector lens.
Source

Press and use the Arrow/Enter 

buttons to select the source.
Audio

For DVD play, press to adjust 

audio settings for the DVD, 

including Voice Description and 

DVD commentary (if available).
Title

Press to access the title 

menu on a loaded DVD. 
Press again to play DVD 

from the beginning.
Angle

Press to view alternate angles 

on supported DVDs.
TTS (Voice Guide)

Press to turn Talk-to-Text 

ON or OFF (intended for 

visually impaired users). 
TTS announces menus 

and remote functions.
Subtitle

Press to turn subtitles ON or OFF.
Menu (DVD)

Press to access DVD menus.
Arrows / OK

Press to navigate and make 

selections in on screen menus.
Zoom

Press to zoom in or out 

on a loaded DVD.
Play/Pause

Press to play or pause an 

individual chapter or track.
Stop 

Press to stop an individual 

chapter or track during play.
Language 

Press to switch audio between 

English, French, and Spanish.
Prog / Reset

Press to program a loaded 

disc to play titles, chapters, or 

tracks in a specified order.
Press and hold to reset the unit 

to default settings. The unit will 

power OFF, defaults are restored 

when next powered ON.

Summary of Contents for IJP557 v1905-01

Page 1: ...Party Projector Karaoke Movie Music System User s Guide for Model IJP557 v1905 01 For the most up to date version of this User s Guide go to www iliveelectronics com...

Page 2: ...exposed to rain or moisture does not operate normally or has been dropped Use only with a cart stand tripod bracket or table specified by the manufacturer or sold with the apparatus When a cart is us...

Page 3: ...ified may result in hazardous radiation exposure WARNING Changes or modifications to this unit not expressly approved by the party responsible for compliance could void the user s authority to operate...

Page 4: ...HDMI Connection Pairing to a Bluetooth Device and Playing Audio Wirelessly Playing Audio Through the 3 5mm Audio Line Input Sending Media to Other Devices 13 Playing Media on an External Television DV...

Page 5: ...r included Power Plug the AC DC power adapter included into a standard wall outlet and the DC power input on the top of the unit After connecting power please allow approximately 5 seconds to pass bef...

Page 6: ...6 Rear Top Views Overview 13 18 20 21 23 3 1 4 2 5 6 8 7 11 14 17 19 20 22 9 10 12 16 15 7...

Page 7: ...16 Menu Stop Pair Skip Press to access DVD menus Press to stop audio or video USB CD DVD Bluetooth Modes Press and hold to pair to a Bluetooth device Press to skip tracks or chapters 17 Play Pause Tit...

Page 8: ...ce Press and use the Arrow Enter buttons to select the source Audio For DVD play press to adjust audio settings for the DVD including Voice Description and DVD commentary if available Title Press to a...

Page 9: ...oth white or lightly colored surface will provide the best picture resolution Projector Distance 3 16 ft 1 5 m Adjust the Lens Tilt Angle to best fit your viewing surface and angle Be sure to aim the...

Page 10: ...upports USB drives up to 32GB 1 Load a USB drive into the USB Port on the rear of the projector 2 Press the Projector AV Out button on the projector to turn the lens ON 3 Set the Source to USB Mode 4...

Page 11: ...luded and a device with an HDMI output 1 Using an HDMI cable connect the HDMI input on the projector to the HDMI output on your external media player streaming or gaming device 2 Press the Projector A...

Page 12: ...and search for nearby devices Select IJP557 when it is discovered 4 When successfully paired a chime will sound and the pairing indicator will change to solid blue Audio played from the connected devi...

Page 13: ...ugs on the RCA cables to their sockets 3 Set the television s input source to the connected output from the projector 4 Audio and video played from the projector will now be sent to the connected tele...

Page 14: ...g Use the remote for play controls menu navigation and device options Programming a DVD Note The procedure for programming CDs CD Gs and DVDs is the same 1 Press the Prog button on the remote 2 Use th...

Page 15: ...lyrics that will appear while the CD is playing The unit will automatically detect the type of disc to be played Programming a CD CD G Note The procedure for programming CDs CD Gs and DVDs is the same...

Page 16: ...ectronics com Para descargar este Manual del Usuario en ingl s espa ol y franc s o para obtener respuestas a preguntas frecuentes visite la secci n de apoyo en www iLiveElectronics com Pour t l charge...

Reviews: