Iiyama ProLite XU24S3HSU User Manual Download Page 25

ENGLISH

  OPERATING THE MONITOR  21
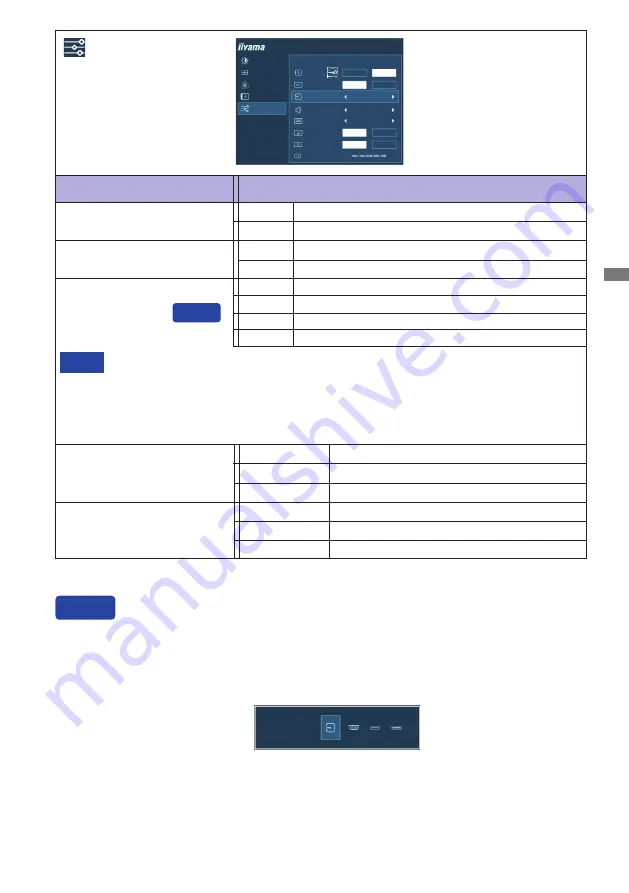
Adjustment Item

Problem / Option                                      Button to Press

Extra

Reset

Factory-preset data is restored.

No

Return to Menu.

Yes

Signal Select

If "Auto" is selected, only one source available is selected automatically.

If there are more input sources available and you select one of them, the "Auto" option is 

not available.

If multiple inputs are connected, the monitor may not recover the last one used after 

turning it off and on again.

It is only possible when you set a specific source.

NOTE

Select the Analog input.     

Select the Digital (HDMI) input.     

VGA
HDMI

PICTURE ADJUST

IMAGE SETTINGS

COLOR SETTINGS

OSD

EXTRA

EXTRA

RESET

DDC/CI

SIGNAL SELECT

AUDIO SOURCE

OPENING LOGO

LED

YES

NO

HDMI

ON

OFF

LINE IN

ON

OFF

ProLite XUB2493HSU

INFORMATION

OFF

ON

HDMI RANGE

AUTO

Auto

Select the signal input automatically.

Direct

Select the Digital (DisplayPort) input.     

DP

Select the HDMI input.

LINE IN

Select the LINE IN input.

HDMI

Audio Source *

* Suitable for HDMI/DisplayPort input only.

DDC/CI

Off

DDC/CI is Off.

DDC/CI is On.

On

SIGNAL SELECT

AUTO

VGA

HDMI

DP

Select the DisplayPort input.

DP

You can skip the Menu items and directly display an option setting screen by using the following 
button operations.

 Signal Select: Press the INPUT Button when the Menu is not displayed, it shows following Menu.


Press the INPUT Button again to select input source and then press the MENU button.

Direct

HDMI Range

Full Range
Limited Range

For full-range color scale signal.
For limited color scale signal.

Auto

Select the HDMI Range automatically.

Summary of Contents for ProLite XU24S3HSU

Page 1: ...ch for choosing the iiyama LCD monitor We recommend that you take a few minutes to read this comprehensive manual carefully before installing and switching on the monitor Please keep this manual in a...

Page 2: ...ENGLISH...

Page 3: ...Model No PL2493H We reserve the right to change specifications without notice All trademarks used in this user manual are the property of their respective owners As an ENERGY STAR Partner iiyama has d...

Page 4: ...roLite XU2493HSU 10 CONNECTING YOUR MONITOR ProLite XUB2493HSU 11 CONNECTING YOUR MONITOR ProLite XU2493HSU 12 DISCONNECTING YOUR MONITOR 13 COMPUTER SETTING 13 ADJUSTING THE HEIGHT AND THE VIEWING AN...

Page 5: ...e fire electric shock or damage INSTALL THE MONITOR ON A FLAT STABLE SURFACE The monitor may cause an injury if it falls or is dropped DO NOT USE THE MONITOR NEAR WATER Do not use where water may be s...

Page 6: ...be sure the signal cable is disconnected If you do not disconnect them it may cause fire or electric shock UNPLUG THE MONITOR If the monitor is not in use for a long period of time it is recommended t...

Page 7: ...or iiyama service center for advice or replacement packaging WARNING If you drop any materials or liquids such as water into the monitor when cleaning unplug the power cable immediately and contact y...

Page 8: ...lied by iiyama An approved power cable greater or equal to H05VVF 3G 0 75mm must be used 2 Accessory for ProLite XUB2493HSU 3 Accessory for ProLite XU2493HSU Power Cable 1 HDMI Cable USB Cable Stand B...

Page 9: ...r which L length is 7mm to fasten the monitor Using the screw longer than this may cause electric shock or damage because it may contact with the electrical parts inside the monitor WARNING Screw Chas...

Page 10: ...eight before panel rotation Attempting to rotate the panel forcibly without adjusting the stand height may cause damage to the panel or the stand With Stand ROTATING THE MONITOR ProLite XUB2493HSU The...

Page 11: ...beforehand to prevent the monitor from being scratched Lay the monitor flat on a table with front face down Loosen the thumb screw to remove the Stand Base from the monitor Installation Put a piece o...

Page 12: ...a table with front face down Keep pressing the Hooks inward to pull out the Stand Base Press the Hook on the back of the monitor and remove the Stand Neck from the monitor Pull and hold the Cable Hol...

Page 13: ...m Connector 5V 500mA Keyhole for Security Lock You can fasten a security lock and cable to prevent the monitor from being removed without your permission USB Upstream Connector Headphone Connector Aud...

Page 14: ...akers USB Downstream Connector 5V 500mA USB Downstream Connector 5V 500mA Keyhole for Security Lock You can fasten a security lock and cable to prevent the monitor from being removed without your perm...

Page 15: ...d pressure from ear headphones can cause hearing damage hearing loss Collect Cables Put the cables through the cable hole to bundle them VGA cable is not supplied with the monitor If you use low quali...

Page 16: ...pressure from ear headphones can cause hearing damage hearing loss VGA cable is not supplied with the monitor If you use low quality VGA cable it may cause a result of electro magnetic interference P...

Page 17: ...you change the height or the angle It may cause damage or break the LCD screen Careful attention is required not to pinch your fingers or hands into the moving part of the stand when you change the an...

Page 18: ...rd In order to ensure a healthy and relaxed body position when using the monitor at visual display workstations it is recommended that the adjusted tilt angle should not exceed 10 Adjust the monitor s...

Page 19: ...for the OSD Time has passed Also the INPUT button can be used to return previous menu and turn off the On Screen Display Any changes are automatically saved in the memory when the On Screen Display d...

Page 20: ...ness of back light is reduced more than Mode1 Off Normal Eco 1 Mode3 Brightness of back light is reduced more than Mode2 i Style Color 1 2 3 Standard For general windows environment and monitor defaul...

Page 21: ...tention will be caused Adjustment Item Problem Option Button to Press Picture Adjust Overdrive 4 Off 2 1 0 1 2 It will improve the gray level response time of the LCD panel A higher level results in a...

Page 22: ...Phase automatically 1 For best results use the Auto Adjust in conjunction with the adjustment pattern See page 24 for SCREEN ADJUSTMENTS 2 Only Analog Input 3 See page 24 for SCREEN ADJUSTMENTS 4 It...

Page 23: ...ifies the difference of color appearance between equipment You can not adjust the Contrast Brightness i Style Color Adv Contrast Eco Color Settings and Blue Light Reducer during sRGB mode because thos...

Page 24: ...conds Adjustment Item Problem Option Button to Press OSD OSD Vertical Position PICTURE ADJUST IMAGE SETTINGS COLOR SETTINGS OSD EXTRA ON SCREEN DISPLAY SETTINGS OSD HORIZONTAL POSITION OSD VERTICAL PO...

Page 25: ...SOURCE OPENING LOGO LED YES NO HDMI ON OFF LINE IN ON OFF ProLite XUB2493HSU INFORMATION OFF ON HDMI RANGE AUTO Auto Select the signal input automatically Direct Select the Digital DisplayPort input...

Page 26: ...nt Item Problem Option Button to Press Extra Opening Logo Off Opening Logo is Off Opening Logo is On On Turn Off the Power Indicator when you are bothered by the light NOTE LED Off The Power Indicator...

Page 27: ...ding the MENU button for 10 seconds when Menu is not displayed will lock unlock the Power OSD Lock function Blue Light Reducer Pressing and holding of the Button for 1 2 seconds when the Menu is not d...

Page 28: ...displaying the picture other than the screen adjustment pattern In this case manual adjustments are required There are two ways to adjust the screen One way is automatic adjustment for Position Pixel...

Page 29: ...rizontal Vertical Position adjustments In case the picture frame is bigger or smaller than the data display area after the Pixel Clock adjustment repeat steps from 2 Stretch the right side of the pict...

Page 30: ...favorite wallpaper Adjust the Phase to correct horizontal wavy noise flicker or blur in the zebra pattern NOTE In case the strong flicker or blurs remain on a part of the screen repeat steps and beca...

Page 31: ...when either the keyboard or the mouse are touched again The power management feature of this product complies with power saving requirement of ENERGY STAR and VESA DPMS When activated it automaticall...

Page 32: ...the socket The Power Switch is turned ON The AC socket is live Please check with another piece of equipment If the blank screen saver is in active mode touch the keyboard or the mouse Increase the Co...

Page 33: ...ent is within the specification of the monitor The audio output level of the audio equipment is within the specification of the monitor The Audio Cable is properly connected Problem Check No sound For...

Page 34: ...nput Video Signal Analog 0 7Vp p Standard 75 Positive Digital HDMI DisplayPort USB Standard USB2 0 DC5V 500mA Number of USB Ports Connector shape 1 Upstream Series B 2 Downstream Series A Input Audio...

Page 35: ...egative Input Video Signal Analog 0 7Vp p Standard 75 Positive Digital HDMI DisplayPort USB Standard USB2 0 DC5V 500mA Number of USB Ports Connector shape 1 Upstream Series B 2 Downstream Series A Inp...

Page 36: ...UB2493HSU DIMENSIONS ProLite XU2493HSU 534 0mm 21 0 539 5mm 21 2 210 0mm 8 3 240 0mm 9 5 379 5mm 14 9 45 5mm 1 8 373 0mm 14 7 503 0mm 19 8 323 0mm 12 7 303 0mm 11 9 415 0mm 16 3 199 5mm 7 8 45 5mm 1 8...

Page 37: ...Hz 31 500MHz 800 600 37 879kHz 60 317Hz 40 000MHz 46 875kHz 75 000Hz 49 500MHz 1024 768 48 363kHz 60 004Hz 65 000MHz 60 023kHz 75 029Hz 78 750MHz 1280 1024 63 981kHz 60 020Hz 108 000MHz 79 976kHz 75 0...

Reviews: