background image

ENGLISH

  BEFORE YOU OPERATE THE MONITOR  11  

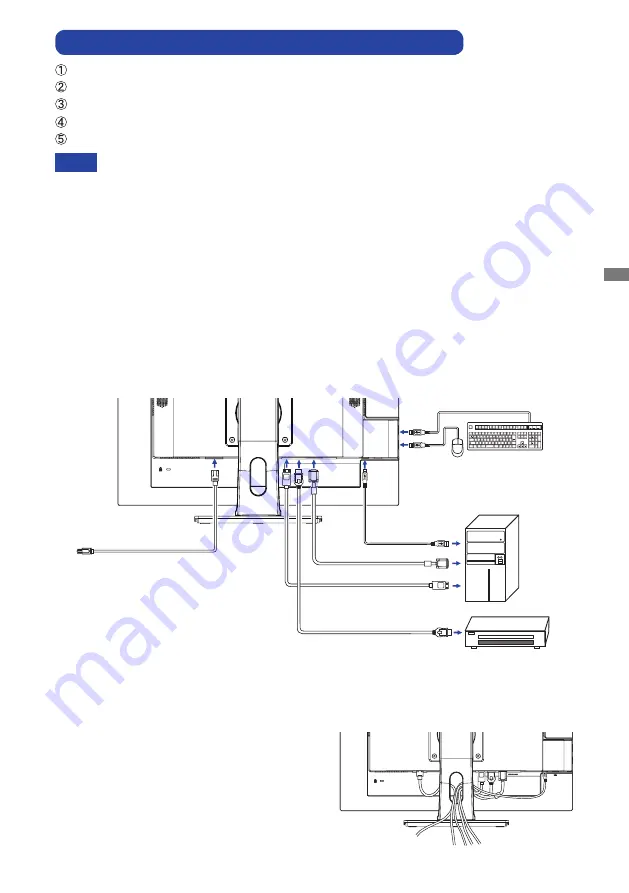
CONNECTING YOUR MONITOR : ProLite XUB2495WSU


Ensure that both the computer and the monitor are switched off.

  Connect the computer to the monitor with the signal cable.
   Connect the computer to the monitor with the USB Cable.

  Connect the Power Cable to the monitor first and then to the power source.

   Turn on your monitor and computer.

[Example of Connection]

<Back>

NOTE

 The signal cables used for connecting the computer and monitor may vary with the 

type of computer used. An incorrect connection may cause serious damage to both 
the monitor and the computer. The cable supplied with the monitor is for a standard 
connector. If a special cable is required please contact your local iiyama dealer or 

regional iiyama office.

 For connection to Macintosh computers, contact your local iiyama dealer or regional 

iiyama office for a suitable adaptor.

 Make sure you tighten the finger screws at each end of the signal cable.

 The Class I pluggable equipment Type A must be connected to protective earth.

 The socket-outlet shall be installed near the equipment and shall be easily accessible.

 Excessive sound pressure from ear-/headphones can cause hearing damage/hearing loss.

[ Collect Cables ]

Put the cables through the cable hole to bundle 
them.

Power Cable (Accessory)

Computer

VGA Cable (Not included)*

HDMI Cable (Not included)

USB Cable (Accessory)

Mouse

Keyboard

DisplayPort Cable (Accessory)

AV Equipment

* VGA cable is not supplied with the monitor. If you use low quality VGA cable, it may cause a result 

of electro-magnetic interference. Please contact the iiyama Support Centre in your country if you 

wish to connect the monitor via the VGA input.

Summary of Contents for ProLite XU2495WSU

Page 1: ...oosing the iiyama LCD monitor We recommend that you take a few minutes to read carefully through this brief but comprehensive manual before installing and switching on the monitor Please keep this man...

Page 2: ...ENGLISH...

Page 3: ...e year product warranty Minimum three year availability of spare parts Product takeback Packaging Limits on hazardous substances in product packaging Packaging prepared for recycling Ergonomic User ce...

Page 4: ...the bezel may cause disturbing reflections from surrounding light and bright surfaces CE MARKING DECLARATION OF CONFORMITY This LCD monitor complies with the requirements of the EC EU Directive 2014...

Page 5: ...ND CONNECTORS ProLite XU2495WSU 10 CONNECTING YOUR MONITOR ProLite XUB2495WSU 11 CONNECTING YOUR MONITOR ProLite XU2495WSU 12 COMPUTER SETTING 13 ADJUSTING THE VIEWING ANGLE ProLite XU2495WSU 13 ADJUS...

Page 6: ...cause fire electric shock or damage INSTALL THE MONITOR ON A FLAT STABLE SURFACE The monitor may cause an injury if it falls or is dropped DO NOT USE THE MONITOR NEAR WATER Do not use where water may...

Page 7: ...e sure the signal cable is disconnected If you do not disconnect them it may cause fire or electric shock UNPLUG THE MONITOR If the monitor is not in use for a long period of time it is recommended th...

Page 8: ...iyama service center for advice or replacement packaging WARNING If you drop any materials or liquids such as water into the monitor when cleaning unplug the power cable immediately and contact your d...

Page 9: ...lay VESA DDC2B Compliant Windows 7 8 1 10 Compliant Power Management ENERGY STAR and VESA DPMS Compliant Ergonomic Design TCO Certified VESA Mounting Standard 100mm 100mm Compliant Keyhole for Securit...

Page 10: ...is 10mm to fasten the monitor Using the screw longer than this may cause electric shock or damage because it may contact with the electrical parts inside the monitor WARNING Screw Chassis Mounting Sta...

Page 11: ...r is designed to be compatible with both landscape and portrait modes Video card for portrait display will be required for rotating the image on the screen With Stand A A Portrait Available Power Indi...

Page 12: ...moval Put a piece of soft cloth on the table beforehand to prevent the monitor from being scratched Lay the monitor flat on a table with front face down Loosen the thumb screw to remove the Stand Base...

Page 13: ...f soft cloth on the table beforehand to prevent the monitor from being scratched Lay the monitor flat on a table with front face down Hold the monitor and install the Stand Base to the monitor until i...

Page 14: ...Mode Exit i Style Color EXIT Input Select INPUT Speakers USB Downstream Connector USB Downstream Connector USB Downstream Connector USB Upstream Connector Headphone connector HEADPHONE VGA Connector V...

Page 15: ...ECO Mode Exit i Style Color EXIT Input Select INPUT Speakers USB Downstream Connector USB Downstream Connector USB Downstream Connector USB Upstream Connector Headphone connector HEADPHONE VGA Connec...

Page 16: ...r regional iiyama office For connection to Macintosh computers contact your local iiyama dealer or regional iiyama office for a suitable adaptor Make sure you tighten the finger screws at each end of...

Page 17: ...ontact your local iiyama dealer or regional iiyama office For connection to Macintosh computers contact your local iiyama dealer or regional iiyama office for a suitable adaptor Make sure you tighten...

Page 18: ...to 22 degrees upward and 5 degrees downward In order to ensure a healthy and relaxed body position when using the monitor at visual display workstations it is recommended that the adjusted tilt angle...

Page 19: ...the monitor s height or angle You are able to adjust the monitor s height up to 130mm angle up to 45 degrees right and left 22 degrees upward and 5 degrees downward Do not touch the LCD screen when y...

Page 20: ...l position select Menu item of Geometry and then press the ENTER Button Then select Vertical Position by using the Buttons An adjustment page appears after you press the ENTER Button Then use the Butt...

Page 21: ...tion Clock and Phase automatically ProLite XUB2495WSU AUTO ADJUST PICTURE ADJUST GEOMETRY COLOR SETTINGS OSD LANGUAGE RECALL MISCELLANEOUS INPUT SELECT AUDIO SETTINGS CLICK ENTER AGAIN TO AUTO ADJUST...

Page 22: ...SETTINGS ProLite XUB2495WSU BRIGHTNESS OSD CONTRAST ECO BLUE LIGHT REDUCER ADV CONTRAST OVERDRIVE OFF OFF OFF ON OFF GAMMA 1 8 ECO 4 Off Normal Direct Mode1 Brightness of back light is reduced Brightn...

Page 23: ...GUAGE RECALL MISCELLANEOUS INPUT SELECT AUDIO SETTINGS ProLite XUB2495WSU OSD HORIZONTAL POSITION GEOMETRY VERTICAL POSITION PIXEL CLOCK PHASE Phase Pixel Clock Too left Too right Too low Too high Hor...

Page 24: ...reset Bluish white Red Green 9300K Reddish white 7500K Greenish white 6500K Blue Color Temperature i Style Color Standard For general windows environment and monitor default setting Text For text edit...

Page 25: ...LOR SETTINGS LANGUAGE RECALL MISCELLANEOUS INPUT SELECT AUDIO SETTINGS ProLite XUB2495WSU OSD ON SCREEN DISPLAY SETTINGS OSD HORIZONTAL POSITION OSD VERTICAL POSITION OSD TIME AFTER AC CUT ON OFF OSD...

Page 26: ...DEUTSCH ITALIANO POLSKI ESPA OL NEDERLANDS ESK ENGLISH Adjustment Item Problem Option Button to Press Recall Recall Factory preset data is restored AUTO ADJUST PICTURE ADJUST GEOMETRY COLOR SETTINGS...

Page 27: ...GUAGE RECALL MISCELLANEOUS INPUT SELECT AUDIO SETTINGS ProLite XUB2495WSU OSD MISCELLANEOUS SHARP AND SOFT VIDEO MODE ADJUST OPENING LOGO DDC CI DISPLAY INFORMATION FULL OFF ON OFF ON Expansion displa...

Page 28: ...by using the following button operations Input Select Press the INPUT button when the Menu is not displayed Direct Search for an available input source and select automatically Auto Select the Analog...

Page 29: ...MISCELLANEOUS INPUT SELECT AUDIO SETTINGS ProLite XUB2495WSU OSD VOLUME OPTIONS MUTE AUDIO OFF ON Too soft Too loud Return the sound volume to the previous level Turn off the sound temporarily Off On...

Page 30: ...ppear on the screen 2 The OSD lock will be deactivated by pressing the front buttons ENTER again for about 5 seconds Power Switch 1 The power switch lock will be activated by pressing the front button...

Page 31: ...displaying the picture other than the screen adjustment pattern In this case manual adjustments are required There are two ways to adjust the screen One way is automatic adjustment for Position Clock...

Page 32: ...may flicker during the Clock H Position and V Position adjustment In case the picture frame is bigger or smaller than the data display area after the Clock adjustment repeat steps from 2 Stretch the r...

Page 33: ...he refresh rate of computer to low 60Hz and repeat steps from again Adjust the H Position after the Phase adjustment if the horizontal position moves during the adjustment Adjust the Phase to correct...

Page 34: ...screen becomes dark and the power indicator turns to orange From Power Management Mode the image reappears in several seconds when either the keyboard or the mouse are touched again The power managem...

Page 35: ...ith another piece of equipment If the blank screen saver is in active mode touch the keyboard or the mouse Increase the Contrast and or Brightness The computer is ON The Signal Cable is properly conne...

Page 36: ...l of the audio equipment is within the specification of the monitor The audio output level of the audio equipment is within the specification of the monitor The sound is too loud or too quiet For bett...

Page 37: ...1920 1200 60Hz Input Connector VGA HDMI DisplayPort Plug Play VESA DDC2BTM Input Sync Signal Separate sync TTL Positive or Negative Input Video Signal Analog 0 7Vp p Standard 75 Positive Digital HDMI...

Page 38: ...Input Connector VGA HDMI DisplayPort Plug Play VESA DDC2BTM Input Sync Signal Separate sync TTL Positive or Negative Input Video Signal Analog 0 7Vp p Standard 75 Positive Digital HDMI DisplayPort USB...

Page 39: ...adjustment range 532 0mm 20 9 527 5mm 20 8 331 5mm 13 1 350 5mm 13 8 240 0mm 9 4 210 0mm 8 3 387 0mm 15 2 517 0mm 20 4 46 5mm 1 8 DIMENSIONS ProLite XU2495WSU 532 0mm 20 9 527 5mm 20 8 350 5mm 13 8 33...

Page 40: ...59 940Hz 25 175MHz 800 600 35 156kHz 56 250Hz 36 000MHz 37 879kHz 60 317Hz 40 000MHz 1024 768 48 363kHz 60 004Hz 65 000MHz 1280 1024 63 981kHz 60 020Hz 108 000MHz 1440 900 55 935kHz 59 887Hz 106 500M...

Reviews: