background image

ENGLISH

16  OPERATING THE MONITOR

SCREEN ADJUSTMENTS

 The screen adjustments described in this manual are designed to set image position and minimize 

fl icker or blur for the particular computer in use. 

 The monitor is designed to provide the best performance at resolution of 1920 × 1080, but can not 

provide the best at resolutions of less than 1920 × 1080 because the picture is automatically stretched 

to fi t the full screen. It is recommended to operate at resolution of 1920 × 1080 in normal use.

 Displayed text or lines will be blurred or irregular in thickness when the picture is stretched due to 

the screen enlargement process.

 It is preferable to adjust the image position and frequency with the monitor controls, rather than the 

computer software or utilities. 

 Perform adjustments after a warm-up period of at least thirty minutes.

 Additional adjustments may be required after the Auto Adjust depending on the resolution or signal 

timing.

 The Auto Adjust may not work correctly when displaying the picture other than the screen adjustment 

pattern. In this case, manual adjustments are required.

There are two ways to adjust the screen. One way is automatic adjustment for Position, Clock and 

Phase. The other way is performing each adjustment manually.

Perform the Auto Adjust first when the monitor is connected to a new computer, or resolution is 

changed. If the screen has a flicker or blur, or the picture does not fit in the display area after 

performing the Auto Adjust, manual adjustments are required. Both adjustments should be made by 

using the screen adjustment pattern (Test.bmp) obtained via the IIYAMA web site (http://www.iiyama.

com).

Adjust the image by following the procedure below to get the desired picture.

This manual explains adjustment under Windows 95/98/2000/Me/XP/Vista/7.

  Display the picture at the optimum resolution.

  Enter the Test.bmp (screen adjustment pattern) to wallpaper. 

 Consult the appropriate documentation for doing this.

 Test.bmp is made at resolution of 1280 × 1024. Set the display position to center in the 

wallpaper setting dialogue box. If you use Microsoft

®

 PLUS! 95/98 cancel the setting of 

“Stretch desktop wallpaper to fi t the screen”.

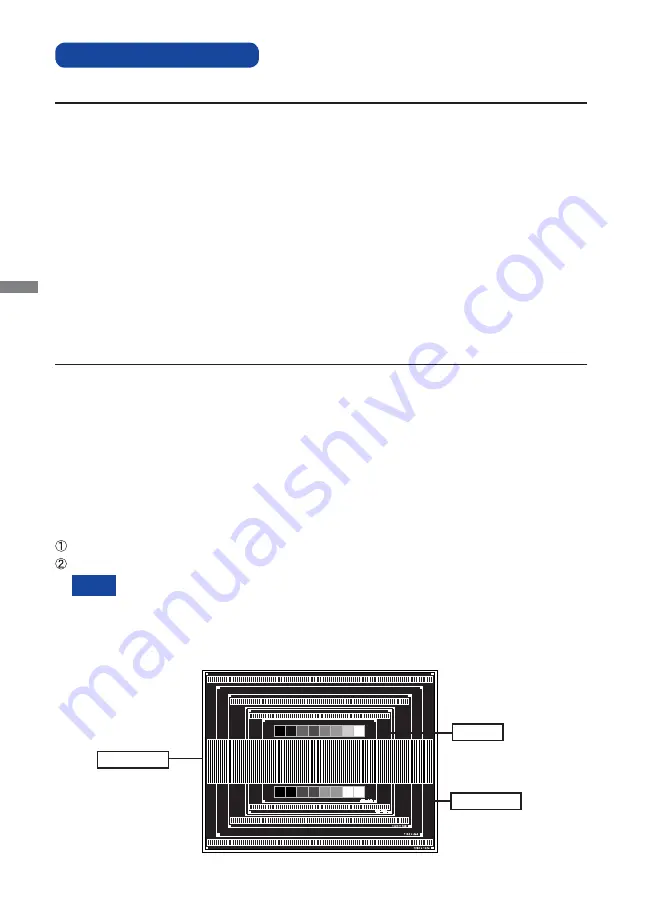
[Adjustment pattern] 

Zebra pattern

Color bar

Picture frame

NOTE

Adjust the image by following the procedure below to get the desired picture when selecting Analog input.      

Summary of Contents for ProLite X2775HDS

Page 1: ...ch for choosing the iiyama LCD monitor We recommend that you take a few minutes to read this comprehensive manual carefully before installing and switching on the monitor Please keep this manual in a...

Page 2: ...ENGLISH...

Page 3: ...ories Electric and magnetic fields emissions as low as normal household background levels Low acoustic noise emissions When applicable Some of the Environmental features of the TCO Certified for displ...

Page 4: ...ezels the user should consider the placement of the display as the bezel may cause disturbing reflections from surrounding light and bright surfaces CE MARKING DECLARATION OF CONFORMITY This LCD monit...

Page 5: ...ING THE CONTENTS OF THE PACKAGE 4 FITTING AND REMOVAL OF BASE 5 CONTROLS AND CONNECTORS 6 CONNECTING YOUR MONITOR 7 COMPUTER SETTING 8 ADJUSTING THE VIEWING ANGLE 8 OPERATING THE MONITOR 9 ADJUSTMENT...

Page 6: ...e fire electric shock or damage INSTALL THE MONITOR ON A FLAT STABLE SURFACE The monitor may cause an injury if it falls or is dropped DO NOT USE THE MONITOR NEAR WATER Do not use where water may be s...

Page 7: ...OVE THE MONITOR When you move the monitor turn off the power switch unplug the monitor and be sure the signal cable is disconnected If you do not disconnect them it may cause fire or electric shock UN...

Page 8: ...t by yourself SPECIAL NOTES ON LCD MONITORS NOTE If you have to return your unit for service and the original packaging has been discarded please contact your dealer or iiyama service center for advic...

Page 9: ...sed by a power cable not supplied by iiyama Power Cable D Sub Signal Cable DVI D Cable USB Cable Audio Cable Stand Base Safety Guide Quick Start Guide BEFORE YOU OPERATE THE MONITOR CHECKING THE CONTE...

Page 10: ...he instructions below to remove the stand Be sure to include the stand with the monitor if it is necessary to return the unit CAUTION FITTING AND REMOVAL OF BASE Installation Put a piece of soft cloth...

Page 11: ...O Speakers USB Connector USB Connector AC Connector AC IN Keyhole for Security Lock You can fasten a security lock and cable to prevent the monitor from being removed without your permission Headphone...

Page 12: ...type of computer used An incorrect connection may cause serious damage to both the monitor and the computer The cable supplied with the monitor is for a standard 15 pin D Sub connector If a special ca...

Page 13: ...ove Monitor Drivers are not required in most cases for Macintosh or Unix operating systems For further information please contact your computer dealer first for advice COMPUTER SETTING NOTE ADJUSTING...

Page 14: ...On Screen Display disappears when the time set for the Timeout has passed Also the AUTO button can be used to return previous menu and turn off the On Screen Display Any changes are automatically sav...

Page 15: ...ode2 i Style Color Standard For general windows environment and monitor default setting Text For text editing and viewing in a word processing environment Internet For internet environment Game For PC...

Page 16: ...Too left Too right Too low Too high H Position 2 V Position 2 Too narrow Too wide To correct flickering text or lines Image Setup Clock Phase H Position V Position 50 50 50 50 Aspect Full 1 See page...

Page 17: ...ormal Mode1 Mode2 High contrast Dark Mode3 Color Temp Gamma User R User G User B 50 50 Mode1 50 Color Temp Warm Gamma Color Temp Normal Warm Cool sRGB sRGB NOTE sRGB is an international standard which...

Page 18: ...n Simplified Chinese Espa ol Spanish Portuguese Timeout H Position OSD is too left OSD is too right OSD is too low OSD is too high You can set the OSD display duration time between 5 and 60 seconds Ad...

Page 19: ...sub DVI D and HDMI which are selected NOTE Select the D SUB input Select the DVI D input D sub DVI Others Reset Information V Frequency 60Hz Yes Signal Select Auto HDMI audio LINE IN Input Auto Resol...

Page 20: ...and display an adjustment scale directly by using the following button operations Direct Adjust H V Position Clock and Phase automatically For best results use the Auto Adjust in conjunction with the...

Page 21: ...nual adjustments are required There are two ways to adjust the screen One way is automatic adjustment for Position Clock and Phase The other way is performing each adjustment manually Perform the Auto...

Page 22: ...licker during the Clock H Position and V Position adjustment In case the picture frame is bigger or smaller than the data display area after the Clock adjustment repeat steps from C 2 Stretch the righ...

Page 23: ...e refresh rate of computer to low 60Hz and repeat steps from C again Adjust the H Position after the Phase adjustment if the horizontal position moves during the adjustment H Adjust the Brightness and...

Page 24: ...W The screen becomes dark and the power indicator turns to orange From Power Management Mode the image reappears in several seconds when either the keyboard or the mouse are touched again The power ma...

Page 25: ...problem you have If the monitor does not get a picture skip to 2 2 Consult the following items if you cannot find an appropriate adjustment item in OPERATING THE MONITOR or if the problem persists 3...

Page 26: ...io equipment is within the specification of the monitor G The sound is too loud or too quiet The audio output level of the audio equipment is within the specification of the monitor H A strange noise...

Page 27: ...3 23lbs Upward 20 degrees Downward 5 degrees Viewable angle Right Left Up Down 89 degrees each Typical Maximum Screen Size 597 6mm W 336 2mm H 23 5 W 13 2 H Power Source 100 240VAC 50 60Hz 1 5A Enviro...

Page 28: ...317Hz 60 004Hz 60 020Hz 59 887Hz 60 000Hz 60 000Hz 59 930Hz 56 424Hz Horizontal Frequency 31 469kHz 37 879kHz 48 363kHz 63 981kHz 55 935kHz 75 000kHz 65 290kHz 66 590kHz 24 827kHz Video Mode SXGA VES...

Reviews: