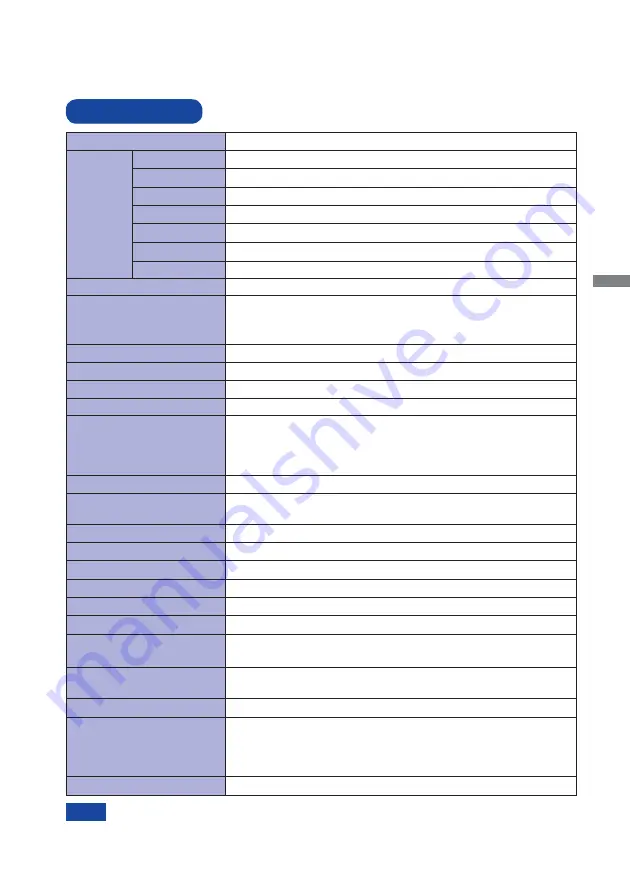
Iiyama ProLite B2888UHSU User Manual Download Page 29

ENGLISH

  APPENDIX  25  

SPECIFICATIONS

APPENDIX 

Design and speci

fi

 cations are subject to change without prior notice.

* USB, MHL and Audio equipment are not connected. 

LCD Panel  Panel technology TN

0.16mm H × 0.16mm V

Response time

Pixel pitch

5ms (Typical), 1ms (Gray to Gray)

Display Colors

Approx. 1.07 Billion

Sync Frequency

Analog : Horizontal: 24.0-80.0kHz, Vertical: 55-75Hz 
Digital (DVI/HDMI) : Horizontal: 30.0-100.0kHz, Vertical: 24-30,55-75Hz 
Digital (DisplayPort) : Horizontal: 30.0-135.0kHz, Vertical: 24-30,55-75Hz 

Native Resolution

3840 × 2160, 8.3 MegaPixels 

Input Connector

VGA(D-sub) mini 15 pin, DVI-D 24 pin, HDMI x2, DisplayPort x2

Plug & Play

VESA DDC2B

TM

45W typical, Power management mode: 0.5W maximum
Energy Ef

fi

 ciency Class: C

Power Consumption*

Dimensions / Net Weight 

663.0 × 412.0 - 542.0 × 230.0mm / 26.1 × 16.2 - 21.3 × 9.1" (W×H×D)
7.7kg / 16.9lbs
Upward: 17 degrees, Left/Right: 45 degrees each

Viewable angle

Right / Left : 85 degrees each, Up / Down: 80 degrees each (Typical) 

Maximum Screen Size 

620.9mm W × 341.3mm H / 24.4" W × 13.4" H

Power Source

100-240VAC, 50/60Hz, 1.0A 

Environmental 
Considerations

Approvals

CE, TÜV-Bauart, CU, VCCI-B, PSE, ENERGY STAR

®

Tilt Angle

Brightness
Contrast ratio

300cd/m

2

 (Typical)

1000 : 1 (Typical), Adv. Contrast Function Available

Analog: 0.7Vp-p (Standard), 75



Positive

Digital: DVI (Digital Visual Interface Standard Rev.1.0) compliance
Digital: HDMI, HDMI (MHL compliance)
Digital: DisplayPort

Input Video Signal

Input Audio Signal

1.0Vrms maximum

Speakers

3W × 2 (Stereo speakers)

Input Audio Connector

ø 3.5mm mini jack (Stereo)

Operating: 

Storage: 

5 to 35°C / 41 to 95°F 
10 to 80% (No condensation)
-20 to 60°C / -4 to 140°F
5 to 85% (No condensation)

Temperature
Humidity
Temperature
Humidity

Size Category

28"

Diagonal: 28" (71cm)

Size

Headphone Connector

ø 3.5mm mini jack (Stereo)

NOTE

USB Standard

USB3.0

Number of USB Ports
Connector shape

1 Upstream : Series B
2 Downstream : Series A 

Input Sync Signal

Separate sync: TTL, Positive or Negative

Summary of Contents for ProLite B2888UHSU

Page 1: ...hoosing the iiyama LCD monitor We recommend that you take a few minutes to read carefully through this brief but comprehensive manual before installing and switching on the monitor Please keep this manual in a safe place for your future reference ...

Page 2: ......

Page 3: ...e Web page of different countries from there CE MARKING DECLARATION OF CONFORMITY This LCD monitor complies with the requirements of the EC EU Directive 2004 108 EC EMC Directive 2006 95 EC Low Voltage Directive 2009 125 EC ErP Directive and 2011 65 EU RoHS Directive The electro magnetic susceptibility has been chosen at a level that gives correct operation in residential areas business and light ...

Page 4: ...S OF THE PACKAGE 4 WALL MOUNTING 5 FITTING AND REMOVAL OF BASE 6 CONTROLS AND CONNECTORS 7 CONNECTING YOUR MONITOR 8 COMPUTER SETTING 9 ADJUSTING THE HEIGHT AND THE VIEWING ANGLE 9 OPERATING THE MONITOR 10 ADJUSTMENT MENU CONTENTS 11 SCREEN ADJUSTMENTS 19 POWER MANAGEMENT FEATURE 22 TROUBLE SHOOTING 23 RECYCLING INFORMATION 24 APPENDIX 25 SPECIFICATIONS 25 DIMENSIONS 26 COMPLIANT TIMING 26 ...

Page 5: ...y cause fire electric shock or damage INSTALL THE MONITOR ON A FLAT STABLE SURFACE The monitor may cause an injury if it falls or is dropped DO NOT USE THE MONITOR NEAR WATER Do not use where water may be splashed or spilt onto the monitor as it may cause fire or electric shock OPERATE UNDER THE SPECIFIED POWER SUPPLY Be sure to operate the monitor only with the specified power supply Use of an in...

Page 6: ...DISCONNECT THE CABLES WHEN YOU MOVE THE MONITOR When you move the monitor turn off the power switch unplug the monitor and be sure the signal cable is disconnected If you do not disconnect them it may cause fire or electric shock UNPLUG THE MONITOR If the monitor is not in use for a long period of time it is recommended that it is left unplugged to avoid accidents HOLD THE PLUG WHEN DISCONNECTING ...

Page 7: ...rvice and the original packaging has been discarded please contact your dealer or iiyama service center for advice or replacement packaging WARNING If you drop any materials or liquids such as water into the monitor when cleaning unplug the power cable immediately and contact your dealer or iiyama service center CAUTION For safety reasons turn off the power switch and unplug the monitor before you...

Page 8: ... Smoothing Stereo Speakers 2 3W Stereo Speakers Plug Play VESA DDC2B Compliant Windows Vista 7 8 Compliant Power Management ENERGY STAR VESA DPMS Compliant VESA Mounting Standard 100mm 100mm Compliant Keyhole for Security Lock The rating of the Power Cable enclosed in 120V area is 10A 125V If you are using a power supply higher than this rating then a power cable with a rating of 10A 250V must be ...

Page 9: ... Screw with washer which L length is 7mm to fasten the monitor Using the screw longer than this may cause electric shock or damage because it may contact with the electrical parts inside the monitor Please check if the wall or ceiling can support the weight of the monitor before mounting it WALL MOUNTING WARNING Screw Chassis Mounting Stage L ...

Page 10: ...able with front face down Hold the monitor and push the Stand Base Use thumb screw provided to secure base to monitor column Removal Put a piece of soft cloth on the table beforehand to prevent the monitor from being scratched Lay the monitor flat on a table with front face down Remove thumb screw to remove base from monitor column FITTING AND REMOVAL OF BASE Thumb screw for Stand Base fixing Stan...

Page 11: ...io Connector AUDIO IN USB Downstream Connector Keyhole for Security Lock You can fasten a security lock and cable to prevent the monitor from being removed without your permission USB Upstream Connector PC USB VGA D sub Connector VGA DisplayPort Connector DP1 DisplayPort Connector DP2 HDMI MHL Connector HDMI1 MHL HDMI Connector HDMI2 DVI D 24pin Connector DVI Cable Holes AC Connector AC IN You can...

Page 12: ...tor If a special cable is required please contact your local iiyama dealer or regional iiyama office For connection to Macintosh computers contact your local iiyama dealer or regional iiyama office for a suitable adaptor Make sure you tighten the finger screws at each end of the signal cable Collect Cables A Put the cables through the cable hole B Collect cables at the back of the stand or Power C...

Page 13: ...ld the panel so that the monitor does not topple when you change the monitor s height or angle You are able to adjust the monitor s height up to 130mm angle up to 45 degrees right and left 17 degrees upward Do not touch the LCD screen when you change the height or the angle It may cause damage or break the LCD screen Careful attention is required not to catch your fingers or hands when you change ...

Page 14: ...us menu and turn off the On Screen Display Any changes are automatically saved in the memory when the On Screen Display disappears Turning off the power should be avoided while using the Menu For example to correct for vertical position select Menu item of Setup and then press the Button Then select V Position by using the Buttons An adjustment page appears after you press the Button Then select V...

Page 15: ...ver it will automatically be selected when just one source is using In Power Management Mode input switching is disabled Input source is fixed not selected automatically when VGA DVI HDMI1 MHL HDMI2 DisplayPort1 and DisplayPort2 which are selected Select the DVI input DVI Select the HDMI2 input HDMI2 NOTE Select the HDMI1 MHL input HDMI1 MHL Select the DisplayPort1 input DisplayPort1 Select the Di...

Page 16: ...ted Brightness of back light is reduced Off Normal ECO Mode Adv Contrast 2 5 Increased Contrast Ratio On Off Typical Contrast Ratio Adjustment Item Problem Option Button to Press Picture Contrast 1 Brightness of back light is reduced more than 1 2 Brightness of back light is reduced more than 2 3 Overdrive 5 Off 2 1 0 1 2 It will improve the gray level response time of the LCD panel A higher level...

Page 17: ...put DisplayPort2 Select the VGA input VGA Sub Win1 Input Sub Win2 Input Sub Win3 Input PiP Size PiP Position Swap Small Middle Large Top Right Top Left Bottom Right Bottom Left Reduce the size of the Sub screen Increase the size of the Sub screen Move the sub screen to the top right corner Move the sub screen to the top left corner Move the sub screen to the bottom right corner Move the sub screen...

Page 18: ... for HDMI DisplayPort input only You can skip the Menu items and display an adjustment scale directly by using the following button operations Audio Press the Button when the Menu is not displayed Mute Pressing and holding of the Button for about 2 seconds when the Menu is not displayed Mute and Unmute are switched as follows by pressing the Button successively Off On Direct Select the DisplayPort...

Page 19: ...can skip the Menu items and display an adjustment scale directly by using the following button operations i Style Mode Press the Button when the Menu is not displayed Direct Standard For general windows environment and monitor default setting Text For text editing and viewing in a word processing environment Game For PC game environment Cinema For movie and video environment Scenery For displaying...

Page 20: ...ess OSD Setting OSD Time Out OSD Background The background of OSD is mode transparent Off 1 2 3 4 iiyama Logo displayed when the monitor is turned on On Off iiyama Logo does not display when the monitor is turned on Opening Logo English Deutsch English German Français French Japanese Russian Polski Polish Simplified Chinese Nederlands Dutch Русский Adjustment Item Problem Option Button to Press La...

Page 21: ... Clock and Phase automatically Too left Too right Too low Too high Too narrow Too wide To correct flickering text or lines Clock 1 H Position 1 3 V Position 1 3 Phase 1 DisplayPort 5 Set the version of the DisplayPort 1 1 1 2 Blue Light Reducer 4 Off Typical 1 Blue light is reduced 2 Blue light is reduced more than Mode1 3 Blue light is reduced more than Mode2 Memory Recall Information 1 Only Anal...

Page 22: ...r 5 seconds Locking the power switch means that won t be able to turn off the Monitor while the power switch is locked If presses the power switch message Power Button Locked will appear on the screen 2 The power switch lock will be deactivated by pressing the front buttons and again for about 5 seconds Direct You can skip the Menu items and display an adjustment scale directly by using the follow...

Page 23: ...atic adjustment for Position Clock and Phase The other way is performing each adjustment manually Perform the Auto Image Adjust first when the monitor is connected to a new computer or resolution is changed If the screen has a flicker or blur or the picture does not fit in the display area after performing the Auto Image Adjust manual adjustments are required Both adjustments should be made by usi...

Page 24: ...k H Position and V Position adjustment In case the picture frame is bigger or smaller than the data display area after the Clock adjustment repeat steps from C 2 Stretch the right side of the picture frame to the right edge of the display area by adjusting the Clock C Pressing and holding of the Button for about 2 seconds Auto Image Adjust D Adjust the image manually by following procedure below w...

Page 25: ...he refresh rate of computer to low 60Hz and repeat steps from C again Adjust the H Position after the Phase adjustment if the horizontal position moves during the adjustment G Adjust the Phase to correct horizontal wavy noise flicker or blur in the zebra pattern NOTE H Adjust the Brightness and Color to get the desired picture after you complete the Clock and Phase adjustments Put back your favori...

Page 26: ...he power indicator turns to orange From Power Management Mode the image reappears in several seconds when either the keyboard or the mouse are touched again The power management feature of this product complies with power saving requirement of ENERGY STAR and VESA DPMS When activated it automatically reduces unnecessary power consumption of the monitor when your computer is not in use To use the f...

Page 27: ...with another piece of equipment If the blank screen saver is in active mode touch the keyboard or the mouse Increase the Contrast and or Brightness The computer is ON The Signal Cable is properly connected The signal timing of the computer is within the specification of the monitor If the monitor is in power management mode touch the keyboard or the mouse The computer is ON The Signal Cable is pro...

Page 28: ...equipment is within the specification of the monitor The audio output level of the audio equipment is within the specification of the monitor The Audio Cable is properly connected The sound is too loud or too quiet A strange noise is heard For better environment protection please don t dispose your monitor Please visit our web site www iiyama com recycle for monitor recycling RECYCLING INFORMATION...

Page 29: ...45 degrees each Viewable angle Right Left 85 degrees each Up Down 80 degrees each Typical Maximum Screen Size 620 9mm W 341 3mm H 24 4 W 13 4 H Power Source 100 240VAC 50 60Hz 1 0A Environmental Considerations Approvals CE TÜV Bauart CU VCCI B PSE ENERGY STAR Tilt Angle Brightness Contrast ratio 300cd m2 Typical 1000 1 Typical Adv Contrast Function Available Analog 0 7Vp p Standard 75 Positive Dig...

Page 30: ...809Hz 56 250Hz 60 317Hz 75 000Hz 60 004Hz 70 069Hz 75 029Hz 60 020Hz 75 025Hz 59 887Hz 74 984Hz 60 000Hz 59 930Hz 60 000Hz 59 951Hz 29 970Hz 59 997Hz VESA SVGA VGA XGA 1024 768 640 480 800 600 Horizontal Frequency 31 469kHz 37 500kHz 37 861kHz 35 156kHz 37 879kHz 46 875kHz 48 363kHz 56 476kHz 60 023kHz 63 981kHz 79 976kHz 55 935kHz 70 635kHz 65 290kHz 66 590kHz 71 584kHz 88 787kHz 67 430kHz 133 31...

Reviews: