Iiyama ProLite B2483HS User Manual Download Page 21

ENGLISH

16  OPERATING THE MONITOR
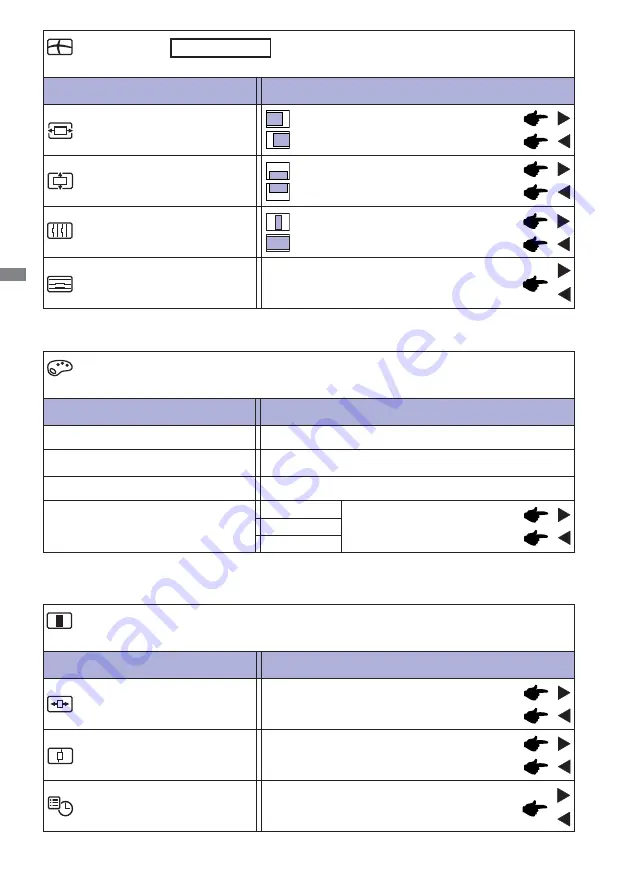
Adjustment Item

Problem / Option                           Button to Press

Geometry

Phase

Pixel Clock

Too left

Too right

Too low

Too high

H. Position

V. Position

Too narrow

Too wide

To correct fl ickering text or lines

Only Analog Input

Adjustment Item

Problem / Option                           Button to Press

Color*

9300K

7500K

Yellowish white

Bluish white

Green

Red

Blue

Too weak

Too strong

User Preset

6500K

Reddish white

OSD Time

H.Position

OSD is too left

OSD is too right

OSD is too low

OSD is too high

You can set the OSD display duration time 

between 5 and 30 seconds.

Adjustment Item

Problem / Option                           Button to Press

OSD

V.Position

*


Color adjustments is disabled when i-Style Color is activated.

Summary of Contents for ProLite B2483HS

Page 1: ...uch for choosing the iiyama LCD monitor We recommend that you take a few minutes to read this comprehensive manual carefully before installing and switching on the monitor Please keep this manual in a safe place for your future reference ...

Page 2: ...ENGLISH ...

Page 3: ...ne year product warranty Minimum three year availability of spare parts Product takeback Packaging Limits on hazardous substances in product packaging Packaging prepared for recycling Ergonomic User centered design Visual ergonomics in products with a display Adjustability for user comfort displays headsets Acoustic performance protection against sound spikes headsets and fan noise projectors comp...

Page 4: ...e Web page of different countries from there CE MARKING DECLARATION OF CONFORMITY This LCD monitor complies with the requirements of the EC EU Directive 2004 108 EC EMC Directive 2006 95 EC Low Voltage Directive 2009 125 EC ErP Directive and 2011 65 EU RoHS Directive The electro magnetic susceptibility has been chosen at a level that gives correct operation in residential areas business and light ...

Page 5: ...HSU ProLite B2483HS 10 CONNECTING YOUR MONITOR ProLite X2483HSU ProLite E2483HS 11 COMPUTER SETTING 12 ADJUSTING THE VIEWING ANGLE ProLite X2483HSU ProLite E2483HS 12 ADJUSTING THE HEIGHT AND THE VIEWING ANGLE ProLite XB2483HSU ProLite B2483HS 13 PANEL ROTATION ProLite XB2483HSU ProLite B2483HS 13 OPERATING THE MONITOR 14 ADJUSTMENT MENU CONTENTS 15 SCREEN ADJUSTMENTS 21 POWER MANAGEMENT FEATURE 2...

Page 6: ...se fire electric shock or damage INSTALL THE MONITOR ON A FLAT STABLE SURFACE The monitor may cause an injury if it falls or is dropped DO NOT USE THE MONITOR NEAR WATER Do not use where water may be splashed or spilt onto the monitor as it may cause fire or electric shock OPERATE UNDER THE SPECIFIED POWER SUPPLY Be sure to operate the monitor only with the specified power supply Use of an incorre...

Page 7: ...MOVE THE MONITOR When you move the monitor turn off the power switch unplug the monitor and be sure the signal cable is disconnected If you do not disconnect them it may cause fire or electric shock UNPLUG THE MONITOR If the monitor is not in use for a long period of time it is recommended that it is left unplugged to avoid accidents HOLD THE PLUG WHEN DISCONNECTING To disconnect the power cable o...

Page 8: ...e it by yourself SPECIAL NOTES ON LCD MONITORS NOTE If you have to return your unit for service and the original packaging has been discarded please contact your dealer or iiyama service center for advice or replacement packaging WARNING If you drop any materials or liquids such as water into the monitor when cleaning unplug the power cable immediately and contact your dealer or iiyama service cen...

Page 9: ...ssory for ProLite XB2483HSU ProLite B2483HS Power Cable 1 D Sub Signal Cable DVI D Cable USB Cable 2 Audio Cable Stand Base Stand 3 Screw for stand fixing 3pcs 4 Safety Guide Quick Start Guide BEFORE YOU OPERATE THE MONITOR CHECKING THE CONTENTS OF THE PACKAGE CAUTION FEATURES Supports Resolutions up to 1920 1080 High Contrast 3000 1 Typical Adv Contrast Function Available Brightness 250cd m2 Typi...

Page 10: ... Screw with washer which L length is 7mm to fasten the monitor Using the screw longer than this may cause electric shock or damage because it may contact with the electrical parts inside the monitor Please check if the wall or ceiling can support the weight of the monitor before mounting it WALL MOUNTING WARNING Screw Chassis Mounting Stage L ...

Page 11: ...scratched Lay the monitor flat on a table with front face down B Remove thumb screw to remove base from monitor column Installation A Put a piece of soft cloth on the table beforehand to prevent the monitor from being scratched Lay the monitor flat on a table with front face down B Hold the monitor and push the Stand Base C Use thumb screw provided to secure base to monitor column Thumb screw for ...

Page 12: ...he table beforehand to prevent the monitor from being scratched Lay the monitor flat on a table with front face down B Press and hold the hooks inside and pull the Stand Base C Press the stopper at the top of the stand and pull it to remove the stand from the monitor Installation A Put a piece of soft cloth on the table beforehand to prevent the monitor from being scratched Lay the monitor flat on...

Page 13: ...ctor USB Downstream Connector USB Upstream Connector D SUB mini 15pin Connector D SUB DVI D 24pin Connector DVI D HDMI Connector HDMI Keyhole for Security Lock You can fasten a security lock and cable to prevent the monitor from being removed without your permission Cable Holes Audio Connector LINE OUT Audio Connector LINE IN AC Connector NOTE NOTE CONTROLS AND CONNECTORS ProLite XB2483HSU ProLite...

Page 14: ...Mode Button Exit Button EXIT Auto Button AUTO Speakers USB Downstream Connector USB Downstream Connector USB Upstream Connector D SUB mini 15pin Connector D SUB DVI D 24pin Connector DVI D HDMI Connector HDMI Keyhole for Security Lock You can fasten a security lock and cable to prevent the monitor from being removed without your permission Audio Connector LINE OUT Audio Connector LINE IN AC Connec...

Page 15: ...mputer used An incorrect connection may cause serious damage to both the monitor and the computer The cable supplied with the monitor is for a standard connector If a special cable is required please contact your local iiyama dealer or regional iiyama office For connection to Macintosh computers contact your local iiyama dealer or regional iiyama office for a suitable adaptor Make sure you tighten...

Page 16: ...computer and monitor may vary with the type of computer used An incorrect connection may cause serious damage to both the monitor and the computer The cable supplied with the monitor is for a standard connector If a special cable is required please contact your local iiyama dealer or regional iiyama office For connection to Macintosh computers contact your local iiyama dealer or regional iiyama of...

Page 17: ...monitor s angle up to 22 upward 5 downward In order to ensure a healthy and relaxed body position when using the monitor at visual display workstations it is recommended that the adjusted tilt angle should not exceed 10 degrees Adjust the monitor s angle to your own preference ADJUSTING THE VIEWING ANGLE ProLite X2483HSU ProLite E2483HS NOTE Do not touch the LCD screen when you change the angle It...

Page 18: ...ouch the LCD screen when you change the height or the angle It may cause damage or break the LCD screen Careful attention is required not to catch your fingers or hands when you change the height or the angle Injury can occur if care is not taken to avoid finger contact with the displays base when adjusting the height NOTE PANEL ROTATION ProLite XB2483HSU ProLite B2483HS A Adjust the mother s heig...

Page 19: ...D Time has passed Also press the EXIT button to quickly turn off the On Screen Display Any changes are automatically saved in the memory when the On Screen Display disappears Turning off the power should be avoided while using the Menu Adjustments for H V Position Pixel Clock and Phase are saved for each signal timing Except for these adjustments all other adjustments have only one setting which a...

Page 20: ...ion with the adjustment pattern See page 20 for SCREEN ADJUSTMENTS Adjustment Item Problem Option Button to Press Luminance 1 2 Direct Too dark Too bright Brightness 3 Contrast Too dull Too intense 1 Luminance adjustment disabled when Adv Contrast mode is active 2 Luminance adjustment disabled when i Style Color is activate 3 Adjust the Brightness when you are using the monitor in a dark room and ...

Page 21: ...ut Adjustment Item Problem Option Button to Press Color 9300K 7500K Yellowish white Bluish white Green Red Blue Too weak Too strong User Preset 6500K Reddish white OSD Time H Position OSD is too left OSD is too right OSD is too low OSD is too high You can set the OSD display duration time between 5 and 30 seconds Adjustment Item Problem Option Button to Press OSD V Position Color adjustments is di...

Page 22: ...anguage Language English Deutsch English German Français French Japanese Polski Polish Dutch Adjustment Item Problem Option Button to Press Recall Recall All Factory preset data is restored No Return to Menu Italiano Italian Russian Simplified Chinese Español Spanish Nederlands Yes ...

Page 23: ...nput signal coming from the graphic card in your computer Display Information DDC CI On and Off are switched as follows by pressing the Button successively On Off NOTE Miscellaneous Display Information 1920x1080 60 Hz Adv Contrast Increased Contrast Ratio On Off Typical Contrast Ratio Display Mode Expansion display Full Aspect Expansion display of Aspect iiyama Logo displayed when the monitor is t...

Page 24: ... Input source is fixed not selected automatically when VGA DVI and HDMI which are selected NOTE Select the Analog input Select the Digital DVI input D sub DVI Adjustment Item Problem Option Button to Press Input Select Direct You can skip the Menu items and display an adjustment scale directly by using the following button operations Input Select Pressing and holding of the AUTO Button for 2 3 sec...

Page 25: ...ced Off Normal The Power indicator is off when ECO Mode is on i Style Color Press the EXIT Button when the Menu is not displayed Off Return to a state set by color adjustment Standard For general windows environment and monitor default setting Game For PC game environment Cinema For movie and video environment Scenery For displaying outdoor scenery images Text For text editing and viewing in a wor...

Page 26: ...e other than the screen adjustment pattern In this case manual adjustments are required There are two ways to adjust the screen One way is automatic adjustment for Position Pixel Clock and Phase The other way is performing each adjustment manually Perform the Auto Adjust first when the monitor is connected to a new computer or resolution is changed If the screen has a flicker or blur or the pictur...

Page 27: ...flicker during the Pixel Clock H Position and V Position adjustment In case the picture frame is bigger or smaller than the data display area after the Pixel Clock adjustment repeat steps from 2 Stretch the right side of the picture frame to the right edge of the display area by adjusting the Pixel Clock Press the AUTO Button Auto Adjust Adjust the image manually by following procedure below when ...

Page 28: ... your favorite wallpaper Adjust the Phase to correct horizontal wavy noise flicker or blur in the zebra pattern NOTE In case the strong flicker or blurs remain on a part of the screen repeat steps and because the Pixel Clock may not be adjusted correctly Adjust the H Position after the Phase adjustment if the horizontal position moves during the adjustment ...

Page 29: ...5W The screen becomes dark and the power indicator turns to orange From Power Management Mode the image reappears in several seconds when either the keyboard or the mouse are touched again The power management feature of this product complies with power saving requirement of ENERGY STAR and VESA DPMS When activated it automatically reduces unnecessary power consumption of the monitor when your com...

Page 30: ...e center The screen is too bright or too dark The Power Cable is firmly seated in the socket The Power Switch is turned ON The AC socket is live Please check with another piece of equipment If the blank screen saver is in active mode touch the keyboard or the mouse Increase the Contrast and or Brightness The computer is ON The Signal Cable is properly connected The signal timing of the computer is...

Page 31: ...olume is turned up The Mute is OFF The audio output level of the audio equipment is within the specification of the monitor The audio output level of the audio equipment is within the specification of the monitor The Audio Cable is properly connected Problem Check No sound For better environment protection please don t dispose your monitor Please visit our web site www iiyama com recycle for monit...

Page 32: ...each Typical Maximum Screen Size 531 4mm W 298 9mm H 20 9 W 11 8 H Power Source Environmental Considerations Approvals TCO Certified CE TÜV GS VCCI B PSE CU ENERGY STAR Tilt Angle Brightness Contrast ratio 250cd m2 Typical 3000 1 Typical Adv Contrast Function Available Analog 0 7Vp p Standard 75 Positive Digital DVI Digital Visual Interface Standard Rev 1 0 compliance Digital HDMI Input Video Sign...

Page 33: ...ize 531 4mm W 298 9mm H 20 9 W 11 8 H Power Source Environmental Considerations Approvals TCO Certified CE TÜV GS VCCI B PSE CU ENERGY STAR Tilt Angle Brightness Contrast ratio 250cd m2 Typical 3000 1 Typical Adv Contrast Function Available Analog 0 7Vp p Standard 75 Positive Digital DVI Digital Visual Interface Standard Rev 1 0 compliance Digital HDMI Input Video Signal Input Audio Connector ø 3 ...

Page 34: ... Certified CE TÜV GS VCCI B PSE CU ENERGY STAR Tilt Angle Brightness Contrast ratio 250cd m2 Typical 1000 1 Typical Adv Contrast Function Available Analog 0 7Vp p Standard 75 Positive Digital DVI Digital Visual Interface Standard Rev 1 0 compliance Digital HDMI Input Video Signal 5 to 35 C 41 to 95 F 10 to 80 No condensation 20 to 60 C 4 to 140 F 5 to 85 No condensation Temperature Humidity Temper...

Page 35: ...h Up Down 80 degrees each Typical Maximum Screen Size 531 4mm W 298 9mm H 20 9 W 11 8 H Power Source Environmental Considerations Approvals TCO Certified CE TÜV GS VCCI B PSE CU ENERGY STAR Tilt Angle Brightness Contrast ratio 250cd m2 Typical 1000 1 Typical Adv Contrast Function Available Analog 0 7Vp p Standard 75 Positive Digital DVI Digital Visual Interface Standard Rev 1 0 compliance Digital ...

Page 36: ...65 5mm 22 3 301 0mm 11 9 340 0mm 13 4 56 5mm 2 2 386 5mm 15 2 516 5mm 20 3 250 0mm 9 8 230 0mm 9 1 393 0mm 15 5 533 5mm 21 0 565 5mm 22 3 301 0mm 11 9 340 0mm 13 4 238 0mm 9 4 56 5mm 2 2 412 0mm 16 2 203 0mm 8 0 Maximum adjustment range DIMENSIONS ProLite X2483HSU ProLite E2483HS ...

Page 37: ...rizontal Frequency 31 469kHz 37 879kHz 48 363kHz 63 981kHz 55 935kHz 75 000kHz 65 290kHz 66 590kHz 31 469kHz 31 469kHz Video Mode SXGA VESA 640 480 1280 1024 VGA SVGA XGA Dot Clock 25 175MHz 40 000MHz 65 000MHz 108 000MHz 106 500MHz 162 000MHz 146 250MHz 138 500MHz 25 175MHz 28 322MHz 800 600 1024 768 VGA TEXT 640 350 WXGA 1440 900 WSXGA 1680 1050 Full HD 1920 1080 UXGA 1600 1200 720 400 ...

Reviews: