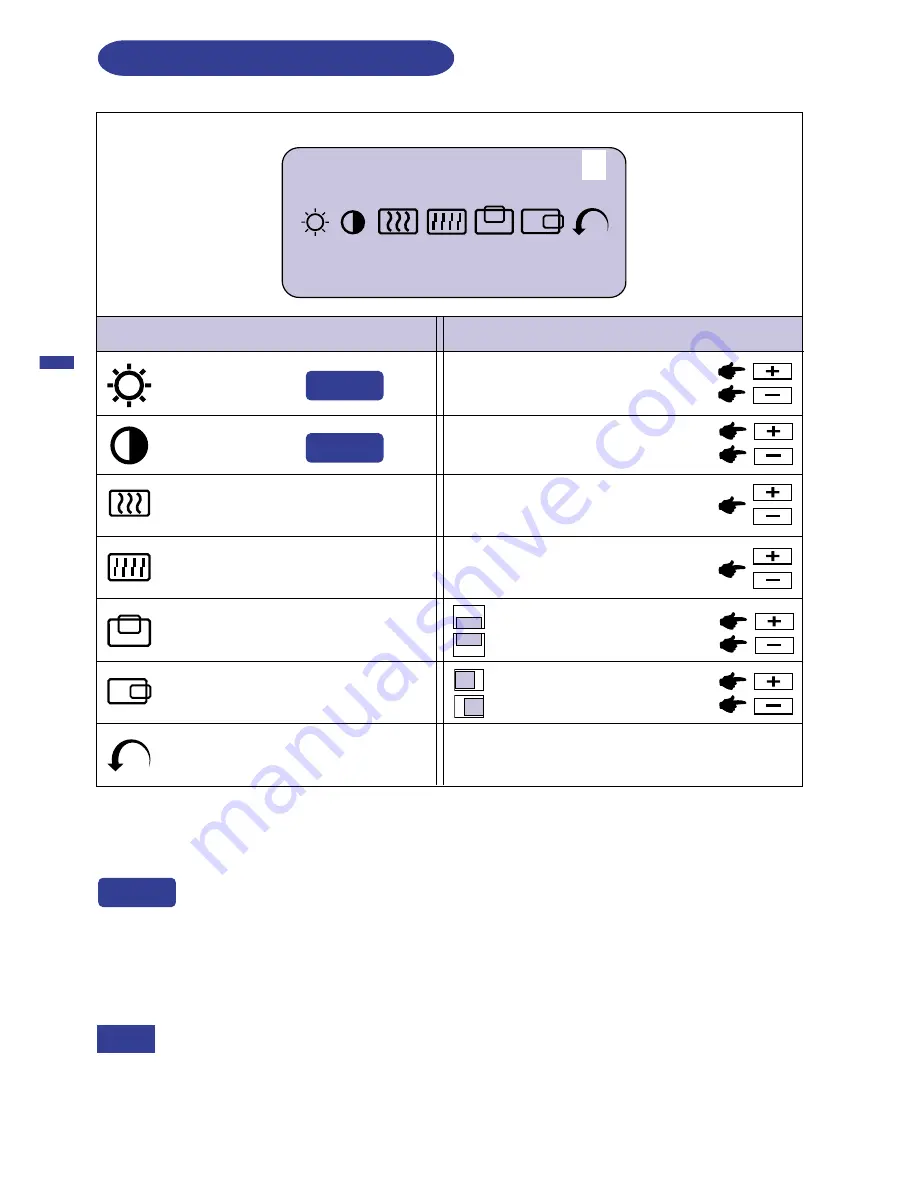
Iiyama ProLite AS4821DT User Manual Download Page 16

ENGLISH

1280 × 1024

M e n u : 1

H: 80.0 KHz  V: 75.0 Hz

10      OPERATING THE MONITOR

ADJUSTMENT MENU CONTENTS

Adjustment Item

Problem / Option                       Button to Press

Menu : 1

(Analog)

Too dark

Too bright

Brightness 

*

1

Contrast

Too dull

Too intense

To correct flickering text or lines

Clock 

*

2

Phase 

*

2

H-Position

Too far to the left

Too far to the right

V-Position

Too  low

Too high

Return To Menu

Highlight “Menu : 1” again.

You  can  skip  the  Menu  pages  and  display  an  adjustment  scale  directly  by  using  the

following  button  operations.

l

Brightness:

Press the Brightness Button when the Menu is not displayed.

l

Contrast:

Press the Contrast Button when the Menu is not displayed.

SWITCHING BRIGHTNESS / CONTRAST ADJUSTMENT

To switch between Brightness and Contrast adjustments, press the Menu Button within 10

seconds  after  pressing  the  Brightness  Button  or  the  Contrast  Button  during  the  direct

adjustments  above.

NOTE

To correct flickering text or lines

*

1

Adjust the Brightness when you are using the monitor in a dark room and feel the screen is too

bright.

*

2

See page 17 for SCREEN ADJUSTMENTS.

Direct

Direct

Direct

Analog Input

Summary of Contents for ProLite AS4821DT

Page 1: ... reference FOR YOUR SAFETY 1 SAFETYPRECAUTIONS 1 SPECIALNOTESONLCDMONITORS 3 CUSTOMERSERVICE 3 CLEANING 3 BEFOREYOUOPERATETHEMONITOR 4 FEATURES 4 CHECKINGTHECONTENTSOFTHEPACKAGE 4 CONTROLSANDCONNECTORS 5 CONNECTINGYOURMONITOR 6 COMPUTERSETTING 7 ADJUSTINGTHEHEIGHTANDTHEVIEWINGANGLE 8 PANELROTATION 8 OPERATINGTHEMONITOR 9 ADJUSTMENTMENUCONTENTS 10 SCREENADJUSTMENTS 17 POWERMANAGEMENTFEATURE 20 TROU...

Page 2: ...ng of personal computers The labelling scheme was developed as a joint effort by the TCO The Swedish Confederation of Professional Employees Svenska Naturskyddsforeningen The Swedish Society for Nature Conservation and Statens Energimyndighet The Swedish National Energy Administration Approval requirements cover a wide range of issues environment ergonomics usability emission of electric and magne...

Page 3: ... nervous system and is toxic in high doses The relevant TCO 99 requirement states that batteries the colour generating layers of display screens and the electrical or electronics components must not contain any cadmium Mercury Mercury is sometimes found in batteries relays and switches It damages the nervous system and is toxic in high doses The relevant TCO 99 requirement states that batteries ma...

Page 4: ...ng of personal computers The labelling scheme was developed as a joint effort by the TCO The Swedish Confederation of Professional Employees Svenska Naturskyddsforeningen The Swedish Society for Nature Conservation and Statens Energimyndighet The Swedish National Energy Administration Approval requirements cover a wide range of issues environment ergonomics usability emission of electric and magne...

Page 5: ...nt in rechargeable batteries and in the colour generating layers of certain computer displays Cadmium damages the nervous system and is toxic in high doses TCO 95 requirement states that batteries may not contain more than 25 ppm parts per million of cadmium The colour generating layers of display screens must not contain any cadmium Mercury Mercury is sometimes found in batteries relays and switc...

Page 6: ...na n Increase the separation between the device and receiver n Connect the device into an outlet on a circuit different from that to which the receiver is connected n Consult the dealer or an experienced radio or TV technician for help To meet the FCC requirements you should use a signal cable with ferrite core at both ends CAUTION Changes or modifications not expressly approved by iiyama could vo...

Page 7: ...hock or damage INSTALL THE MONITOR ON A FLAT STABLE SURFACE The monitor may cause an injury if it falls or is dropped DO NOT USE THE MONITOR NEAR WATER Do not use where water may be splashed or spilt onto the monitor as it may cause fire or electric shock OPERATE UNDER THE SPECIFIED POWER SUPPLY Be sure to operate the monitor only with the specified power supply Use of an incorrect voltage will ca...

Page 8: ...material may also cause damage DISCONNECT THE CABLES WHEN YOU MOVE THE MONITOR When you move the monitor turn off the power switch unplug the monitor and be sure the signal cable is disconnected If you do not disconnect them it may cause fire or electric shock UNPLUG THE MONITOR If the monitor is not in use for a long period of time it is recommended that it is left unplugged to avoid accidents HO...

Page 9: ...itor may have to be periodically replaced For the warranty coverage on this component please check with local iiyama service center If you have to return your unit for service and the original packaging has been discarded please contact your dealer or iiyama service center for advice or replacement packaging n n WARNING If you drop any materials or liquids such as water into the monitor when clean...

Page 10: ... sRGB International Standard K Power Management ENERGY STAR and VESA DPMS Compliant K Ergonomic Design AS4821DT TCO 99 and MPR 3 Approved AS4821DT BK TCO 95 and MPR 3 Approved Cabinet color is black K Digital Input DVI I for Clear Display K USB Hub Function K 90 Panel Rotation Design K VESA Standard 100mm 100mm Compliant CHECKING THE CONTENTS OF THE PACKAGE BEFORE YOU OPERATE THE MONITOR The monit...

Page 11: ...he signal input when both of the signal inputs are connected to a signal source Switch INPUT 1 and 2 whenever pressing the Input Button When only one of the two signal inputs is connected to the signal source the one connected is automatically selected Input Button is not available if there is no signal input from the selected connector or during the power management mode H USB UP Connect with a U...

Page 12: ...he computer The cable supplied with the monitor is for a standard 15 pin D Sub connector If a special cable is required please contact your local iiyama dealer or regional iiyama office n For connection to Macintosh computers contact your local iiyama dealer or regional iiyama office for a suitable adaptor n Make sure you tighten the finger screws at each end of the signal cable n Cables are conne...

Page 13: ...lug Play The iiyama LCD monitor complies with DDC2B of VESA standard The Plug Play function runs on Windows 95 98 2000 Me XP by connecting the monitor to DDC2B compliant computer with the Signal Cable supplied Windows 95 98 2000 Me XP Monitor Information File for iiyama monitors may be necessary for your computer and obtained via the Internet using the address http www iiyama com U S A http www ii...

Page 14: ... up to 35 degrees right and left 35 degrees upward NOTE n Do not touch the LCD screen when you change the height or the angle It may cause damage or break the LCD screen n Careful attention is required not to catch your fingers or hands when you change the height or the angle 90 35 A Adjust the monitor s height to the maximum B Rotate the panel 90 degrees Portrait Turn clockwise Landscape Turn cou...

Page 15: ...the Menu Button again The On Screen Display disappears several seconds after you stop pressing the buttons while performing an adjustment Any changes are automatically saved in the memory when the On Screen Display disappears Turning off the power should be avoided while using the Menu n To help you to operate the monitor more efficiently press the Menu and Buttons at the same time so that the On ...

Page 16: ...t scale directly by using the following button operations l Brightness Press the Brightness Button when the Menu is not displayed l Contrast Press the Contrast Button when the Menu is not displayed SWITCHING BRIGHTNESS CONTRAST ADJUSTMENT To switch between Brightness and Contrast adjustments press the Menu Button within 10 seconds after pressing the Brightness Button or the Contrast Button during ...

Page 17: ...O YES Return to Menu Adjust Clock Phase H Position and V Position automatically Direct 1 See page 17 for SCREENADJUSTMENTS Direct You can skip the Menu pages and display an adjustment scale directly by using the following button operations l Auto Set up Press the Auto Button Color1 sRGB sRGB mode NOTE n sRGB is an international standard which defines and unifies the difference of color appearance ...

Page 18: ...screen size ratio NOTE Adjust the screen size at resolutions of less than 1280 1024 When selecting 1 or 2 displayed text or lines may be blurred or brightness may not be uniform when inputting stripe pattern signal or the like Swedish Mode2 Stretch the picture to fit the full screen You can skip the Menu pages and display an adjustment scale directly by using the following button operations l Sign...

Page 19: ...Menu Highlight Menu 3 again Reset NO YES Return to Menu Factory preset data is restored Zoom Zoom in Zoom out To move the zoom point to the right To move the zoom point to the left To move the zoom point downward To move the zoom point upward OPERATING THE MONITOR 13 ...

Page 20: ...arpness 1 2 3 4 5 Adjust the picture quality at resolutions of less than 1280 1024 when selecting 1 or 2 at Full Screen on Menu 2 You can change the picture quality 1 to 5 sharp to soft Press the Button to change the picture quality in numerical order Press the Button to change the picture quality in reverse numerical order Color Temp NOTE n sRGB is an international standard which defines and unif...

Page 21: ...han 1280 1024 When selecting 1 or 2 displayed text or lines may be blurred or brightness may not be uniform when inputting stripe pattern signal or the like Swedish Mode2 Stretch the picture to fit the full screen You can skip the Menu pages and display an adjustment scale directly by using the following button operations l Brightness Press the Brightness Button when the Menu is not displayed l Co...

Page 22: ...Menu Highlight Menu 2 again Reset NO YES Return to Menu Factory preset data is restored Zoom Zoom in Zoom out To move the zoom point to the right To move the zoom point to the left To move the zoom point downward To move the zoom point upward 16 OPERATING THE MONITOR ...

Page 23: ...est bmp screen adjustment pattern In this case manual adjustments are required There are two ways to adjust the screen One way is automatic adjustment for Clock Phase and Position Another way is performing each adjustment manually Perform the Auto Set up first when the monitor is connected to a new computer or resolution is changed If the screen has a flicker or blur or the picture does not fit in...

Page 24: ... and V Position adjustment n In case the picture frame is bigger or smaller than the data display area after the Clock adjustment repeat steps from C 2 Stretch the right side of the picture frame to the right edge of the display area by adjusting the Clock C Press the Auto Button Direct adjustment Or perform the Auto Set up D Adjust the image manually by following procedure below when the screen h...

Page 25: ...t the refresh rate of computer to low 60Hz and repeat steps from C again n Adjust the H Position after the Phase adjustment if the horizontal position moves during the adjustment H Adjust the Brightness and Color Temp to get the desired picture after you complete the Clock and Phase adjustments Put back your favorite wallpaper G Adjust the Phase to correct horizontal wavy noise flicker or blur in ...

Page 26: ...e screen becomes dark and the power indicator turns to orange From Power Management Mode the image reappears in several seconds when either the keyboard or the mouse are touched again The power management feature of this product complies with every power saving requirement of ENERGY STAR and VESA DPMS When activated it automatically reduces unnecessary power consumption of the monitor when your co...

Page 27: ...the specification of the monitor Power indicator is orange If the input video signal selection is different switch the Signal Select o o If the monitor is in power management mode touch the keyboard or the mouse The screen is not synchronized o The Signal Cable is properly connected o The signal timing of the computer is within the specification of the monitor B o The signal timing of the computer...

Page 28: ...tive Digital DVI Digital Visual Interface standard Rev 1 0 compliance Viewable angle Right Left Up Down 85 degrees each Typical Maximum Screen Size 376 3mm W 301 0mm H 14 8 W 11 9 H Power Source 100 230VAC 50 60Hz 0 7 0 35A Rev 1 1 compliance Self powered hub Upstream Series B Downstream Series A USB Standard Connectors 1 Upstream For computer 4 Downstream For peripherals Number of USB Ports Envir...

Page 29: ...kHz 37 861kHz 37 500kHz 43 269kHz 35 156kHz 37 879kHz 48 077kHz 46 875kHz 53 674kHz 48 363kHz 56 476kHz 60 023kHz 68 677kHz 67 500kHz 63 981kHz 79 976kHz 31 469kHz 37 927kHz 35 000kHz 49 725kHz 60 150kHz 24 827kHz 76 968kHz 61 846kHz Dot Clock 25 175MHz 31 500MHz 31 500MHz 36 000MHz 36 000MHz 40 000MHz 50 000MHz 49 500MHz 56 249MHz 65 000MHz 75 000MHz 78 750MHz 94 500MHz 108 000MHz 108 000MHz 135 ...

Page 30: ...e SCL Data line SDA Analog V Sync T M D S Data 1 T M D S Data 1 T M D S Data 1 3 Ground T M D S Data 3 T M D S Data 3 5V Power Ground T M D S Data 0 T M D S Data 0 5 Ground T M D S Data 5 T M D S Data 5 T M D S Clock Ground T M D S Clock T M D S Clock Analog Red Analog Green Analog Blue Analog H Sync Analog Ground Compliant to VESA DDC DVI I 29pin Connector n 24 APPENDIX DVI I 16 17 24 1 9 8 C1 C2...

Reviews: