background image

8

9

Connecting to the WiFi network

1. 

Before you get started, make sure you have the 

WiFi network name 

(SSID) and 

WiFi password

 (WPA pre-shared key). The default settings 

are printed on the back of your Home Gateway, or you may have set 
your own and written them down. 

2. 

This is generic advice for all WiFi devices. For instructions specific to 
your device, please  check your software provider’s website or visit 

iihelp.iinet.net.au.

3. 

Open your device’s Settings menu and get to the Wi-Fi settings. This 
may be under “Wi-Fi”, “Wireless Network”, or “Network”. On computers 
and laptops, you’ll have a Network icon in the bottom right-hand corner 
(Windows) or top right (MAC OSX).

4. 

Your device will search for all available WiFi networks in the area. Select 
your WiFi network name (SSID) from the list.

5. 

When you attempt to connect to/join this network, you’ll be asked for a 
password. Enter your 

WiFi password 

(WPA pre-shared key) remember-

ing that it is case sensitive.

6. 

After connecting successfully, your computer or device will remember 
your WiFi details to connect automatically in the future.

Netphone (VoIP) Setup

1. 

Once you’re online, you can configure your Netphone (VoIP) service by 
following these steps. 

2. 

Open a web browser on your computer and go to 

http://192.168.1.1.

3. 

Log in with the default username “admin” and password “admin”. If you have 
changed your password, please use your custom password instead.

4. 

In the left-hand column, select 

Basic

 and then click 

Voice.


5. 

You’ll see the SIP Server table. By default, a server should already be configured 
for you, so you can go ahead and select 

SIP Accounts

 above the table.

6. 

Enter the following settings:

Profile index: 

Leave as “Profile1(Voice)”

SIP account number: 

VoIP phone number with area code (e.g. 0898765432)

SIP account:

 Leave “Enable” ticked

User name:

  VoIP phone number with area code  

(e.g. 0898765432)

Password: 

VoIP password

Area code enable:

 Do not tick

Area code: 

Leave blank

7. 

Click 

Submit 

to finish.

To use your VoIP 
service, you’ll need 
to plug a phone 
handset into the 

Phone 1

 port as 

shown on 

page 5.

Summary of Contents for Home Gateway

Page 1: ...Home Gateway Quick Start Guide Start here ...

Page 2: ...Thanks for choosing iiNet This guide will show you how to set up your new Home Gateway ...

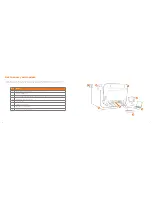
Page 3: ...y other devices you may be using with it such as a computer or set top box No Item 1 Telephone wall socket 2 Power adapter 3 Phone cable Plug directly into wall do not use a line filter splitter 4 HG658 Home Gateway 5 Set top box 6 Laptop computer 7 Desktop computer 8 Phone1 port for VoIP 1 2 3 4 5 6 7 8 ...

Page 4: ... ll see the Wizard page Click Next 4 Enter your VDSL Username and Password case sensitive as supplied by your Internet Service Provider and then click Next 5 You can choose to keep the default WiFi details as found on the back of your Home Gateway or customise them here SSID WiFi network name WPA pre shared key WiFi password We recommend writing these details down you ll need them to connect devic...

Page 5: ... ing that it is case sensitive 6 After connecting successfully your computer or device will remember yourWiFi details to connect automatically in the future Netphone VoIP Setup 1 Once you re online you can configure your Netphone VoIP service by following these steps 2 Open a web browser on your computer and go to http 192 168 1 1 3 Log in with the default username admin and password admin If you ...

Page 6: ...fault WiFi settings on the back of your Home Gateway Configuring a SIP Server If for any reason a SIP server is not already configured in your Home Gateway settings do the following 1 In Basic Voice SIP Server table select New and then enter the following settings Profile name Voice User agent port 5060 Proxy server address sip act iinet net au Proxy server port 5060 Registration server address si...

Page 7: ...m WST Mon Fri 13 86 89 bizsupport iinet net au iiNet Support Available 24 7 13 22 58 support iinet net au Ifyou have any issues with your setup ortechnology just isn t your strong point you can always call ourfriendly stafffor a hand ...

Reviews: