iHome2GO iH85 Manual Download Page 3

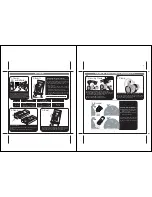
Controls and Indicators

Side Panel

Speaker Cap

Mounting Unit

Remote Panel

3

Reverse Button

Volume Decrease

Power Button 

AC Adaptor Jack 

Volume Increase 

Forward Button 


Play / Pause Button

(Hold 3 seconds for OFF)

P5 

Using the iH85

Connecting iH85 to AC Power Source

Plug the AC adaptor cable into the 

AC Adaptor Jack and the other end into a 

standard 120 VAC wall socket.  If an iPod is properly connected, it will begin charging, 
indicated by a flashing  LED. The iH85 also operates on 4 “AA” batteries (see page 
4 for information on installing/replacing batteries) for portable playing. The AC adaptor 
charges the iPod with or without batteries installed. The unit will not charge your iPod 
while operating just on batteries. 

NOTE:

  To save battery life, when running on Batteries, unit will automatically power 

OFF after 2 hours of NON-use (no button activation). Press any button to 
re-activate the unit.
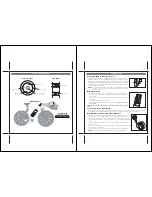
Install iPod Insert 

Your iH85 comes with 3 inserts to ensure your iPod fits properly on the dock located 

inside the case. Not all iPod models require inserts. See Page 1 for insert table.

To place an insert: 

1. Select the insert for your iPod. Using the correct insert ensure the proper fit to 

your iPod. 

2. Gently press the iPod insert into the insert. 

3. Carefully place your iPod with insert into the dock. 

The iPod must not be in a 

case or “skin”. 

NOTE: For nano models, dock the nano first, then slide insert over docked 

nano

To check for iPod compatibility 

iH85 is an advanced system and supports most updated iPod features. To have your iPod working properly with the iH85, 

please update your iPod firmware with the latest one. Please check Apple website for the latest firmware. 

Install/Replace the Remote Control Batteries 

The remote control batteries are already installed at the factory. When the remote control 

stops operating or its range seems reduced, replace the batteries with new ones. 

1. The battery compartment cover is located on the bottom of the remote control. 

2. Use a Phillips screwdriver to unscrew the retaining screw on the battery compartment

   cover. 

3.  Turn the battery compartment cover counterclockwise slightly to unlock the battery cover.       

Remove the cover. 

4. Insert 2 CR2032 batteries, checking the + and – ends of the batteries match the diagram 

inside the battery compartment.

5. Replace the battery cover, turn clockwise to lock and replace the retaining screw. 

NOTE:

 Make sure you dispose of batteries properly (see your local regulations). 

4

P6 

Summary of Contents for iH85

Page 1: ...mined by turning the equipment off and on the user is encouraged to try to correct the interference by one or more of the following measures Reorient or relocate the receiving antenna Increase the separation between the equipment and receiver Connect the equipment into an outlet on a circuit different from that to which the receiver is needed Consult the dealer or an experienced radio TV technicia...

Page 2: ... insert into the dock 3 Carefully place your iPod with insert into the dock The iPod must not be in a case or skin NOTE See step 3 for docking a nano Use with iPod Mini iPod 4G 20 GB iPod Photo 20 30 GB 5G iPod w Video 30 GB Mini Insert Thin iPod Insert Thick iPod no Insert needed Nano Insert iPod 4G 40 GB iPod Photo 60 GB 5G iPod w Video 60 80 GB iPod Nano 2 4 8 GB A B Attaching the Remote Clamp ...

Page 3: ... your iPod Using the correct insert ensure the proper fit to your iPod 2 Gently press the iPod insert into the insert 3 Carefully place your iPod with insert into the dock The iPod must not be in a case or skin NOTE For nano models dock the nano first then slide insert over docked nano To check for iPod compatibility iH85 is an advanced system and supports most updated iPod features To have your i...

Page 4: ... instruction and service manual 1 Water and Moisture The unit should not be used near water For example near a bathtub washbowl kitchen sink laundry tub in a wet basement or near a swimming pool etc when using the AC adaptor 2 Ventilation The unit should be situated so that its location or position does not interfere with its proper ventilation For example it should not be situated on a bed sofa r...

Page 5: ...tlet and all connections are good Plug another device into a wall outlet same outlet to confirm the outlet is working Make sure the dock insert is the proper fit to your iPod Remove your iPod from the dock and check for obstruction on the connectors in the dock and on your iPod Then reseat it in the dock Remove your iPod from the dock and check for obstruction on the connectors in the dock and on ...

Page 6: ...sured to the Factory Service Center listed below Consumer Repair Department SDI Technologies Inc 1330 Goodyear Drive El Paso TX 79936 6420 Disclaimer of Warranty NOTE This warranty is valid only if the product is used for the purpose for which it was designed It does not cover i products which have been damaged by negligence or willful actions misuse or accident or which have been modified or repa...

Reviews: