background image

Installing Clock Backup Batteries

Installing iPod Insert

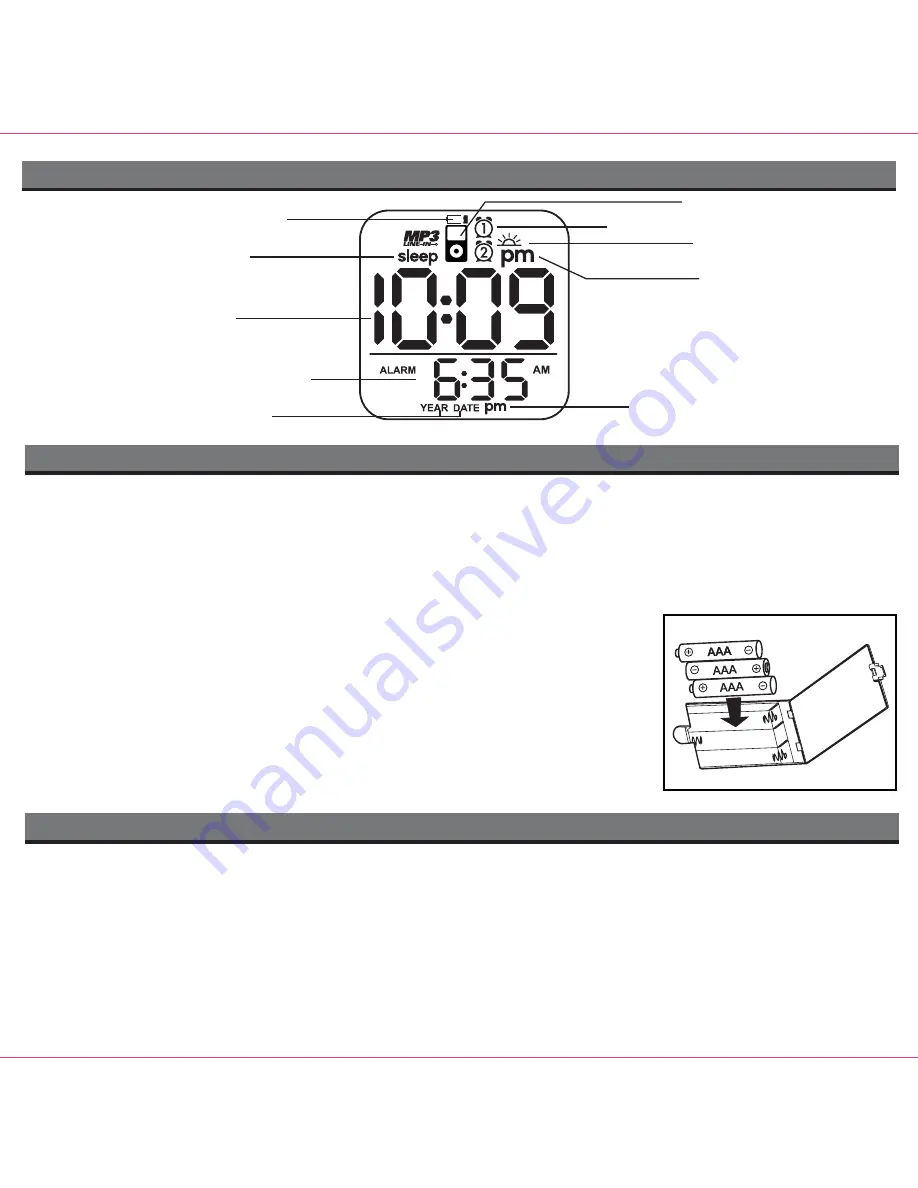
The iH22 uses 3 AAA batteries (installed) for backup to provide continuous alarm operation and clock settings in the event of 
a power failure. If the backup batteries have been installed and a power failure occurs or the AC cord is accidentally disconnected, 
the display backlight will not remain lit, but current time and alarm time settings will be temporarily maintained. Otherwise, you 
must reset the time and alarm settings.

Note:

 You should replace backup batteries when the 

Battery Low Indicator

 appears on the display.

1.  Please make sure the AC cord is connected. Otherwise all settings may be lost during battery replacement.
2.  Open backup battery compartment door located on the bottom of the unit.
3.  Insert three “AAA” batteries, checking the + and – ends of the batteries. We recommend 

to use alkaline battery for longer life time. Do not mix alkaline, standard (carbon-zinc) 
or rechargeable (nickel-cadmium) batteries.

4.  Close the compartment cover.

Note:

 Make sure you dispose of batteries properly (see your local regulations).

Battery Low Indicator

The 

Battery Low Indicator

 is located in the top of display. When it lights up it is time to 

replace backup batteries.

Your iH22 comes with 3 inserts to ensure your iPod fits properly in the dock on the top of the system. If the inserts that come 
with the unit do not match your iPod model, use the insert that came with your iPod or visit www.ihomeaudio.com or call 
1-800-288-2792 toll free to purchase the proper insert for our iPod model.
To place an insert:
1.  Select the insert for your iPod. Using the correct insert ensures the proper fit to your iPod.
2.  Gently press the iPod insert into the dock.
3.  Carefully place your iPod into the dock. The iPod must not be in a case or “skin”.
4.  To remove/replace an insert, first remove your iPod then press down the insert latch, grip the insert and pull gently upwards.

3

iH22 display

Alarm 1, Alarm 2 Indicators

Battery Low Indicator

Time Display

PM Indicator

Alarm time PM Indicator

DST indicator

iPod  Indicator

Sleep Indicator

Alarm Time/Date Display 

Year/Date Indicator 

Summary of Contents for iH22

Page 1: ...Now Playing Keith LuBrant 1 03 2 30 All I Want To Be snooze dimmer alm reset sleep Model iH22 IB English Date Feb 13 2009 Color Black Model iH22 Dual Alarm Clock for your iPod ...

Page 2: ...ant ou une autre sortie de courant sauf si les lames peuvent étre insérées à fond sans en laisser aucune partie à decouvert The apparatus shall not be exposed to dripping or splashing and that no objects filled with liquids such as vases shall be placed on apparatus L appareil ne doit pas être exposé aux écoulements ou aux éclaboussures et aucun objet ne contenant de liquide tel qu un vase ne doit...

Page 3: ...ly at plugs convenience receptacles and the point where they exit from the apparatus It is always best to have a clear area from where the cord exits the unit to where it is plugged into an AC outlet 11 Cleaning Unplug this product from the well outlet before cleaning Do not use liquid cleaners or aerosol cleaners Clean only with a dry cloth 12 Non Use Periods The power cord of the unit should be ...

Page 4: ...rticular installation If this equipment does cause harmful interference to radio or television reception which can be determined by turning the equipment off and on the user is encouraged to try to correct the interference by one or more of the following measures Reorient or relocate the receiving antenna Increase the separation between the equipment and receiver Connect the equipment into an outl...

Page 5: ... working wall socket NOTE If you do not have an insert for your iPod please visit iwww ihomeaudio com or call iHome toll free at 800 288 2792 to purchase one thin iPod with video 30 GB Insert 9 thin 30 GB iPod with video thin 80 120 GB iPod classic nano 5G Insert 18 nano 5G Use this insert For this iPod iPod touch 2G Insert 16 iPod touch 2G 2 inserts 3 iPod Insert an iPod into the dock with proper...

Page 6: ...r Volume Button Raise Volume Button Alarm Reset Power Button Forward Button Alarm 2 Button Alarm 1 Button Sleep Button Play Pause Button Reverse Button DST switch MP3 Line in Jack Time Zone Button Clock Adj Botton dst aux in 1 1 time zone clock adj snooze dimmer alm reset sleep ...

Page 7: ...mium batteries 4 Close the compartment cover Note Make sure you dispose of batteries properly see your local regulations Battery Low Indicator The Battery Low Indicator is located in the top of display When it lights up it is time to replace backup batteries Your iH22 comes with 3 inserts to ensure your iPod fits properly in the dock on the top of the system If the inserts that come with the unit ...

Page 8: ...he button for a few seconds will advance or reverse rapidly 5 Press the Clock Adjust Button again or no button within 10 seconds to exit the time calendar setting mode You will hear two beeps to confirm Time and Calendar setting are completed Using the Alarms Setting the Alarms 1 By default the unit selects iPod as your wake source If no iPod is docked or detected the iH22 will automatically defau...

Page 9: ...hat your iPod is in play mode If this happens press the Button on the main unit to play it 2 When the iPod is docked and in standby mode press the Button on the iH22 to play it The will appear on the display indicating iPod play mode 3 Press the Button again to pause play press again to resume it 4 Press the Volume and Volume Button to adjust the system volume 5 Press the or Button on the unit to ...

Page 10: ...tton as needed to adjust the sleep timer from 90 60 30 or 15 minutes or turn sleep off 3 When the display changes back to show the real time press the Sleep Button once to show the sleep time remaining Pressing it again to change sleep time to the next lowest increment 4 To stop listening at any time press the Button to turn unit off Dimmer Operation During normal operation press the Snooze Dimmer...

Page 11: ...ve your iPod from the dock and check for obstruction on the connectors in the dock and on your iPod Then reseat it in the dock Upgrade software on your iPod via iTunes Please refer to your iPod manual for details Please make sure your iPod is working properly before docking in the unit Remove your iPod from the dock and check for obstruction on the connectors in the dock and on your iPod Then rese...

Page 12: ...insured to the Factory Service Center listed below Consumer Repair Department SDI Technologies Inc 1330 Goodyear Drive El Paso TX 79936 6420 Disclaimer of Warranty NOTE This warranty is valid only if the product is used for the purpose for which it was designed It does not cover i products which have been damaged by negligence or willful actions misuse or accident or which have been modified or re...

Reviews: