background image

Pairing is the set-up process to introduce your Bluetooth-capable device to the Go+ Arc. Once your device is 

paired, the Go+ Arc can recognize it and you can play your audio through it. 

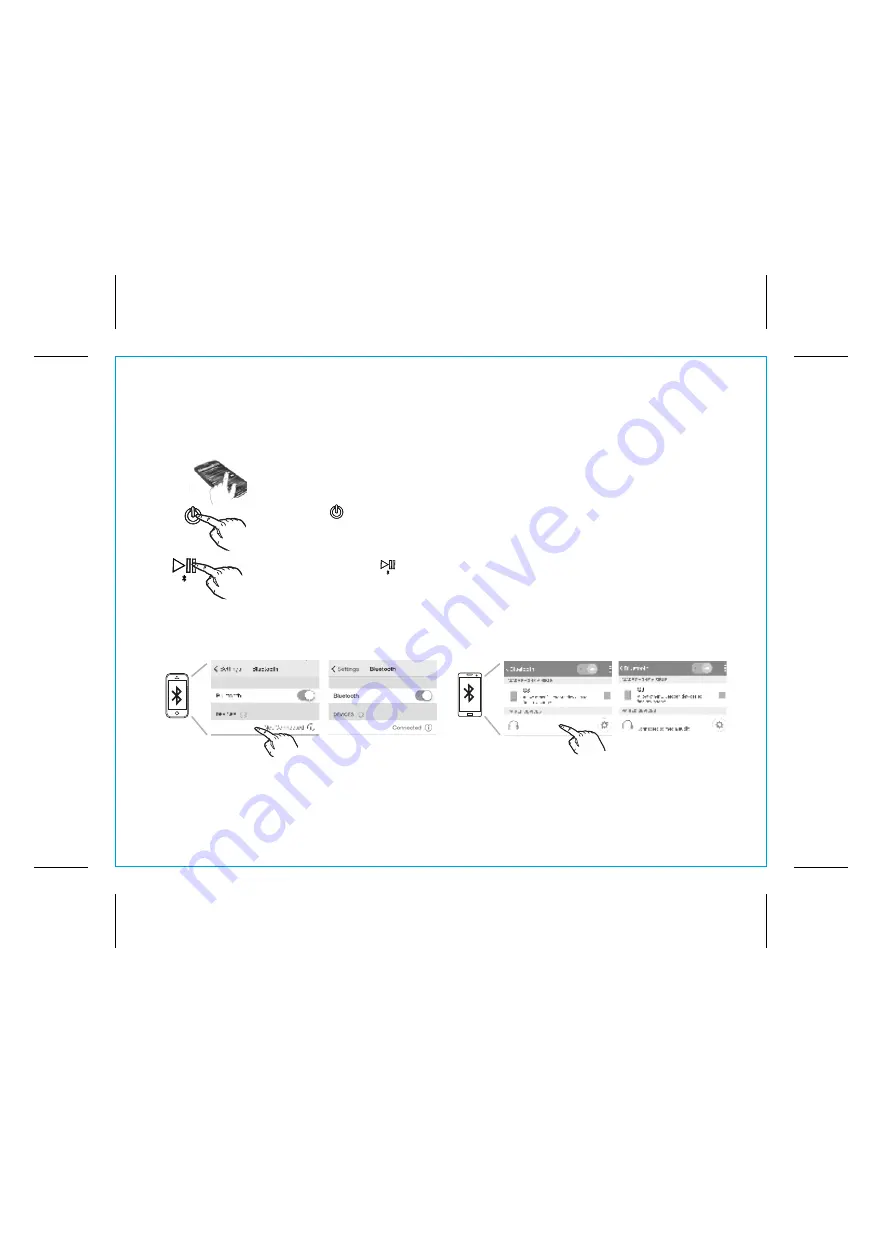
1.  Make sure your Bluetooth device is fully charged. Turn on your Bluetooth device and 

make it “discoverable” by turning on Bluetooth mode (check in Options or Settings).

2. Press the       

Power Button

 to turn on the Go+ Arc. 

The first time the unit is 

powered on

, it will enter auto-pairing mode and attempt to connect to a Bluetooth 

device (if so, skip to step 4). Otherwise, follow step 3 to begin pairing.

3.  

Press and hold

 the      

Play/Pause/Pairing Button

 for 2 seconds. The Go+ Arc will 

beep and the Bluetooth status indicator light on front of the unit will flash quickly. 

4.  “iHome Go+ Arc” should appear in your device’s Bluetooth menu. If “Not Paired”, “Not Connected” or 

similar message appears, select “iHome Go+ Arc” to connect it. If prompted for a passcode, enter 

“1234” on your device’s keypad.

Using the 

Go+ Arc

iHome Go+ Arc

6

P7

5.  If pairing is successful, 1 beep will sound and the Bluetooth status indicator light will appear solid blue, 

indicating the Go+ Arc is ready to play music. There should also be an indication on your device. If no 

device is successfully paired within 3 minutes the Go+ Arc will default to previous mode. Once the Go+ 

Arc is paired to a device, it will attempt to autolink when the device is within range (about 30 feet). 

Pairing Your Device  

For iPhone

iHome Go+ Arc

iHome Go+ Arc

iHome Go+ Arc

iHome Go+ Arc

For other

iHome Go+ Arc

Summary of Contents for iBT34 Go+ Arc

Page 1: ...o Arc instruction manual iBT34 IB English Size 153mm x 120mm Printing color Black Jan 29 2014 P1 Portable Rechargeable Bluetooth Stereo Speaker CHARGE BEFORE USE Questions Contact Customer Service at 1 800 288 2792 ...

Page 2: ...d carefully and keep for future reference Maintenance Place the unit on a level surface away from sources of direct sunlight or excessive heat Protect your furniture when placing your unit on a natural wood and lacquered finish A cloth or other protective material should be placed between it and the furniture Clean your unit with a soft cloth moistened only with mild soap and water Stronger cleani...

Page 3: ...t 5 Pairing Your Device 6 Pairing with a Different Device 7 Playing Audio Via Bluetooth 7 Speakerphone Operation 8 Playing Audio Via Aux In 9 Internal Rechargeable Lithium ion Battery 10 Consumer Product Safety Guide 11 12 FCC Information 13 Troubleshooting 14 Warranty 15 P3 ...

Page 4: ...P4 Go Arc 3 Included Go Arc unit unit USB adaptor Micro USB to USB cable Aux audio cable P4 iBT34 audio cable micro USB to USB cable USB Adaptor ...

Page 5: ... Panel Front Volume Volume Buttons Battery Level Meter Microphone behind grille Power Button REV FWD End Answer Call Buttons Play Pause Pairing Button Bluetooth Status Indicator Light Aux in Jack Reset port Micro USB Charging Audio in Port ...

Page 6: ...nit is charging and turns solid once the unit is fully charged See table above for charge status information 5 Using the Go Arc P6 NOTE The white 4 segment Battery Level Meter on the front of the unit is activated when the unit is ON or when connected to a charging source via the USB cable iHome Go Arc USB port Charge via computer USB port USB AC adaptor or other powered USB port Computer connecte...

Page 7: ...beep and the Bluetooth status indicator light on front of the unit will flash quickly 4 iHome Go Arc should appear in your device s Bluetooth menu If Not Paired Not Connected or similar message appears select iHome Go Arc to connect it If prompted for a passcode enter 1234 on your device s keypad Using the Go Arc iHome Go Arc 6 P7 5 If pairing is successful 1 beep will sound and the Bluetooth stat...

Page 8: ...sten to audio streamed wirelessly from your paired Bluetooth device 2 Press the Play Pause Pairing Button to play audio from your device Press again to pause play and once more to resume play When Bluetooth audio is active the status indicator will glow solid blue 3 Press the REV or FWD Buttons to go to the beginning or end of the current track Press again to go to the previous or next track You c...

Page 9: ... to hear the ring tone Press thexxxxxxFWD Answer Call Button to answer the call or press the REV End Call Button to ignore it For call waiting function use phone controls on your device 2 When a call is completed press the REV End Call Button to end the call and resume previous function Using the Go Arc 8 P9 Speakerphone Operation ...

Page 10: ...ess the Button on the unit to turn it on 3 Power on the audio device and use the controls on the device to play or pause audio and navigate tracks 4 Press the or Button to adjust the system volume You can also adjust volume on your device 5 When done listening press the Button to turn the unit OFF Remember to turn off your device too Using the Go Arc 9 P10 Mobile Phone Game Devices iPod Laptop PC ...

Page 11: ...l please dispose of the device in a waste bin for electronic devices Many electronics retailers now recycle batteries and other electronic components at no charge Check to see which ones in your area do so CAUTION The battery used in this device may present a risk of fire explosion or chemical burn if mistreated Never use or charge the battery if it appears to be leaking discolored deformed or in ...

Page 12: ...e that may block ventilation openings Also it should not be placed in a built in installation such as a bookcase or cabinet which may impede the flow of air through the ventilation openings 3 Heat The unit should be situated away from heat sources such as radiators heat registers stoves or other appliances including amplifiers that produce heat 4 Power Sources The unit should be connected to a pow...

Page 13: ...el when A the power supply cable or plug has been damaged B objects have fallen into or liquid has been spilled into the enclosure C the unit has been exposed to rain D the unit has been dropped or the enclosure damaged E the unit exhibits a marked change in performance or does not operate normally 12 Periods of Nonuse If the unit is to be left unused for an extended period of time such as a month...

Page 14: ...mful interference to radio or television reception which can be determined by turning the equipment off and on the user is encouraged to try to correct the interference by one or more of the following measures Reorient or relocate the receiving antenna Increase the separation between the equipment and receiver Connect the equipment into an outlet on a circuit different from that to which the recei...

Page 15: ...ation varies depending on your device s hardware and operating system Please see our website for updates on pairing When you power ON the speaker it will automatically link with the last previously paired Bluetooth device if the device is still within range approx 30 feet To pair with a different device you must turn off Bluetooth capability on the already paired device or take it out of range If ...

Page 16: ... or which have been modified or repaired by unauthorized persons ii cracked or broken cabinets or units damaged by excessive heat iii damage to digital media players CD s or tape cassettes if applicable iv the cost of shipping this product to the Factory Service Center and its return to the owner This warranty is valid only in the United States of America and does not extend to owners of the produ...

Reviews: