background image

4

2 Functions and features

2.1 Application area 

The unit monitors the flow of liquid media�

2.2 Operating principle flow monitoring

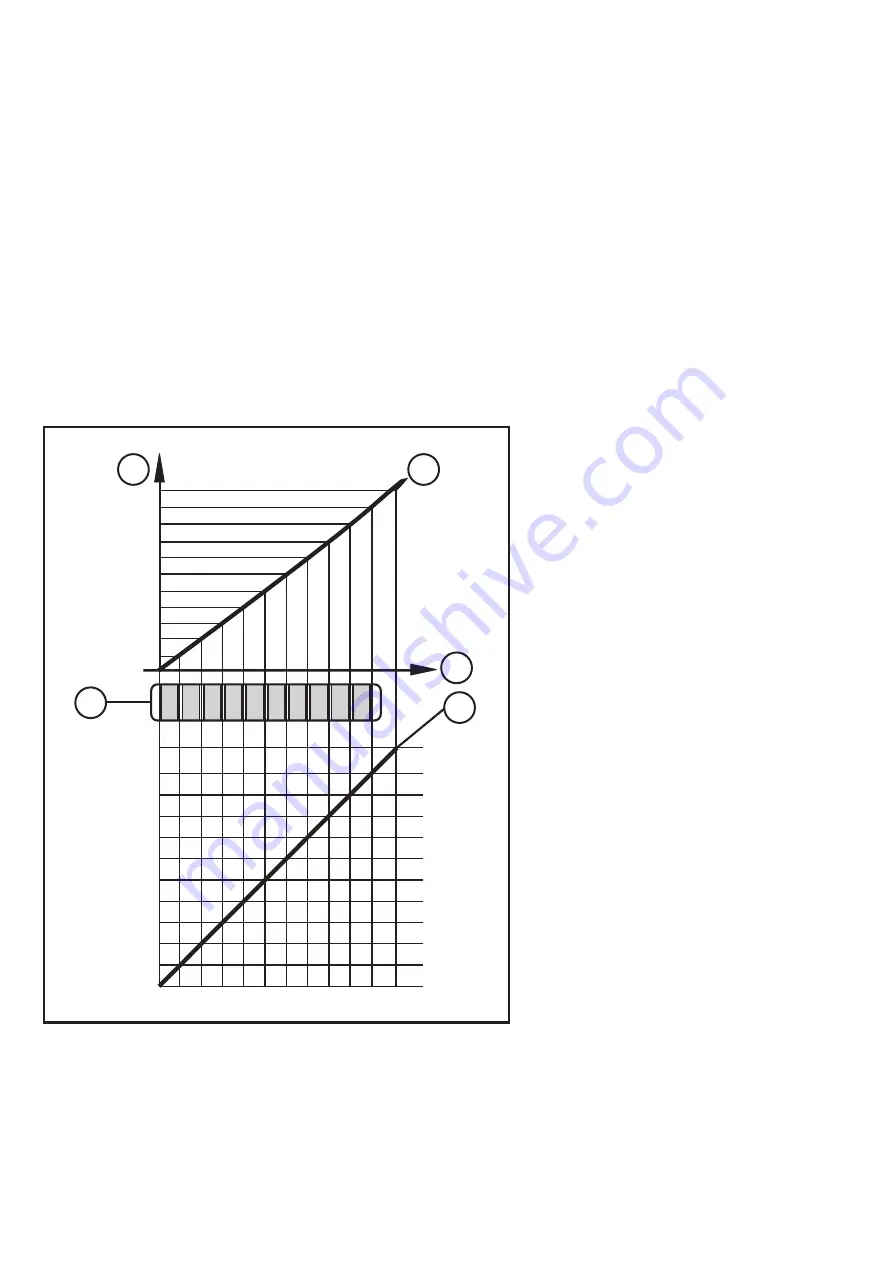
•  The unit detects the flow speed to the calorimetric measuring principle and 

converts it into an analog output signal (4���20 mA)�

The output signal corresponds to the characteristic curve of the sensor� Like the 

row of LEDs it indicates the relative flow velocity within the detection range set�
In case of excess flow (flow velocity  exceeds the detection range) the output 

signal increases to 20���22 mA�


A: operation display (row of LEDs)

B: flow velocity

C: characteristic curve

D: sensor signal

E: output signal in mA

The unit is delivered with the following factory setting: monitoring range = 

5���100 cm/s in water�

The typical response time of the unit is 1���10 s�

Summary of Contents for efector 300 SI5004

Page 1: ...Operating instructions Flow monitors SI5004 704339 02 08 2010 UK ...

Page 2: ... the pipe system 6 3 3 Mounting operation 6 4 Electrical connection 7 5 Operating and display elements 7 6 Set up and settings for water 8 6 1 High flow adjustment optional 8 7 Additional settings optional 9 7 1 Low flow adjustment 9 7 2 Restore the factory setting reset 9 7 3 Lock unlock the unit 9 8 Error during adjustment 10 9 Operation 10 10 Maintenance 11 11 Scale drawing 11 12 Technical data...

Page 3: ...proper or non intended use may lead to malfunctions of the unit or to un wanted effects in your application That is why installation electrical connection set up operation and mainte nance of the unit must only be carried out by qualified personnel authorised by the machine operator For the scope of validity cULus The device shall be supplied from an isolating transformer having a secondary Listed...

Page 4: ...o the characteristic curve of the sensor Like the row of LEDs it indicates the relative flow velocity within the detection range set In case of excess flow flow velocity exceeds the detection range the output signal increases to 20 22 mA A operation display row of LEDs B flow velocity C characteristic curve D sensor signal E output signal in mA The unit is delivered with the following factory sett...

Page 5: ...lation location General The sensor tip is to be completely sur rounded by the medium Insertion depth of the sensor minimum 12 mm Recommended For horizontal pipes mounting from the side For vertical pipes mounting in the rising pipe Conditional Horizontal pipe mounting from the bot tom if the pipe is free from build up Horizontal pipe mounting from the top if the pipe is completely filled with medi...

Page 6: ...rces of interference 3 3 Mounting operation Ensure that the system is free of pressure during installation Ensure that no media can leak at the mounting location during installa tion Grease the threads of the process connection 1 adapter 2 and nut 3 Note The sensor tip A must not be in contact with grease Screw the suitable adapter into the process connection Place the flow monitor onto the adapte...

Page 7: ...st be adhered to Voltage supply to EN 50178 SELV PELV Disconnect power Connect the unit as follows Core colours of ifm sockets 1 BN brown 2 WH white 3 BU blue n c not connected 5 Operating and display elements 1 Operation display The green LEDs indicate the current flow the LEDs 0 to 9 represent the range between no flow and maximum flow 2 3 Setting buttons for adjustment ...

Page 8: ...lay Carry out high flow adjustment 6 1 3 Your normal flow exceeds the representation range of the display LED 9 flashes Carry out high flow adjustment 6 1 You can restore the factory setting any time 7 2 6 1 High flow adjustment optional The unit determines the existing flow as normal flow and adapts the display repre sentation all LEDs light green Proceed as follows Let the normal flow circulate ...

Page 9: ... flashes Release the pushbutton The unit adopts the new value and passes into the operating mode 7 2 Restore the factory setting reset Press the pushbutton for at least 15 s LED 9 lights after approx 5 s it flashes After approx 15 s LEDs 0 9 flash orange Release the pushbutton All settings are reset to the factory setting operating area 5 100 cm s for water unlocked 7 3 Lock unlock the unit The un...

Page 10: ... ment was not adhered to Carry out the two adjustment operations again in the right sequence 9 Operation After every power on all LEDs light and go out again step by step during this time the output signal is 20 mA The unit is then ready for operation In case of power failure or interruption all settings remain Operating indicators Green LED bar current flow within the representa tion range LED 9 ...

Page 11: ... tip for build up from time to time Clean it using a soft cloth Stubborn build up e g lime can be removed using a common vinegar cleaning agent 11 Scale drawing 22 1 2 113 60 65 14 8 2 45 50 27 63 M12 x1 3 1 LED bar display 2 set button 3 tightening torque 25 Nm ...

Page 12: ...tion rating IP 67 Protection class III Shock resistance g 50 DIN IEC 68 2 27 11 ms Vibration resistance g 20 DIN IEC 68 2 6 55 2000 Hz Housing materials stainless steel 316L 1 4404 stainless steel 304S15 PC Makrolon PBT GF 20 EPDM X Santoprene Materials wetted parts stainless steel 316L 1 4404 O ring FPM 8x1 5 gr 80 Shore A EMC EN 61000 4 2 ESD 4 kV CD 8 kV AD EN 61000 4 3 HF radiated 10 V m EN 61...

Reviews: