background image

11

UK

9 Operation

After every power on all LEDs light and go out again step by step (during this time 

the output is closed if configured as normally open)� The unit is then ready for 

operation�
In case of power failure or interruption all settings remain�

Operating indicators 


Green LED bar: Current flow within the representa-

tion range�

Indication of the switch point (SP):

- LED orange: output closed�

- LED red: output open�


LED 9 flashes: current flow above the

representation range�


LED 0 flashes: current flow far below the represen-

tation range�

Interference indicator


Short circuit at the switching output:

The operating indicator and red LEDs light 

alternately� 

If the short circuit has been rectified, the unit im-

mediately passes into the normal operating state�

The current operating state is displayed�

Display OFF

(no LED lights):

Operating voltage too low (< 19 V) or failed�

Ensure a correct voltage supply�

10 Maintenance

Recommended maintenance: 


► Check the sensor tip for build-up from time to time� 


► Clean it using a soft cloth� Stubborn build-up (e�g� lime) can be removed using 

a common vinegar cleaning agent�

Summary of Contents for efector 300 SI0553

Page 1: ...Operating instructions Flow monitors SI0553 704379 01 08 2010 UK...

Page 2: ...ical connection 7 5 Operating and display elements 7 6 Set up and settings for water 8 6 1 Change the switch point optional 8 6 2 High flow adjustment optional 9 7 Additional settings optional 9 7 1 L...

Page 3: ...the unit Ensure that the product is suitable for your application without any restrictions The unit conforms to the relevant regulations and EC directives Improper or non intended use may lead to mal...

Page 4: ...n applies output open if medium is flowing If the flow speed increases the switching status changes when the switch point is reached If the flow speed falls again the switching status changes if the v...

Page 5: ...ation location General The sensor tip is to be completely sur rounded by the medium Insertion depth of the sensor minimum 12 mm Recommended For horizontal pipes mounting from the side For vertical pip...

Page 6: ...ces of interference 3 3 Mounting operation Ensure that the system is free of pressure during installation Ensure that no media can leak at the mounting location during installa tion Grease the threads...

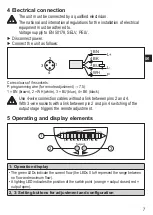
Page 7: ...7 5 1 BN brown 2 WH white 3 BU blue 4 BK black Use 4 wire connection cables without a link between pins 2 and 4 With 3 wire sockets with a link between pin 2 and pin 4 switching of the output stage t...

Page 8: ...2 3 Your normal flow exceeds the representation range of the display LED 9 flashes Carry out high flow adjustment 6 2 You can restore the factory setting any time 7 3 6 1 Change the switch point optio...

Page 9: ...you should additionally adapt the unit to the minimum flow Note The following adjustment must only be carried out after the high flow adjust ment Let the minimum flow circulate in the installation or...

Page 10: ...adapt the unit to new flow conditions any time Apply the operating voltage for 5 10 s to Pin 2 high flow adjustment Apply the operating voltage for 10 15 s to Pin 2 low flow adjustment This adjustmen...

Page 11: ...the representation range LED 0 flashes current flow far below the represen tation range Interference indicator Short circuit at the switching output The operating indicator and red LEDs light alternat...

Page 12: ...on 3 tightening torque 25 Nm 12 Technical data Application area Liquids and gases Operating voltage V 19 36 DC1 Current rating mA 250 Short circuit protection pulsed reverse polarity overload protecti...

Page 13: ...tion rating IP 67 Protection class III Shock resistance g 50 DIN IEC 68 2 27 11 ms Vibration resistance g 20 DIN IEC 68 2 6 55 2000 Hz Housing materials stainless steel 316L 1 4404 stainless steel 304...

Reviews: