PPC-51xxA-G41/WIDS-51xA-G41 Panel PC
Page 42
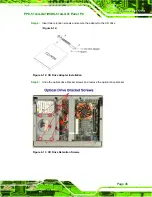
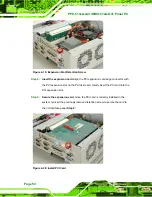
Figure 4-6: HDD SATA Connector
Step 4:
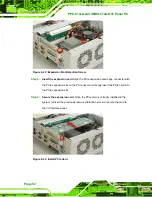
Attach the hard drive in the bracket. To do this, slide the hard drive onto the
bracket until it connects with the SATA connector at the back. Fasten the four
retention screws on the side.
Figure 4-7: HDD Retention Screws
Step 5:
Install the hard drive bracket (with hard drive and SATA cable attached) into the
PPC-51xxA-G41/WIDS-51xA-G41 and fasten the four hard drive bracket
screws.
Step 0:
Summary of Contents for PPC-5150A-G41
Page 13: ...PPC 51xxA G41 WIDS 51xA G41 Panel PC Page 1 Chapter 1 1 Introduction ...
Page 22: ...PPC 51xxA G41 WIDS 51xA G41 Panel PC Page 10 Chapter 2 2 Specifications ...
Page 40: ...PPC 51xxA G41 WIDS 51xA G41 Panel PC Page 28 Chapter 3 3 Unpacking ...
Page 44: ...PPC 51xxA G41 WIDS 51xA G41 Panel PC Page 32 Chapter 4 4 Installation and Configuration ...
Page 77: ...PPC 51xxA G41 WIDS 51xA G41 Panel PC Page 65 Chapter 5 5 BIOS Setup ...
Page 78: ...PPC 51xxA G41 WIDS 51xA G41 Panel PC Page 66 ...
Page 119: ...PPC 51xxA G41 WIDS 51xA G41 Panel PC Page 107 Chapter 6 6 System Maintenance ...
Page 129: ...PPC 51xxA G41 WIDS 51xA G41 Panel PC Page 117 Appendix A A BIOS Options ...
Page 133: ...PPC 51xxA G41 WIDS 51xA G41 Panel PC Page 121 Appendix B B Terminology ...
Page 137: ...PPC 51xxA G41 WIDS 51xA G41 Panel PC Page 125 Appendix C C Digital I O Interface ...
Page 140: ...PPC 51xxA G41 WIDS 51xA G41 Panel PC Page 128 Appendix D D Watchdog Timer ...
Page 143: ...PPC 51xxA G41 WIDS 51xA G41 Panel PC Page 131 Appendix E E Address Mapping ...
Page 146: ...PPC 51xxA G41 WIDS 51xA G41 Panel PC Page 134 Figure E 3 Input Output IO 2 of 2 ...
Page 148: ...PPC 51xxA G41 WIDS 51xA G41 Panel PC Page 136 E 4 Memory Figure E 5 Memory ...
Page 149: ...PPC 51xxA G41 WIDS 51xA G41 Panel PC Page 137 Appendix F F Hazardous Materials Disclosure ...


