background image

PAC-400AI QIG 


IEI Integration Corp.   


CHASSIS MAINTENANCE 


F

AN 

R

EPLACEMENT


  NOTE: 

Please ensure that the power of the computer is switched off 
before you replace a fan. 


There is one  8  cm cooling fan inside the PAC-400AI  chassis. To 

replace a fan, please follow the steps below: 

Step 1: 

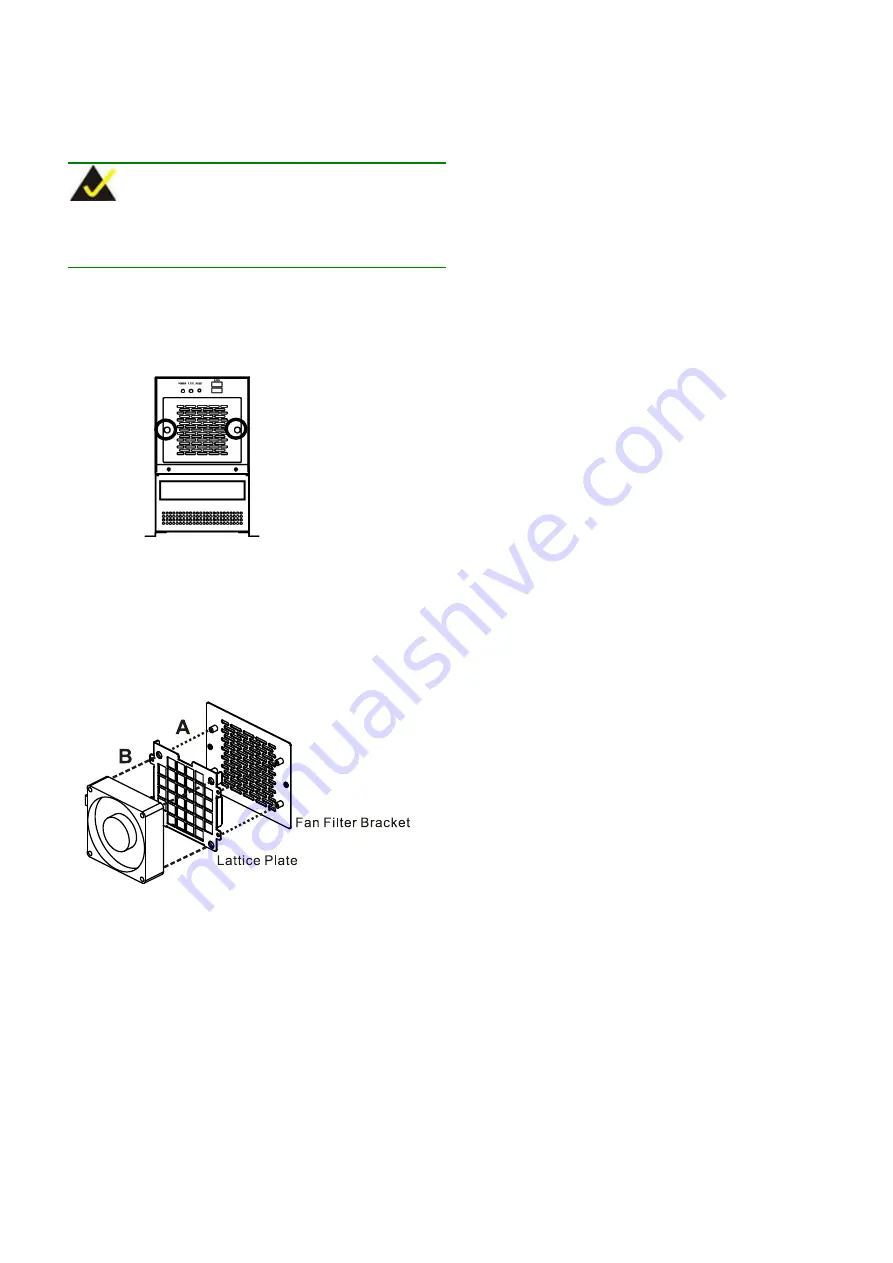
Loosen the two fan filter bracket thumbscrews. 


Figure 12: Fan Filter Bracket Thumbscrews 

Step 2: 

Unplug the power cable connected to the fan. 

Step 3: 

Remove the four screws that secure the lattice plate with 

the fan filter bracket (A). 

Step 4: 

Remove the  four fan retention screws that secure the 

fan to the lattice plate (B). 


Figure 13: Fan Retention Screws 

Step 5: 

Install a new fan and  reinsert the four previously 

removed fan filter plate retention screws. 

Step 6: 

Reinstall the fan filter plate with the fan. 

Step 7: 

Reinstall the fan filter bracket and tighten the two fan 

filter bracket thumbscrews. 


F

AN 

F

ILTER 

R

EPLACEMENT


To replace the fan filter, please follow the steps below: 

Step 1: 

Loosen the two fan filter bracket thumbscrews. 

Step 2: 

Pull the fan filter pad out of the space between the lattice 
plate and the fan filter bracket. 

Step 3: 

Insert a new fan filter pad. 

Step 4: 

Reinstall the fan filter bracket and fasten the two fan filter 
bracket thumbscrews. 


Summary of Contents for PAC-400AI

Page 1: ...ive Bay 1 x 3 5 HDD Dimensions DxWxH o 269mm x 140mm x 230 5mm Operating Temperature 0 40 C Relative Humidity 5 95 Vibration o 5 to 17Hz 0 1 double amplitude displacement o 17 to 640Hz 1 5G accelerati...

Page 2: ...AC 400AI QIG IEI Integration Corp 2 DIMENSION DRAWING The dimensions of the PAC 400AI are shown below USB 170 156 269 156 180 206 238 170 238 140 Figure 1 Dimension Drawing measurement units millimete...

Page 3: ...ver is secured to the chassis with four retention screws on the left side of the chassis Step 1 Remove all four top cover retention screws from the left side of the chassis Step 2 Slide the cover left...

Page 4: ...3 5 HDD in the lower compartment To install a 3 5 HDD please follow the steps below Step 1 Mount a 3 5 HDD onto the 3 5 drive bracket Step 2 To secure the 3 5 HDD to the 3 5 HDD bracket insert four re...

Page 5: ...card and the PCI ISA card I O connectors face the rear of the chassis Step 2 Align the retention screw holes in the backplane with the retention screw holes in the four elevated predrilled retention...

Page 6: ...nsion card please follow the instructions below Step 1 Remove the slot cover at the back of the chassis To do this remove the slot cover retention screw at the top of the slot cover Step 2 Slide the P...

Page 7: ...Remove the four fan retention screws that secure the fan to the lattice plate B Figure 13 Fan Retention Screws Step 5 Install a new fan and reinsert the four previously removed fan filter plate reten...

Reviews: