background image


IMK-571R Software and Programming Guides 

Page 99


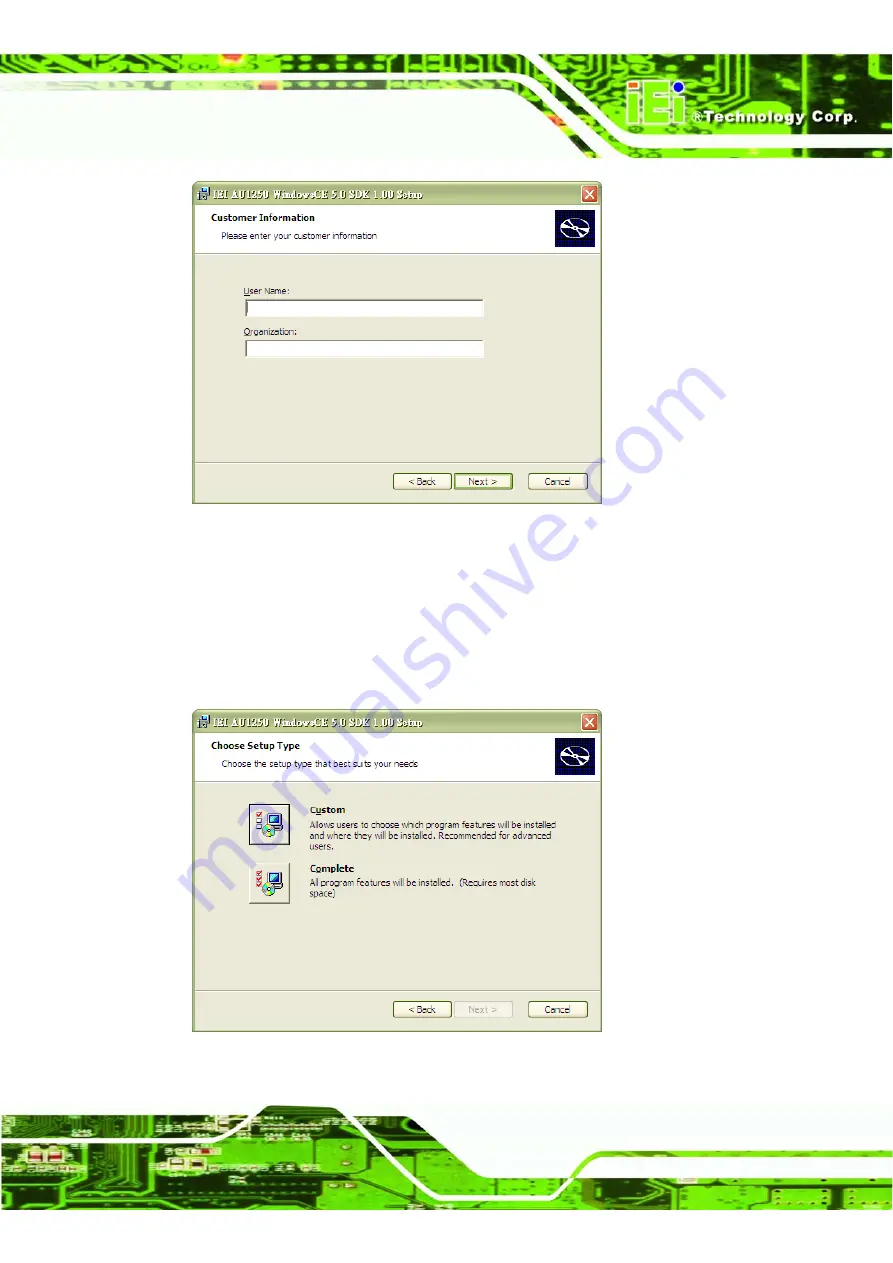
Figure 6–4: SDK Customer Information 

Step 4: 

Choose setup type. User can choose development program language such as 

Embedded Virtual C++ 4.0 or .NET Compact Framework. Then click 

Next

Step 5: 

Select 

Complete

 to install the whole program, to just install specific parts, select 

Custom


Figure 6–5: SDK Setup Type Selection 

Summary of Contents for IMK-571R

Page 1: ...and Programming Guides Page i IEI Technology Corp User Manual IMK 571R Software and Programming Guides IMK Runtime DEMO User Guide XML Merchandise Manager User Guide and MSR Programming Guide Rev 1 00...

Page 2: ...IMK 571R Software and Programming Guides Page ii Revision Date Version Changes 29 September 2009 1 00 Initial release...

Page 3: ...al damages arising out of the use or inability to use the product or documentation even if advised of the possibility of such damages This document contains proprietary information protected by copyri...

Page 4: ...UILT IN USER APPLICATIONS OF WINDOWS CE 5 0 15 1 4 1 Internet Explorer 16 1 4 2 Set up a Remote Desktop Connection 18 1 4 3 Software based Input Panel 21 1 4 4 Media Player 22 1 4 5 File Viewer 23 1 4...

Page 5: ...gement Tools 35 2 1 3 System Requirement 35 2 1 4 Concept 35 2 2 TO INSTALL IEI REMOTE MANAGEMENT TOOLS 36 2 3 REMOTE MANAGEMENT TOOLS 38 2 4 WAKE UP CONFIGURE UPDATE CONNECT AN IEI WINDOWS CE DEVICE...

Page 6: ...XML FILES TO IMK 571R 77 5 IMK WEB INTERFACE 80 5 1 IMK WEB INTERFACE MAIN PAGE 81 5 2 SYSTEM SETTINGS PAGES 82 5 2 1 Main Page 82 5 2 2 Device Information 83 5 2 3 Ethernet 84 5 2 4 Wireless 85 5 2...

Page 7: ...0 6 4 1 5 Program Debugged Using the Emulator 121 6 4 2 Development Using Visual Studio NET 2003 121 6 4 2 1 Creating a Project 122 6 4 2 2 Building and Downloading a Program 124 6 4 2 3 Program Debug...

Page 8: ...s 11 Figure 1 13 Renew Network Status 12 Figure 1 14 DHCP Warning 12 Figure 1 15 Volume Sounds Properties 13 Figure 1 16 Keyboard Properties 13 Figure 1 17 Control Panel 14 Figure 1 18 System Properti...

Page 9: ...Desktop Icon 24 Figure 1 45 Microsoft PDF Viewer Desktop Icon 24 Figure 1 46 System Time 24 Figure 1 47 Date Time Properties 25 Figure 1 48 IEI CE Utility 26 Figure 1 49 Save Registry 27 Figure 1 50...

Page 10: ...ystem Property Device Name Tab 44 Figure 2 22 System Property Copyright Tab 45 Figure 2 23 RDP Connection Properties 45 Figure 2 24 Terminal Connection Manager 46 Figure 2 25 Connection Startup 46 Fig...

Page 11: ...l XML Product File 68 Figure 4 6 Edit Product Information 68 Figure 4 7 Update Product Information 69 Figure 4 8 Add New Product 70 Figure 4 9 Add New Product Dialog 70 Figure 4 10 Delete Product from...

Page 12: ...Make New Connection 103 Figure 6 13 Make Direct Connection 104 Figure 6 14 Select Device Connection 104 Figure 6 15 Port Settings 105 Figure 6 16 PC Connection 105 Figure 6 17 Change Connection to My...

Page 13: ...onnect With ActiveSync 120 Figure 6 40 My Device Desktop Icon 120 Figure 6 41 Run Test Program 121 Figure 6 42 Emulator Debugging 121 Figure 6 43 Create New Project 122 Figure 6 44 Smart Device Applic...

Page 14: ...IMK 571R Software and Programming Guides Page xiv List of Tables Table 6 1 Hardware Requirements 96 Table 6 2 Software Requirements 96...

Page 15: ...IMK 571R Software and Programming Guides Page 1 Chapter 1 1 Windows CE Setup...

Page 16: ...automatically when the system is turned on The initial screen shows for 30 seconds while loading Windows CE 5 0 The startup image can be changed by overwriting the default logo bmp with a customized o...

Page 17: ...ts are formatted correctly Step 4 The OS image NK bin should be on the SD card and not be crashed Step 5 If the OS image is crashed prepare a new SD card with the same contents Step 6 Contact technica...

Page 18: ...s the exclusive interface for Web browser only machines When installed Internet option is added and screen functions can be toggled Cash Location RAM Drive SIP Software based Input Panel The larger si...

Page 19: ...n application program such as a browser and the Internet program that uses TCP IP Windows Networking API Manages network connections and accesses remote file systems and printers TCP IP Offers network...

Page 20: ...it DOS prompt and Shell The shell provides the user with an interface to the objects necessary for running applications and managing the Microsoft Windows CE operating system on a target device These...

Page 21: ...Connection Set up connecting computers Required Required Regional Settings Select the regional settings Required Required Remove Programs Delete installed applications Need to save its registry excep...

Page 22: ...t Settings Step 3 Then select Control Panel Figure 1 3 Control Panel Step 4 Make any required changes Step 5 Select Start Programs Save Registry to save any changes If not saved to the registry the ch...

Page 23: ...or Start Programs Calibration Figure 1 5 Touch Screen Calibration Step 2 Select the Stylus tab Figure 1 6 Control Panel Step 3 Click Recalibrate Step 4 Click on and hold the mark at the center of the...

Page 24: ...rk through the Ethernet cable do the following Step 1 Double click the Network and Dial up Connections icon on the Control Panel Step 2 Double click the DM9CE1 icon Step 3 Set the IP address and Name...

Page 25: ...make sure the network cables are attached and verify the network is connected Figure 1 10 Network Not Ready Figure 1 11 Network Ready Step 5 If the network does not become ready double click the icon...

Page 26: ...1 14 DHCP Warning Step 8 If the original IP has not been used for a while it might not work any more If all other settings are correct then the old IP needs to be removed from the registry Clicking Sa...

Page 27: ...sounds for to either ON or OFF S t e p 0 Figure 1 15 Volume Sounds Properties 1 3 4 Keyboard Set the properties of the keyboard Step 1 Double click the Keyboard icon on the Control Panel Step 2 Select...

Page 28: ...l or Start Programs System Figure 1 17 Control Panel Step 2 General shows the system information Figure 1 18 System Properties Step 3 Memory move the slider to the left for more memory to run programs...

Page 29: ...CE device to other computers Please type a name and a short description Figure 1 20 Device Name Step 5 Copyrights displays the copyrights for the operating system S t e p 0 Figure 1 21 Copyrights 1 4...

Page 30: ...Page 16 Figure 1 22 Desktop 1 4 1 Internet Explorer How to use Internet Explorer Step 1 Open Internet Explorer Figure 1 23 Internet Explorer Icon Step 2 Enter the website address URL Figure 1 24 Webs...

Page 31: ...ons Figure 1 25 Internet Explorer File Menu Step 4 Edit Cut Copy Paste Select All Find functions to edit the context of the current page Figure 1 26 Internet Explorer Edit Menu Step 5 View sets the vi...

Page 32: ...s Menu 1 4 2 Set up a Remote Desktop Connection Set up a connection to a host computer Step 1 Double click the Remote Desktop icon on the desktop Figure 1 29 Remote Desktop Icon Step 2 To create a con...

Page 33: ...e 19 Figure 1 31 Remote Desktop Extended Interface Step 4 Select Start Programs as the default application to start when you connect or specify an application name If you select to specify an applicat...

Page 34: ...IMK 571R Software and Programming Guides Page 20 Figure 1 32 Remote Desktop Programs Tab Step 5 Click Save As to save the new connection Figure 1 33 Remote Desktop General Tab...

Page 35: ...nect Figure 1 34 Remote Desktop Connection Step 7 Enter the User name Password and Domain of the computer to connect to and click Connect S t e p 0 Figure 1 35 Windows Server 2003 Logon 1 4 3 Software...

Page 36: ...eyboard Step 3 Or select Keyboard S t e p 0 Figure 1 38 Normal Software Keyboard 1 4 4 Media Player Step 1 Double click the Media Player icon S t e p 0 Figure 1 39 Media Player Desktop Icon File Use O...

Page 37: ...ayer 1 4 5 File Viewer File View enables you to view files created for various Microsoft programs You cannot edit these files A File Viewer includes the following applications Microsoft Excel Viewer V...

Page 38: ...crosoft Image Viewer View print and copy Image File Figure 1 44 Microsoft Image Viewer Desktop Icon Microsoft PDF Viewer View print and copy PDF documents Figure 1 45 Microsoft PDF Viewer Desktop Icon...

Page 39: ...unching IEI CEUTILITY 1 0 To launch the utility select Start Programs IEI IEI CEUTILITY 1 0 the target execution file is IEI_CEUTILITY exe in SYSTEM directory in your default SD Memory Card file syste...

Page 40: ...Registry button If you want to restore system registry to default factory settings click Recover to Factory Settings before you do this make sure all custom applications are no longer associated with...

Page 41: ...n the device is turned on The programs are loaded from the top of the list to the bottom To add a new program to the list double click the last empty row or click the Add button Alternatively click th...

Page 42: ...IMK 571R Software and Programming Guides Page 28 Figure 1 50 Auto Execution To chose an application path from the file dialog box Figure 1 51 Auto Execution Choose Program Dialog...

Page 43: ...ut the configuration file please refer to section 2 7 My Device Storage Card Figure 1 52 OS Image Startup Logo and Configuration File Also in the storage card is agentd log This is a log file automati...

Page 44: ...E exe is the Windows CE agent of IEI Remote management tools It is executed automatically in Windows CE device side while your Windows CE device started and it would wait for communication with PC sid...

Page 45: ...ter or Unregister a DLL Syntax REGSVR32 U S C I Command_Line DLL_Name REGSVR32 U S C N I Command_Line DLL_Name Switches u Unregister Server s Silent no dialogue boxes c Console output n Don t call Dll...

Page 46: ...Save Registry Saves any settings made to the registry If not saved settings will return to their original values when the system is reset Figure 1 58 Save Registry 1 7 Configuration File 1 7 1 Overvi...

Page 47: ...be changed according to required settings Anything after a double slash is a comment 1 7 2 Offset 0x00 Load Registry From EEPROM 0x00 loads default registry and skips loading from EEPROM 0x01 loads re...

Page 48: ...IMK 571R Software and Programming Guides Page 34 Chapter 2 2 Using the Remote Management Tool...

Page 49: ...ows CE devices in the network Remote wakeup restart shutdown Remote modification of thin client settings Remote adding and deleting of RDP settings Monitor settings of thin clients including device na...

Page 50: ...tarted S t e p 0 Figure 2 1 Remote Management Tools Overview The following sections describe how to setup the remote management tool 2 2 To Install IEI Remote Management Tools To install the remote ma...

Page 51: ...Management Setup Installation Options Step 2 Specify the destination folder that the program is installed to and click Install If unsure leave the default Figure 2 3 Remote Management Setup Installati...

Page 52: ...nd Programming Guides Page 38 Figure 2 4 Remote Management Setup Completed 2 3 Remote Management Tools IEI Windows CE devices online offline status Figure 2 5 Remote Management device is offline now d...

Page 53: ...9 Step 1 After installing IEI Remote Management Tools run the program The following window will be shown Default Password Admin Figure 2 6 Remote Management Step 2 Select Set Subnet from File on the t...

Page 54: ...te Management Set Subnet Step 4 Click to search for all available IEI Windows CE devices in the subnet Figure 2 9 Remote Management Device Search 2 4 Wake up Configure Update Connect an IEI Windows CE...

Page 55: ...to search for all available IEI Windows CE devices Figure 2 10 Search for Devices Step 6 The devices will be shown on the left column S t e p 0 Figure 2 10 Device List 2 4 2 Configure an IEI Windows C...

Page 56: ...Figure 2 112 Terminal Properties 2 4 2 1 General You can view the general information of the device in this page Figure 2 123 Terminal Properties General Tab 2 4 2 2 Control Panel Control Panel enable...

Page 57: ...IMK 571R Software and Programming Guides Page 43 Figure 2 15 Terminal Properties Control Panel Tab 2 4 2 2 1 Date Time Set the time of the device Figure 2 16 Set Device Time...

Page 58: ...is section displays device information Figure 2 17 System Property General Tab 2 4 2 2 3 Device Name This section shows name of the device You can enter a description here Figure 2 18 System Property...

Page 59: ...2 4 2 3 Define Terminal Connection of an IEI Windows CE Device Please follow the steps below to configure RDP connection of Thin Client via Remote Manager Step 1 Select the device name on the left col...

Page 60: ...ick Add to add a new connection Step 4 To edit an existing connection select the item and click Edit Step 5 To set the startup option for the connection click Start Select the startup option and click...

Page 61: ...iew a real time desktop display of any connected IEI Windows CE devices directly and control their mouse and keyboard just like being at the terminal Step 1 To use the VNC function run Remote Manager...

Page 62: ...Figure 2 24 Client PC VNC Viewer 2 4 2 5 Configure FTP Settings of an IEI Windows CE device Step 1 This option is used to configure FTP settings of devices Select a device on the left and click FTP on...

Page 63: ...ice will automatically reset so changes take effect S t e p 0 Figure 2 26 Set FTP Directory 2 4 2 6 Update an IEI Windows CE device Step 1 To update an IEI Windows CE device select a device on the lef...

Page 64: ...IMK 571R Software and Programming Guides Page 50 Figure 2 28 Device Update Dialog Figure 2 29 Browse for System Image...

Page 65: ...download log records of the thin client and check against the logs in case of any device error To download the log file select a connected client and click LOG on the toolbar Figure 2 30 System Logs...

Page 66: ...8 Network Parameter Configuration Step 1 This function enables network administrator to set up the network parameter of indicate devices To set up the parameter of indicate devices select a connected...

Page 67: ...dicate devices Click Set Network to confirm S t e p 0 Figure 2 33 Net Config Dialog 2 4 2 9 Account management Step 1 This function enables network administrator to add or modify account information o...

Page 68: ...e and Programming Guides Page 54 Figure 2 34 Account management Step 2 When the following screen appears modify Administrator s password Click Apply to confirm Figure 2 35 Account Setting Dialog chang...

Page 69: ...IMK 571R Software and Programming Guides Page 55 Chapter 3 3 IMK Runtime Demo...

Page 70: ...monstration from the path shown below Storage Card Demo IMK Runtime Demo exe 3 2 Main Page Button Video Go to Video Demo Frame Button F1 Go to Barcode Demo Frame Button F2 Go to Printer Demo Frame But...

Page 71: ...IMK 571R Software and Programming Guides Page 57 3 3 Video Player Figure 3 2 Play Video...

Page 72: ...d Programming Guides Page 58 3 4 Button F1 Barcode Demo Select Data Base Search barcode in data base XML and display in this screen Select Test Mode List barcode and compare with AIM ID data base Figu...

Page 73: ...IMK 571R Software and Programming Guides Page 59 Figure 3 4 Barcode Demo Test Mode...

Page 74: ...IMK 571R Software and Programming Guides Page 60 3 5 Button F2 Printer Demo Figure 3 5 Main Screen...

Page 75: ...IMK 571R Software and Programming Guides Page 61 Print Result Figure 3 6 Main Screen...

Page 76: ...IMK 571R Software and Programming Guides Page 62 3 6 Button F3 MSR Demo Figure 3 7 MSR Demo Screen...

Page 77: ...3 3 7 Button F4 Exit Select Exit button Exit to WinCE Select Cancel button Go back to IMK Runtime Demo Main Frame Figure 3 8 Exit Notice If you confront trouble when compiling IMK Runtime Demo source...

Page 78: ...IMK 571R Software and Programming Guides Page 64 Chapter 4 4 XML Merchandise Manager...

Page 79: ...chandise Manager Double click the XML Merchandise Manager exe icon to start the program Figure 4 1 XML Merchandise Manager Icon 4 2 Modifying the XML File Step 3 Click Edit XML to select the location...

Page 80: ...IMK 571R Software and Programming Guides Page 66 Step 4 Click the New button to pick the location where the XML file will be created Figure 4 3 Create a New XML File...

Page 81: ...67 Step 5 Click the Folder button to pick the XML file Figure 4 4 XML List Dialog Step 6 The location of the XML file is selected and the product information contained in the file is displayed in the...

Page 82: ...save any changes These changes are only saved to the local copy of the XML file Figure 4 6 Save Local XML Product File Step 8 Double click a product item or select a product item and click Edit to cha...

Page 83: ...IMK 571R Software and Programming Guides Page 69 Step 9 Edit the product information in the dialog box Figure 4 8 Update Product Information...

Page 84: ...ogramming Guides Page 70 Step 10 Click the Add button to add new product information Step 11 Enter the new product information and click OK to apply the settings Figure 4 10 Add New Product Dialog Fig...

Page 85: ...oftware and Programming Guides Page 71 Step 12 Click Delete to delete the selected product If no product is selected the first item in the list will be deleted S t e p 0 Figure 4 11 Delete Product fro...

Page 86: ...ing Guides Page 72 4 3 Scanning for XML Files on the Network Subnet Step 1 The subnet is automatically selected according to the current network settings To select a different subnet just change this...

Page 87: ...tware and Programming Guides Page 73 Step 2 Double click a list itemDouble click any list item to get a popup of the target computer s IMK web browser based configuration tool S t e p 0 Figure 4 13 We...

Page 88: ...ramming Guides Page 74 4 4 Downloading XML Files from IMK 571R Step 1 Click the download button to start downloading the selected items Step 2 Select the current Download location of the XML files Fig...

Page 89: ...IMK 571R Software and Programming Guides Page 75 Step 3 Confirm the download of the XML files Click Yes to download the files or No to go back Figure 4 15 Download Confirmation...

Page 90: ...IMK 571R Software and Programming Guides Page 76 Step 4 The download progress is shown in the progress column S t e p 0 Figure 4 16 Download Progress...

Page 91: ...IMK 571R Software and Programming Guides Page 77 4 5 Uploading XML Files to IMK 571R Step 1 Select the path of the XML file to upload Figure 4 17 Local Product File Selection...

Page 92: ...e 78 Step 2 Select the target computer to upload to Step 3 Click the upload button to start uploading Figure 4 18 Product File Upload Step 4 Click Yes to start uploading the file or No to cancel S t e...

Page 93: ...IMK 571R Software and Programming Guides Page 79 Figure 4 20 Upload Progress Bar...

Page 94: ...IMK 571R Software and Programming Guides Page 80 Chapter 5 5 IMK Web Interface...

Page 95: ...IMK 571R Software and Programming Guides Page 81 5 1 IMK Web Interface Main Page Figure 5 1 Main Screen System Settings Barcode Settings IEI Website...

Page 96: ...e 82 5 2 System Settings Pages Adjust the main settings of the IMK 571R 5 2 1 Main Page The main system settings page Figure 5 2 Main System Settings Page Go to barcode settings page Go to http www ie...

Page 97: ...IMK 571R Software and Programming Guides Page 83 5 2 2 Device Information Displays general system information Figure 5 3 Device Information System Settings Page...

Page 98: ...IMK 571R Software and Programming Guides Page 84 5 2 3 Ethernet Shows Ethernet settings Figure 5 4 Ethernet System Settings Page...

Page 99: ...IMK 571R Software and Programming Guides Page 85 5 2 4 Wireless Show the target device s Wireless information Figure 5 5 Wireless System Settings Page...

Page 100: ...IMK 571R Software and Programming Guides Page 86 5 2 5 Restart Network Reset the network connection on the connected IMK 571R Figure 5 6 Restart Network System Settings Page...

Page 101: ...IMK 571R Software and Programming Guides Page 87 5 2 6 Reboot System Restart the IMK 571R Figure 5 7 Reboot System System Settings Page...

Page 102: ...gramming Guides Page 88 5 3 Barcode Settings Pages 5 3 1 Main Frame The main barcode settings page Figure 5 8 Main Barcode Settings Page Go to system settings page Go to http www ieiworld com Return t...

Page 103: ...IMK 571R Software and Programming Guides Page 89 5 3 2 Support Codetypes Set the supporting codetypes for scanned barcodes Figure 5 9 Supported Codetypes Barcode Settings Page...

Page 104: ...IMK 571R Software and Programming Guides Page 90 5 3 3 Beeper Option Sets the system beeper Figure 5 10 Beeper Option Barcode Setting Page...

Page 105: ...IMK 571R Software and Programming Guides Page 91 5 3 4 Trigger Mode Set the mode for the barcode scanner Figure 5 11 Trigger Mode Barcode Settings Page...

Page 106: ...IMK 571R Software and Programming Guides Page 92 5 3 5 Factory Default Sets the selected items to the system default Figure 5 12 Factory Default Barcode Settings Page...

Page 107: ...IMK 571R Software and Programming Guides Page 93 5 3 6 Version Information View the barcode information from the last scanned item Figure 5 13 Version Information Barcode Settings Page...

Page 108: ...IMK 571R Software and Programming Guides Page 94 Chapter 6 6 General Software Development...

Page 109: ...tion from the personal computer to Windows CE device and run the application The following describes the personal computer hardware required to develop applications Refer to the hardware environment s...

Page 110: ...dio NET 2003 Windows CE Utilities for Visual Studio NET 2003 add on pack 1 1 is required and can be downloaded from MSN IEI ALCHEMY AU1250 Windows CE 5 0 SDK Includes standard Windows CE library files...

Page 111: ...4 0 install the Service Pack 4 or above If you use Visual Studio NET 2003 install the Windows CE utilities for Visual Studio NET 2003 add on pack 1 1 6 2 1 Installing the IEI ALCHEMY Windows CE 5 0 S...

Page 112: ...mming Guides Page 98 Figure 6 2 SDK Installation Welcome Screen Step 2 Read the End User License Agreement carefully Select Accept and click Next Figure 6 3 SDK License Agreement Step 3 Enter customer...

Page 113: ...tion Step 4 Choose setup type User can choose development program language such as Embedded Virtual C 4 0 or NET Compact Framework Then click Next Step 5 Select Complete to install the whole program t...

Page 114: ...set the components and the location If you select Complete set the component location only Figure 6 6 SDK Custom Setup Options Step 7 Set destination folders to install SDK Then click Next Figure 6 7...

Page 115: ...1R Software and Programming Guides Page 101 Figure 6 8 SDK Ready to Install Step 9 Install SDK Figure 6 9 SDK Installation Progress Bar Step 10 Step 8 Click Finish to complete the SDK installation S t...

Page 116: ...1 Establishing a Connection via ActiveSync To transfer a program from the personal computer for developing applications to an IEI Windows CE device and then debug the program while it is running on a...

Page 117: ...of the IEI Windows CE device using a serial cable Step 2 Go to Start Menu Settings Control Panel Step 3 Double click Network and Dial up Connection Figure 6 11 Network and Dial up Connections Step 4...

Page 118: ...rogramming Guides Page 104 Figure 6 13 Make Direct Connection Step 6 Select a device In this example select Serial Cable on COM1 Then click Configure Figure 6 14 Select Device Connection Step 7 Set th...

Page 119: ...lick PC Connection to open the PC Connection Properties screen Figure 6 16 PC Connection Step 9 Select the connection method to connect to the personal computer if necessary Figure 6 17 Change Connect...

Page 120: ...art up the ActiveSync on the personal computer for developing applications Select Get Connected from the File menu and then select the port to connect to the data transfer cable Figure 6 19 Connect Wi...

Page 121: ...e personal computer for developing applications is not established the following dialog will pop up Please retry steps 10 and 11 Or run step 11 first and then run step 10 Step 16 Description of Get Co...

Page 122: ...for Device Step 18 After the session is established the following message will be shown Select Yes or No on the Set Up a Partnership dialog If you select No the device will be set as a guest If you se...

Page 123: ...ogramming Guides Page 109 Figure 6 22 Set Up a Partnership Step 19 Select the items to be synchronized The settings can be changed after the partnership is created Click Next to continue Figure 6 23 S...

Page 124: ...ng Guides Page 110 Step 20 ActiveSync will display the Setup Complete screen with information of using ActiveSync Click Finish Figure 6 24 Device Setup Complete Step 21 Connected Screen Figure 6 25 De...

Page 125: ...tnership Please refer to ActiveSync s online help for more details Note Once connected ActiveSync will reside in the personal computer and its connection setting will be kept It is possible to establi...

Page 126: ...Visual C 4 0 6 4 1 1 Creating a Project Step 1 Start eMbedded Visual C 4 0 and select New from the File menu In the Projects tab select the type of program to create and input a project name Step 2 S...

Page 127: ...Figure 6 28 Select the VCE Emulator Step 4 To create a program using a dialog based interface select Single based Select the necessary items and click Next Figure 6 29 Select Single Document Step 5 To...

Page 128: ...Programming Guides Page 114 Figure 6 30 Select Required Functions Step 6 To select the functions what you need and click Next Figure 6 31 Select Source File Options Step 7 Click Finish and the followi...

Page 129: ...IMK 571R Software and Programming Guides Page 115 Figure 6 32 Finish Setup Step 8 Click OK to create the new project S t e p 0...

Page 130: ...orm Manager Follow the steps below to register the device name of IMK 570 By this IMK 570 can be specified to be a download place now It includes the way to set up a property of the device in accordan...

Page 131: ...mming Guides Page 117 Figure 6 34 Platform Manager Configuration Step 2 To open Device Property select IEI_AU1250 Device and click Properties Then select Microsoft ActiveSync from the Transport and St...

Page 132: ...IMK 571R Software and Programming Guides Page 118 Figure 6 35 Platform Manager Configuration Figure 6 36 Platform Manager Device Properties Step 3 Building and Downloading a ProgramS t e p 0...

Page 133: ...e designated device Before executing the build process designate the SDK and other environment to be used in this process via the options in the Select Active WCE Configuration Select Active Configura...

Page 134: ...program start the personal computer s debugger S t e p 0 6 4 1 4 Programs Released for IMK 570 Step 1 Connect the personal computer to be used for development and the IEI Windows CE device via Active...

Page 135: ...cessfully the program is automatically downloaded to the emulator If the emulator is not running it will be launched and will load the program automatically Step 3 To debug this program start the debu...

Page 136: ...r to the release note and register the settings in case of using the emulator debugging Make sure you understand the release note as it contains very important information prior to development It is n...

Page 137: ...roject genre Select Smart device Application as template Enter the project name and the file location Click OK Step 3 Select Windows CE as target platform Then select a project type and click OK Figur...

Page 138: ...4 2 2 Building and Downloading a Program Here as an example we will create a program to display the text WELLCOME at the center of a window Step 1 Select a label from the toolbox and add a label name...

Page 139: ...es Page 125 Figure 6 46 Dialog Properties Step 3 Start to debug Figure 6 47 Debugging Step 4 Before starting to debug the following dialog will appear You can choose to debug by an emulator and debug...

Page 140: ...vice s original function such as the backlight and touch panel debugging using an emulator is available Before debugging starts click Deploy on the dialog of Windows CE NET Emulator 6 4 2 4 Program De...

Page 141: ...mming Guides Page 127 Figure 6 49 Select Deployment Device Step 3 Click Deploy on the dialog of Windows CE NET Device Figure 6 50 Select Windows CE NET Device Step 4 The file will be downloaded and de...

Page 142: ...IMK 571R Software and Programming Guides Page 128 Figure 6 51 Example Program Output...

Page 143: ...IMK 571R Software and Programming Guides Page 129 Chapter 7 7 Control Barcode Scanner with BARControl ocx...

Page 144: ...clsid F1AC3FFD 785B 4592 AC8D 34F358D11FDF id BarControl width 0 height 0 object 7 3 ReadBarCode int iLowTrigTime Description Reads barcode string Syntax BSTR ReadBarCode int iLowTrigTime Return Valu...

Page 145: ...IMK 571R Software and Programming Guides Page 131 Chapter 8 8 MSR Programming Guide for IMK 571R CE5 MSR...

Page 146: ...ags 8 1 2 cpp void CMSRDemoDlg CheckKey UINT nChar UINT nRepCnt UINT nFlags CString strintput TCHAR tcchkKeydata 64 0 TCHAR tcKeydata 64 0 strintput Format L c nChar int i if g_str IsEmpty g_str strin...

Page 147: ...ftware and Programming Guides Page 133 BOOL CMSRDemoDlg PreTranslateMessage MSG pMsg if pMsg message WM_KEYDOWN CheckKey UINT pMsg wParam UINT pMsg lParam UINT pMsg lParam return CDialog PreTranslateM...

Page 148: ...IMK 571R Software and Programming Guides Page 134 Chapter 9 9 FAQ...

Page 149: ...display The display maybe not works fine when you use other display because the resolution of display doesn t match the system settings The value of offset 0x02 in configure file can support different...

Page 150: ...IMK 571R Software and Programming Guides Page 136 A Select Tools Options at toobar Figure 9 1 Adding Library Step 1...

Page 151: ...IMK 571R Software and Programming Guides Page 137 B Switch to Directories tag select New icon to add a new directory Figure 9 1 Adding Library Step 2 Figure 9 1 Adding Library Step 3...

Page 152: ...IMK 571R Software and Programming Guides Page 138 C Direct the new directory to IMK RUNTIME DEMO lib Figure 9 1 Adding Library Step 4...

Page 153: ...IMK 571R Software and Programming Guides Page 139 D Rebuild the program it s done Figure 9 1 Adding Library Step 5...

Page 154: ...IMK 571R Software and Programming Guides Page 140 Appendix A A Terminology...

Page 155: ...25 1 255 The subnet IP cannot be assigned as a computer s IP address Sync Compares two files or pieces of information and updates them with the missing information from the other one so they both stay...

Reviews: