IDT 8A34 Series User Manual Download Page 8


8A3xxxx 144BGA EVK User Manual 


© 2019 Integrated Device Technology, Inc. 

February 6, 2019 


2.


Working with Timing Commander™ for Programing/Configuration 

The following sections are best cross-referenced with the ClockMatrix GUI Step-by-Step User Guide which is available on 

www.idt.com

2.1


Default Operation 

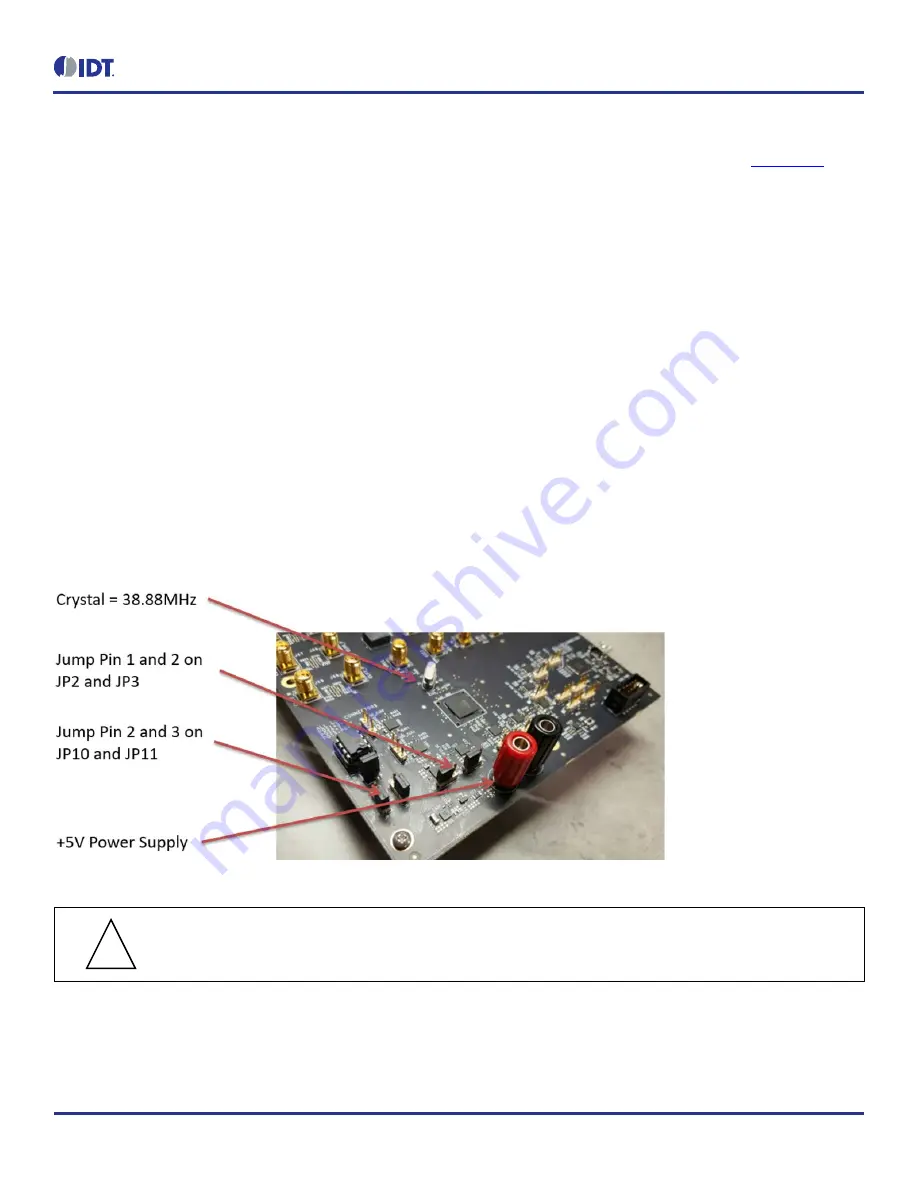
The board can operate off an EEPROM that has stored all information including firmware and a default configuration data. A default operation 

provides a sanity check on the board before running the board through the IDT Timing Commander. Please set the board in the following default 

conditions (see Figure 4 for jumper and switch positions).  


Set all the GPIOs to the center position. This will ensure that GPIO8 and GPIO9 are high and that the serial port is configured for I

2

1-byte addressing.  


VDDA = 3.3V, VCC_GPIO_DC = 3.3V, and VDDO_Qx = 3.3V 


Crystal frequency = 50MHz 


CLK0 = 25MHz 


EEPROM is connected to ClockMatrix chip through an I

2

C bus by jumping Pin 2 and 3 of JP10 and JP11 


With the above default conditions ready, connect the board to the PC using a USB type A to USB mini cable, and power up the board using a 

5V supply. On power-up, the ClockMatrix chip will read its firmware and configuration data from EEPROM and update all registers. 

When this process is completed, the following frequencies are available: 
Q0 = 122.88MHz 
Q1 = 122.88MHz 

Figure 4.  Board Setting for Default Operation 


Important Equipment Warning

In order to set GPIO8 and GPIO9 to “High”, the switches for GPIO8 and GPIO9 

must be set either to the “+” (high) position or the center position.  


!


Summary of Contents for 8A34 Series

Page 1: ...software GUI Discusses how to configure and program the board to generate standard compliant frequencies Kit Contents 8A34xxx 144BGA Evaluation Board USB Type A cable Requirements IDT Timing Commander...

Page 2: ...TUTORY WARRANTY OF NON INFRINGEMENT AND ANY OTHER WARRANTY THAT MAY ARISE BY REASON OF USAGE OF TRADE CUSTOM OR COURSE OF DEALING Important Equipment Warning Ensure the correct connection of all cable...

Page 3: ...34001 using Personality File v4 6 10 Figure 7 Timing Commander GUI with a Settings File Opened 11 Figure 8 Setting I2C for Connecting the Board with GUI 12 Figure 9 A Green Band appears when a Valid C...

Page 4: ...LVDS PECL 2 5V and PECL 3 3V or in single ended format CMOS Output SMA Connectors There are 12 outputs labeled as Q0 nQ0 Q11 nQ11 Each output clock can be configured differentially LVDS LVPECL or use...

Page 5: ...canned crystal two through holes are also available EEPROM An SO 8 socket is provided to hold an EEPROM device of compatible package EEROM is used to store firmware and customer configuration data if...

Page 6: ...es LEDs and Test Points Two 8 bit dip switches sets the logic levels for 16 GPIOs The following table shows the GPIO levels for each setting and the corresponding LED state Table 1 GPIO Settings Dip S...

Page 7: ...cable is a USB Type A connector going to a PC 1 6 Onboard EEPROM An onboard EEPROM is used to store device firmware and or customer s configuration data There are two headers jumpers JP10 and JP11 use...

Page 8: ...osition This will ensure that GPIO8 and GPIO9 are high and that the serial port is configured for I2C 1 byte addressing VDDA 3 3V VCC_GPIO_DC 3 3V and VDDO_Qx 3 3V Crystal frequency 50MHz CLK0 25MHz E...

Page 9: ...nd program the ClockMatrix device per your specific application requirements using Timing Commander GUI tools 1 Power up the board and set the main serial port in I2C mode by GPIO9 high Set GPIO8 High...

Page 10: ...ion window will pop up In the window choose the intended device in the list in this example 8A34001 is selected Click the button at the lower right corner of the window red circle to browse and select...

Page 11: ...lock diagram will open for configurations or if Open Settings File is selected in Step 3 you will be prompted to browse and select an existing tcs file and the personality file When the configuration...

Page 12: ...he communication protocols see Figure 7 After I2C and one byte addressing are selected click OK to close the window Figure 8 Setting I2C for Connecting the Board with GUI 6 Click on the chip symbol at...

Page 13: ...sonality file a firmware version mismatch warning message will appear Click Close button to close the message window and a connection is made Figure 10 Firmware Version Mismatch Warning Message 8 Once...

Page 14: ...k the Get Firmware Version button to read the firmware version Figure 12 Read Firmware Version of ClockMatrix Chip 10 In the case where the firmware version mismatches each other a firmware upgrade is...

Page 15: ...ormance The following rework must be implemented in order to support a 1PPS input clock All input clocks for this board are ac coupled and terminated as in the following figure Figure 13 AC Coupling a...

Page 16: ...o the EVK board 2 Power up the board with no EEPROM present This ensures the firmware is 4 0 2 7017 as displayed in the figure 3 The GUI will indicate that the firmware on the chip does not match the...

Page 17: ...17 February 6 2019 6 In the next window press Yes and wait around 3 4 minutes 7 Once the firmware is updated the following window will indicate a successful update Click Close 8 Press Get Firmware Ve...

Page 18: ...d Device Technology Inc 18 February 6 2019 3 2 Upload Firmware into the EEPROM 1 Once the firmware has been updated to the chip steps 1 to 8 install the EEPROM on the EVK board 2 Press Write Firmware...

Page 19: ...s No 5 In the next window press Close to start the EEPROM write 6 Wait about 5 minutes for the EEPROM write to complete Click Close in the following window 3 3 Verify the EEPROM Programming 7 Power cy...

Page 20: ...8A3xxxx 144BGA EVK User Manual 2019 Integrated Device Technology Inc 20 February 6 2019 4 Schematics...

Page 21: ...8A3xxxx 144BGA EVK User Manual 2019 Integrated Device Technology Inc 21 February 6 2019...

Page 22: ...8A3xxxx 144BGA EVK User Manual 2019 Integrated Device Technology Inc 22 February 6 2019...

Page 23: ...8A3xxxx 144BGA EVK User Manual 2019 Integrated Device Technology Inc 23 February 6 2019...

Page 24: ...8A3xxxx 144BGA EVK User Manual 2019 Integrated Device Technology Inc 24 February 6 2019...

Page 25: ...8A3xxxx 144BGA EVK User Manual 2019 Integrated Device Technology Inc 25 February 6 2019...

Page 26: ...8A3xxxx 144BGA EVK User Manual 2019 Integrated Device Technology Inc 26 February 6 2019...

Page 27: ...8A3xxxx 144BGA EVK User Manual 2019 Integrated Device Technology Inc 27 February 6 2019...

Page 28: ...8A3xxxx 144BGA EVK User Manual 2019 Integrated Device Technology Inc 28 February 6 2019...

Page 29: ...whether express or implied including but not limited to the suitability of IDT s products for any particular purpose an implied warranty of merchantability or non infringement of the intellectual pro...

Reviews: