NJR-T01UHD/NJR-R01UHD Command Guide
6
3 Communication configuration and Specifications
3.1 RS-232C communication
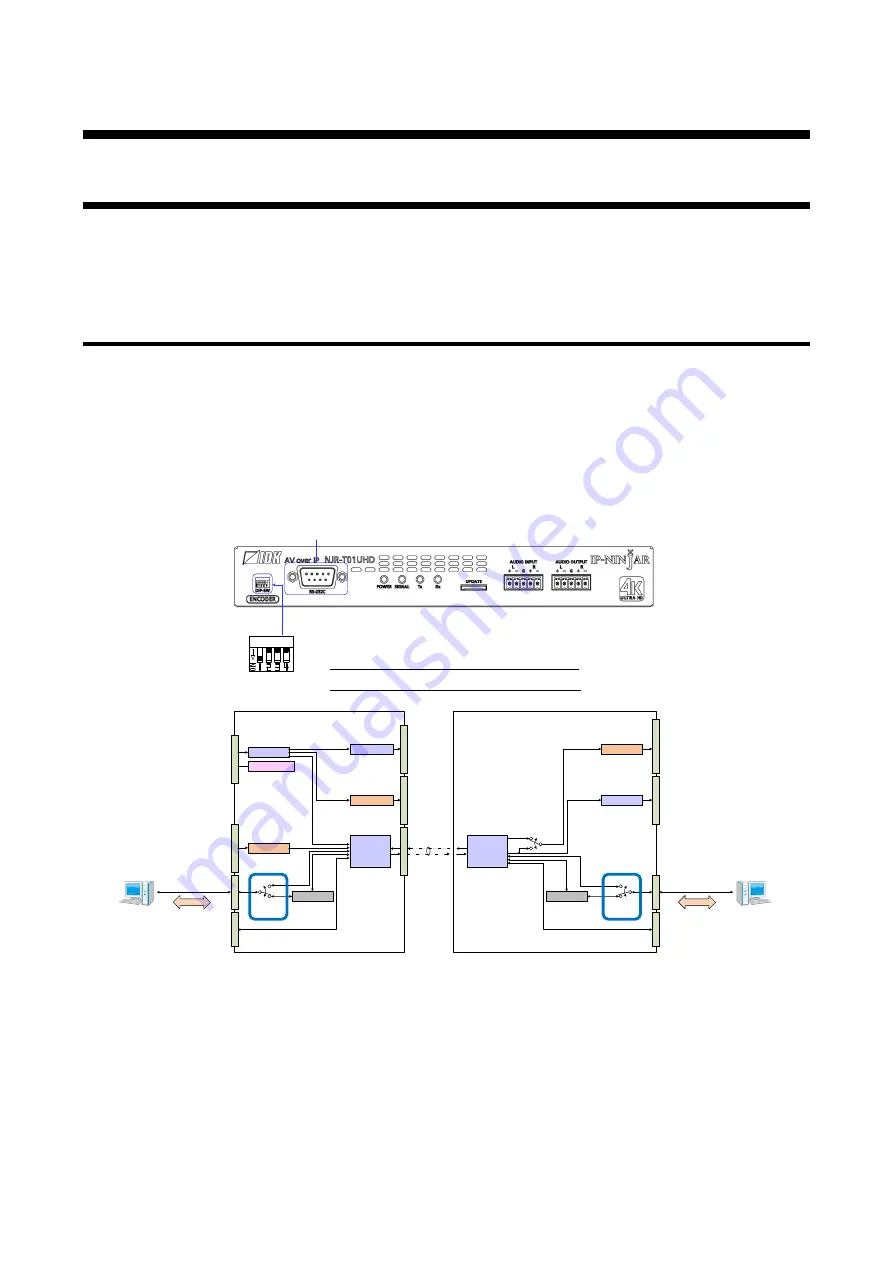
The NJR-01UHD can be accessed and controlled via RS-232C communication.
Connecting a control device to the NJR-01UHD’s RS-232C connectors enables system control and status
queries per the Command List.
3.1.1 Setting up of RS-232C communication
Follow the procedure below.
(1) Connect the control device to the RS-232C connector of the NJR-01UHD through an RS-232C cable.
(2) Set the DIP switch 1 to “ON”.
(3) See the control device according to “
”.
(4) Send communication command from the control device to the NJR-01UHD.
You can control the NJR-01UHD and get the status information using communication command.
DIP switch (No.1)
Setting the internal connection of RS-232C connector
OFF
ON
NJR-T01UHD and NJR-R01UHD are connected.
Connected to CPU of NJR-T01UHD, and NJR-T01UHD can be set.
or
Connected to CPU of NJR-R01UHD, and NJR-R01UHD can be set.
(Default: OFF)
EDID emulator
CPU
HDMI receiver
NJR-T01UHD
D/A conversion
A/D conversion
Audio D
*1
PC for control
HDM
I I
NP
UT
AUDI
O
INP
UT
HDMI transmitter
HDM
I O
UT
P
UT
AUDI
O
O
UT
PUT
TX
RS
-23
2C
LA
N
DIP switch
(No.1)
NJR-R01UHD
OFF
ON
(2)
(1)
RS-232C cable
Video/Audio D
*1
Video/Audio D
*1
Audio A
*2
RX
Audio A
*2
Audio D
*1
Video/Audio D
*1
HDMI transmitter
HDM
I O
UT
P
UT
D/A conversion
AUDI
O
O
UT
PUT
CPU
PC for control
RS
-23
2C
LA
N
DIP switch
(No.1)
OFF
ON
Audio A
*2
or D
*1
Step(1)
RS-232C cable
(3)
Step(3)
(4)
Communication
command
NJR-R01UHD cannot be controlled from a PC
connected to NJR-T01UHD.
*
NJR-T01UHD cannot be controlled from a PC
connected to NJR-R01UHD.
*
Step(4)
Communication
command
RS-232C connector
Cable for
extension
:
:
NJR-T01UHD/NJR-R01UHD
*1
Audio D: Digital audio
*2
Audio A: Analog audio
[Fig. 3.1] Setting RS-232C communication


