background image

10

 - Mode: Select the scan mode.
 - Advanced Setup: If the camera is networked but 

not scanned, use this setup. This setup allows you to 
change the network setting of the NVR’s VIDEO IN 
port which is camera’s network environment. Check 
the camera’s network setting first before you use this 
setup. Make sure that this setting does not conflict 
with the WAN setting. For more information on the 
WAN setting.

Select 

Scan

 to commence scanning.

Select a camera from the scan list and then select 

Add 

Camera

. The Device Login window will appear.

Enter a 

User ID

 and a 

Password

 for the selected 

camera.

Camera View Buttons


ALIGNMENT 


Button: Realigns camera screens 

displayed on the video display area in the order of 

Video 

In

 port connections.


RESET


 Button: Refreshes the video display area and 

the camera list.


TOOL


 Button: Displays network camera tool 

window to run a camera-related actions. There are 
Authentication, Screen Assignment and Camera Protocol 
Change for actions.

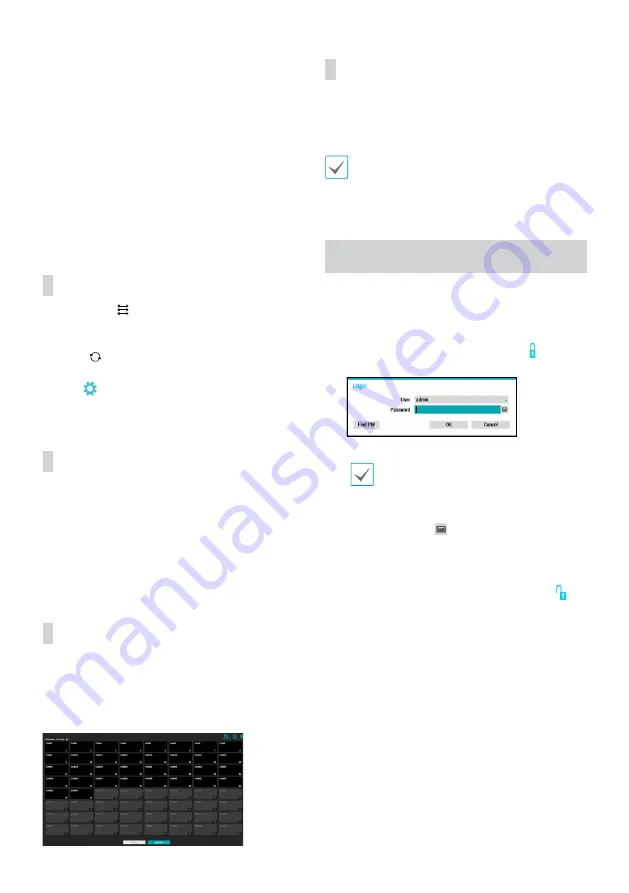
Camera List Area

Following options can be accessed by right-clicking on a 
camera list entry:


Add/Remove Camera

: Adds or removes the selected 

camera. The Add Camera option is inactive if the camera 
has already been added to the screen.


Authentication

: Enter the necessary camera login 

info. This option is inactive for DirectIP™ / IDIS cameras 
because they do not require logins. This option is 
inactive for IDIS protocol only if the passoword is set.

Video Display Area

Left-click on the video display area to toggle between split 
screen and single screen modes.
Drag the camera screens around to rearrange them. The 
maximum number of the channels that can be registered 
on the NVR and the current registered camera channels 
display on the upper left corner of each screen.

Apply/Cancel Buttons

While in Camera Registration mode, select 

Apply

 to register 

all changes.
Select 

Cancel

 to exit Camera Registration mode without 

applying the changes.

It is not possible to register a camera that has already 
been registered to a different NVR.

Login

Configuring the NVR's settings and accessing its searching 
and other functions require an authorized user login.

Bring up the Live menu and either press the 

Setup


button on the remote control or click on    icon using 
the mouse to log in.

Select a user, enter the password, and then select 

OK

.

•  Leaving the admin account unassigned with 

a password poses a security risk. Please assign 
a password at your earliest convenience. A 
warning message will continue to be displayed 
until a password is assigned.

•  Click on the 

 button next to the password 

field using the mouse. This will bring up a 
virtual keyboard you can use to assign a 
password.

To log out, bring up the Live menu and click on   

icon using the mouse.

Summary of Contents for DR-8364

Page 1: ...DR 8364 DR 8364D DR 8364F DR 8364FD Network Video Recorder Quick Guide Powered by...

Page 2: ...has been exposed to rain or water D If the equipment does not operate normally by following the operating instructions adjust only those controls that are covered by the operating instructions as an...

Page 3: ...thatmaybeofsufficientmagnitudetoconstituteariskofelectricshock Theexclamationpointwithinanequilateraltriangleisintendedtoalerttheusertothepresenceofimportantoperatingandmaintenance servicing instructi...

Page 4: ...ntoffice fordetailsofwhereand howtheycantakethisitemforenvironmentallysaferecycling Businessusersshouldcontacttheirsupplierandcheckthetermsandconditionsofthepurchasecontract Thisproductshouldnotbemixe...

Page 5: ...following accessories are included Item Network Video Recorder Power Cable Quick Guide Optical USB Mouse IR Remote Control Optional Please download IDIS Center software and product manual from this l...

Page 6: ...front panel buttons refer to the manual Rear Panel DR 8364 DR 8364F 2 3 4 5 6 8 9 0 1 7 DR 8364D DR 8364FD 2 3 4 5 6 8 9 0 1 7 1 Power In Port 2 Video In Ports SFP 1 2 RJ45 3 5 3 Network Port 4 eSATA...

Page 7: ...on 0 Keylock Button Setup Button Freeze Button Log Button Enter Button Arrow Buttons Alarm Button Sequence Button Zoom Button PTZ Button View Button a Save Button b Menu Button c Playback Buttons d Bo...

Page 8: ...n you login as an administrator account after initial booting you can use Wizard to go to Live menu and select Wizard For more details on Setup Wizard refer to the manual 1 Select a system language Se...

Page 9: ...To Camera Moves the focus automatically to the camera using MAC address of camera in the camera list Search Scope Assigns the detected cameras on the video display area Screen Auto Assign Assigns the...

Page 10: ...s option is inactive for DirectIP IDIS cameras because they do not require logins This option is inactive for IDIS protocol only if the passoword is set Video Display Area Left click on the video disp...

Page 11: ...service must be enabled to use find password function 3 Enter an UPR User Password Reset verification and then click on UPR Verification button 4 Select the UPR file and then click on Import button To...

Page 12: ...Recording will not take place if recording mode is not set to Recycle and the HDD has reached 100 of its capacity Audio Recording If the Record Audio option under Record Setup General has been enabled...

Page 13: ...enter the NVR name registered to the FEN server instead of its IP address You will be prompted to enter the FEN server s address and port number under Setup IDIS Center Program System Requirements Rec...

Page 14: ...he system this step will be skipped automatically 6 When the Installation Completed window appears click Close and finish the installation Start Program When IDIS Center software is installed IDIS Cen...

Page 15: ...t OK for remote access 6 Click Device Group on the Sites panel and click E at the bottom Add Device Group window will appear Name Enter a name for the device group Location Select an location for the...

Page 16: ...E may result in excessive data charges Android OS device 1 Open the Play Store Google Play on your Android device 2 In Play Store Google Play enter IDIS Mobile in the search field 3 Install IDIS Mobil...

Page 17: ...No default value of password Specifications These product specifications may change without prior notice VIDEO Video Inputs 64 IP channels Video Outputs 1 HDMI 1 VGA Display Resolution 3840x2160 1920...

Page 18: ...Serial Interface RS232 Terminal Block RS485 Terminal Block USB USB 2 0 x 2 USB 3 0 x 1 GENERAL Operating System Embedded Linux Unit Dimensions W x H x D 482 6mm x 88mm x 523 3mm 19 x3 5 x20 6 Unit We...

Page 19: ...DR 8364 DR 8364D DR 8364F DR 8364FD Powered by...

Page 20: ...2 1 2 3 4 5 6 SMPS 7 8 UPS UPS 9 10 11 12 13 14 15 16 17 18 19 Tmra 20 21 22 23 24 HDMI HDMI HDMI HDMI HDMI HDMI HDMI Ethernet...

Page 21: ...RTISSEMENT Pi ces mobiles dangereuses Se tenir loign des pales de ventilateurs mobiles 15 IDIS Ltd 2020 IDIS Ltd IDIS Ltd IDIS IDIS Ltd OpenSSL OpenSSL http www openssl org eay cryptsoft com tjh crypt...

Page 22: ...4 USB IDIS Center IDIS www idisglobal com 88 90 482 6 523 3 529 5 440...

Page 23: ...5 1 SATA 2 3 4 USB 5 6 7 DR 8364 DR 8364F 2 3 4 5 6 8 9 0 1 7 DR 8364D DR 8364FD 2 3 4 5 6 8 9 0 1 7 1 2 SFP 1 2 RJ45 3 5 3 4 eSATA 5 USB 3 0 6 7 VGA Out 8 HDMI 9 0 RS 485 RS 232 1 2 3 4 6 5 7 7...

Page 24: ...Panic 3 Camera 4 Status 5 Layout 6 PTZ PTZ Control 7 Register Mode 8 Thumbnail 9 Calendar 0 Keylock Setup Freeze Log Enter Arrow Alarm Sequence Zoom PTZ PTZ View a Save b Menu c Playback d Bookmark e...

Page 25: ...7 1 H 265 FEN NVR FEN...

Page 26: ...8 1 3 4 2 5 1 2 3 4 5 1 2 3 4 5 DirectIP MAC csv NVR WAN WAN 1 2 3 DirectIP IDIS IDIS...

Page 27: ...9 NVR 1 2 K admin admin OK 3 1 2 OK SSL TLS...

Page 28: ...eb Microsoft Windows 7 Home Premium Professional Ultimate Microsoft Windows 8 Pro Enterprise Intel Pentium IV 2 4 Core 2 Duo E4600 RAM 1 VGA 128 1280x1024 24 Internet Explorer 7 0 32 IDIS Web Microsof...

Page 29: ...global com IP FEN FEN IP FEN IDIS Center Microsoft Windows 7 x86 64 Home Premium Professional Ultimate Microsoft Windows 8 pro Enterprise Microsoft Windows XP Home SP3 Intel CoreTM i5 2550 3 30 Intel...

Page 30: ...3 4 5 NET Framework Visual C NET Framework Visual C 6 IDIS Center IDIS Center IDIS Center Run as administrator IDIS Center IDIS Center IDIS Center Run as administrator IDIS Center eSATA HDD SD SDHC ID...

Page 31: ...13 IDIS Center 1 a IDIS Center 2 E 3 4 5 6 E 7 E...

Page 32: ...e 1 2 IDIS Mobile Wi Fi 3G LTE Android 1 Android Play Store Google Play 2 Play Store Google Play IDIS Mobile 3 IDIS Mobile 4 5 IDIS Mobile FEN FEN FEN FEN fen idisglobal com 10088 FEN FEN FEN FEN IP I...

Page 33: ...FEN FEN FEN OFF IP ID ID admin 64 IP 1 HDMI 1 VGA 3840 x 2160 1920 x 1200 1920 x 1080 1680 x 1050 1600 x 1200 1920 16 400 1920 Full HD H 264 H 265 16 Full HD 4 4 HDD HDD SATA x8 eSATA x4 6 RAID 1 5 10...

Page 34: ...1 Linux 482 6 x 88 x 523 3 19 x 3 5 x 20 6 9 9 21 8 0 C 40 C 0 90 100 240 50 60 2 0 1 0 A 100 240 6 3 50 60 DR 8364 F 100 240 8 4 50 60 x2 DR 8364 F D 100 240 2 1 50 60 120 DR 8364 100 240 2 1 50 60 1...

Page 35: ...IDIS Co Ltd For more information please visit at www idisglobal com...

Reviews: