background image

8

Camera Registration

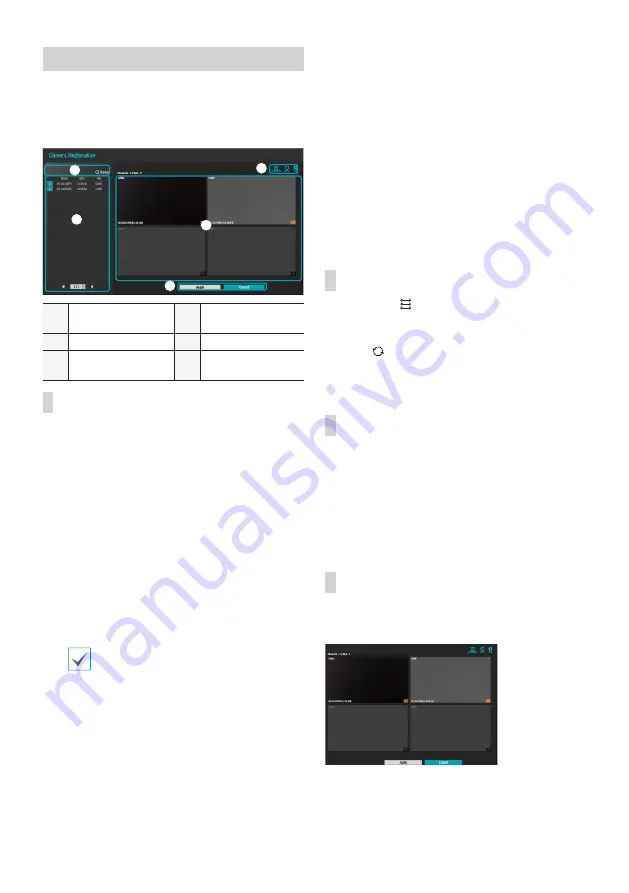
Once Network Setup Wizard is complete, live mode screen 
appears. While in live mode, right-click on the mouse and 
select Camera Registration to run the Camera Registration 
mode. It allows you to scan for the cameras connected to 
the NVR. 

1

3

4

2

5

1

Camera Scan Button

2

Camera View 
Buttons

3

Camera List Area

4

Video Display Area

5

Apply/Cancel 
Buttons

Camera Scan Button

Use this button to scan for and register cameras.
Pressing the 

Scan

 button displays the following submenu:


Rescan

: Scan for DirectIP™ cameras that were not 

scanned automatically. 


Go To Camera

: Moves the focus automatically to the 

camera using MAC address of camera in the camera list.


Screen Auto. Assign

: Assigns the detected cameras on 

the video display area.


Camera list

: By using the camera information file, .csv, 

the user can register the cameras easily. 


Third Party Scan

: Used to manually scan for third-party 

cameras that cannot be recognized by the auto scan 
feature. 

 - Protocol: Select the protocol used by the camera (or 

video encoder) you wish to search for.

Even if the network device uses a protocol 
supported by the NVR, the device itself may not 
be visible for scanning and registration by the 
NVR. For more information about supported 
network devices and models, contact your 
retailer.

 - Mode: Select the scan mode.
 - Advanced Setup: If the camera is networked but 

not scanned, use this setup. This setup allows you to 
change the network setting of the NVR’s VIDEO IN 
port which is camera’s network environment. Check 
the camera’s network setting first before you use this 
setup. Make sure that this setting does not conflict 
with the WAN setting. For more information on the 
WAN setting.

Select 

Scan

 to commence scanning.

Select a camera from the scan list and then select 

Add 

Camera

. The Device Login window will appear.

Enter a 

User ID

 and a 

Password

 for the selected 

camera.

Camera View Buttons


ALIGNMENT 


Button: Realigns camera screens 

displayed on the video display area in the order of 

Video 

In

 port connections.


RESET


 Button: Refreshes the video display area and 

the camera list.


TOOL

Button: Displays netcwork camera tool window 

and changes the camera protocol.

Camera List Area

Following options can be accessed by right-clicking on a 
camera list entry:


Add/Remove Camera

: Adds or removes the selected 

camera. The Add Camera option is inactive if the camera 
has already been added to the screen.


Authentication

: Enter the necessary camera login info. 

This option is inactive for DirectIP™ cameras because 
they do not require logins.

Video Display Area

Left-click on the video display area to toggle between split 
screen and single screen modes.
Drag the camera screens around to rearrange them.

Summary of Contents for DR-1204P

Page 1: ...DR 1204P Network Video Recorder Quick Guide Powered by...

Page 2: ...r servicing to qualified service personnel under the following conditions A When the power supply cord or the plug has been damaged B If liquid is spilled or objects have fallen into the equipment C I...

Page 3: ...ate collection systems Thismarkingshownontheproductoritsliterature indicatesthatitshouldnotbedisposedwithotherhouseholdwastesattheendofits workinglife Topreventpossibleharmtotheenvironmentorhumanhealt...

Page 4: ...following accessories are included Item Network Video Recorder Power Cable DC Adapter 56V Quick Guide Manual and IDIS Center Program CD Optical USB Mouse Overview Dimensions Unit mm 3 4 45 48 4 215 2...

Page 5: ...islinkedtoanethernet HDD LED Flasheswhendatais beingwrittenontheHDDoravideosearch isinprogress Power LED Lightsupwhilethemainunit isinoperation Rear Panel 1 4 5 3 2 6 1 HDMIOutPort 2 VGAOutPort 3 USBP...

Page 6: ...6 Connections on the Rear Panel Network Keyboard USBHDD VGAMonitor HDMIMonitor Power 56V IDISCenter RemoteMonitoring Camera...

Page 7: ...izard Date Time Setup The new date and time settings will only be applied after clicking Next Record Method Setup Record Video Quality Setup Higher recording quality uses up more disk space Finish the...

Page 8: ...ces and models contact your retailer Mode Select the scan mode Advanced Setup If the camera is networked but not scanned use this setup This setup allows you to change the network setting of the NVR s...

Page 9: ...ccount unassigned with a password poses a security risk Please assign a password at your earliest convenience A warning message will continue to be displayed until a password is assigned Click on the...

Page 10: ...General has been enabled the camera will record audio along with video Check your local laws and regulations on making audio recordings Video Recording Playback You can play back video recordings by...

Page 11: ...cting by entering http web idisglobal com enter the NVR s IP address in the Device Address field Selecting the Use FEN option on the login window allows you to enter the NVR name registered to the FEN...

Page 12: ...this step will be skipped automatically 6 When the Installation Completed window appears click Close and finish the installation Start Program When IDIS Center software is installed IDIS Center and I...

Page 13: ...t OK for remote access 6 Click Device Group on the Sites panel and click E at the bottom Add Device Group window will appear Name Enter a name for the device group Location Select an location for the...

Page 14: ...n your Android device 2 In Play Store Google Play enter IDIS Mobile in the search field 3 Install IDIS Mobile program and open it 4 The start up menu appears when pressing the Menu button on your mobi...

Page 15: ...neral Enter a name of the device to be used in IDIS Mobile app Connection Info Turn FEN ON and enter the device name used to register the device to the FEN If FEN feature is not enabled on the device...

Page 16: ...e Event Panic PLAYBACK Performance 4chFullHDsynchronousplayback Search Mode Time lapse Eventlog Thumbnail Motion Text in STORAGE HDD SATAx1 Upto4TBcapacityforeachdisk Total Capacity 4TB 4TB x 1 Data E...

Page 17: ...it Dimensions W x H x D 215mm x 214 5mm x 48 5 mm 8 5 x 8 5 x 1 9 Unit Weight 1 21Kg with1HDD Working Temperature 0 C 40 C 32 F 104 F Operating Humidity 0 90 Power NVRAdaptor Input 100 240V 50 60Hz 1...

Page 18: ...IDIS Co Ltd For more information please visit at www idisglobal com...

Reviews: