background image


BLENDORAMA III 


11


3.2.2 

Placing a machine & can. 


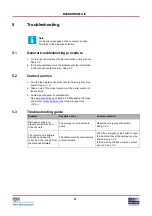
1. Check the height of the can.


Note 

The correct height of the can table depends                        

                 on the height of the can.


2. Place the can table (A) in the correct slots for the correct 

height.


CAUTION 

Make sure that the can table is secure.


3. Place the can (B) at the center of the can table.


CAUTION 

Make sure that the can does not touch the turntable 
(C). Keep enough free space.


Note 

Make sure that the can sensor (D) is able to 
detect the can.


3.2.3 

Using the emergency stop switch 

1. Push the emergency stop switch (A). The machine stops  
     immediately.


                  CAUTION 

Only push the emergency stop switch in the 
case of a safety emergency. Do not use the 
 emergency stop switch as an on/off function! 


2. Solve the problem as quickly as possible.


                 CAUTION 

When the machine is shut down, the stirring 
mechanism, which is necessary to keep the 
 colorant in optimal condition, is also shut down. 


3. Reset the emergency stop switch by turning the emergency stop 

switch. The machine restarts automatically.


Note 

After the reset, the machine is operational when 
you hear two 'beeps'. 


Summary of Contents for Blendorama III Series

Page 1: ...Original Manual of www fluidman com V 1 0 www fast fluid com...

Page 2: ...f Fast Fluid Management B V to notify any person of such revision or change Details and values given in this manual are average values and have been compiled with care They are not binding however and...

Page 3: ...Description 9 3 1 1 Overview of the machine 9 3 1 2 Type plate serial number 10 3 1 3 Type plate details 11 3 2 Operation 11 3 2 1 General dispensing procedure 11 3 2 2 Placing a can 12 3 2 3 Using t...

Page 4: ...21 5 3 Troubleshooting guide 21 6 Technical data 22 6 1 General specifications 22 6 2 Dimensions and mass 22 6 3 Ambient conditions 23 6 4 Noise level 23 6 5 Safety classifications 23 6 6 Electrical...

Page 5: ...e manual is English Note For the unpacking and installation procedures refer to the separate installation instruction sheets 1 1 How to work with the manual For the safe use of the machine it is impor...

Page 6: ...e building structure of the load capacity of the floor Place machine in a well lit and well ventilated room Install and connect the machine according to the instructions in this manual Connect the mac...

Page 7: ...nstall the machine if you have written permission from the supplier of the machine 2 4 Certifications For some markets machines need a certification to proove the machine complies with the essential r...

Page 8: ...hine 2 7 Disposal of the machine 1 Sort the machine the accessories and the packaging for environmentally friendly recycling 2 Do not dispose of the machine into domestic waste Dispose of the machine...

Page 9: ...Operator manual 3 1 Description 3 1 1 Overview of the machine A Top cover B Canister C Pump D Brush unit E Nozzle F Can sensor G Can table H Emergency stop switch I Turntable J Agitator part of the s...

Page 10: ...he dispense software instructions see the dispense software documentation 1 Place the can table in the correct slots for the correct height See 3 2 2 2 Place the can See 3 2 2 3 Choose the recipe and...

Page 11: ...or D is able to detect the can 3 2 3 Using the emergency stop switch 1 Push the emergency stop switch A The machine stops immediately CAUTION Only push the emergency stop switch in the case of a safet...

Page 12: ...clear overview of the maintenance tasks and a reminder to keep your machine in optimal condition Replace the brush unit C every 4 months for optimal performance Use the Blendorama paper funnels D for...

Page 13: ...t is installed in a bracket with a click connection It is advised to replace the brush unit every 4 months to ensure optimal performance Replacement brush units are provided in the Blendorama Maintena...

Page 14: ...vel depends on the type of colorant that is used 8 Slide the brush unit A back in the bracket B Note The brush unit is properly connected to the bracket when you feel a snap fit Make sure you hear the...

Page 15: ...e software shows when you need to refill a canister 1 In the dispense software start the fill canister command Note The fill canister command of the dispense software controls the motor of the turntab...

Page 16: ...BLENDORAMA III 16 4 Installation 4 1 Unpack the machine Unpack the machine remove the parts serially as shown below...

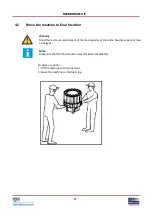
Page 17: ...place in position 1 Lift the machine with two persons 2 Move the machine on the table top Warning Mind the minimum requirement of the load capacity of the table See dimensions mass on page 21 Note Ma...

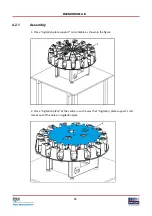
Page 18: ...18 4 2 1 Assembly 1 Place Agitation plate support on turntable as shown in the figure 2 Place Agitation plate at the centre in such a way that Agitation plate support s rod comes out of the holes on A...

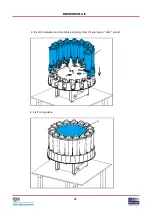
Page 19: ...BLENDORAMA III 19 3 Fix all 16 canisters on turntable periphery slots till you hear a click sound 4 Fix the top plate...

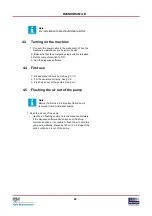
Page 20: ...place the brush unit See 3 3 3 2 Fill the canisters correctly See 3 5 3 Flush all air out of the pumps See 4 3 4 5 Flushing the air out of the pump Note Before the first use it is important that all...

Page 21: ...erial number of the machine 3 Contact your supplier or manufacturer See www fast fluid com Fast Fluid Management Europe and Asia or www fluidman com Fluid management U S A 5 3 Troubleshooting guide Pr...

Page 22: ...z 0 077 0 0026 Nozzle diameter mm in 4 0 517 6 2 Dimensions and mass i Parameter Specification Metric standard Imperial standard Dimensions height x width x depth cm in 78 x 79 x 85 30 7 x 31 1 x 33 5...

Page 23: ...ation RH 90 6 4 Noise level i Parameter Specification Maximum noise level dB A 65 6 5 Safety classifications i Parameter Specification IP Ingress Protection classification 32 EMC ElectroMagnetic Compa...

Page 24: ...6 7 Electrical diagram 244...

Page 25: ...ions 105cmx105cm weight bearing capacity 250kg 4 Make sure that the final location is well lit and well ventilated 5 Machine may never be shut down the colorants always need to be stirred 6 Machine Sp...

Reviews: