background image

-         9 -

“Sing-A-Long“ CD player with two microphones
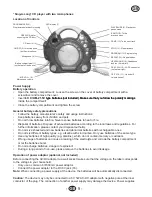
Location of Controls

PROGRAM LED ():

Programmed playback is running

LED display (1)

PLAY/PAUSE (9): Playback or

pause mode
B.SKIP (10): To the 

previous track

F.SKIP (11): T

o the next track

STOP (1): Stop playback

PROGRAM (1): Programming

REPEAT (14): Repeat modes

HEADPHONE (15): Headphone 

jack (on the rear left)

DC 6V 5W (16): AC-DC connector 

(on the rear right)

OFF. VOL. (17): On and off/

Volume control

OPEN ():Grip for

sopening the CD door

CD door (4)

ON/OFF (5) for microphone

(on the microphone)

Microphone (6)

Battery compartment (7)

(on the rear of the device)

- MIC VOL + (8):

Microphone volume

Power Supply

Battery operation

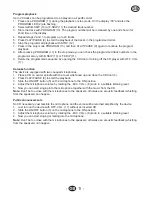
•   Open the battery compartment : Loosen the screw on the cover of battery compartment with a 

screwdriver and remove the cover.

•   Insert 4 X C/UM- 1.5V type batteries (not included). Make sure that you follow the polarity markings

4 X C/UM- 1.5V type batteries (not included). Make sure that you follow the polarity markings

type batteries (not included). Make sure that you follow the polarity markings 

inside the compartment!

•   Close the battery compartment and tighten the screw.

General battery safety precautions

•   Follow the battery manufacturer’s safety and usage instructions.

•   Keep batteries away from children and pets.

•   Do not throw batteries into fire. Never expose batteries to heat or fire.

•   Disposal of batteries: Dispose of exhausted batteries according to the local laws and regulations. For 

further information, please contact your disposal authority.

•   Do not mix exhausted and new batteries and abnormal batteries with rechargeable ones.

•   Do not mix different battery types, e.g. alkaline with zinc/carbon. Only use batteries of the same type.

•   Use only batteries of high quality (e.g. alkaline), which do not contain mercury or cadmium.

•   Wrong usage of batteries can cause a leaking of the electrolyte and corrode the battery compartment 

or let the batteries burst.

•   Do not recharge batteries, danger of explosion!

•   During a long period of non-use, please remove the batteries to avoid leakage.

operation of power adaptor (optional, not included)

Before connecting the AC/DC adaptor to a wall socket make sure that the voltage on the label corresponds 

to the voltage in your household.

•   Only use a common 6V/600 mA power adaptor.

•   Connect the power adaptor to the DC 6V jack (16) .

Note: 

When connecting a power supply at the device, the batteries will be automatically disconnected.

Caution: 

The device may only be connected to a 6V, 5W AC-DC adaptor with negative pole at the inner 

conductor of the plug. The connection of another power supply may damage the device. Power supplies 

Summary of Contents for K 1216 N

Page 1: ...INSTRUCTION MANUAL BEDIENUNGSANLEITUNG K 1216 N ...

Page 2: ...zten Kopfhörern langsam hoch Stellen Sie die Kopfhörer nicht zu laut ein Längeres Hören von hohen Lautstärken kann zu permanenten Hörschäden führen Haben Sie die Lautstärke einmal eingestellt dann erhöhen Sie diese nicht Mit der Zeit gewöhnt sich Ihr Gehör an die Lautstärke Eine Lautstärke die nicht zu hoch erscheint kann so doch zu Hörschäden führen BEDIENUNGSHINWEISE Allgemeine Sicherheitshinwei...

Page 3: ...b Setzen Sie 4 X C UM 2 1 5V Batterien nicht mitgeliefert ein achten Sie hierbei auf die Polarität wie innen im Batteriefach gekennzeichnet Schließen Sie das Batteriefach und ziehen die Schraube wieder an Allgemeine Hinweise zu Batterien Folgen Sie den Sicherheits und Benutzungshinweisen des Batterieherstellers Bewahren Sie Batterien kindersicher und sicher vor Haustieren auf Werfen Sie Batterien ...

Page 4: ...fdruck nach oben auf die Spindelachse und schließen die Klappe 4 Hinweis Wenn keine CD eingelegt wurde zeigt das LED Display 1 an 3 Auf dem LED Display 1 blinkt die Anzeige einige Sekunden Anschließend wird die gesamte Anzahl der Tracks auf der CD angezeigt 4 Starten Sie mit PLAY PAUSE 9 die Wiedergabe Auf dem Display wird die Tracknummer angezeigt z B 01 5 Stellen Sie die Lautstärke durch Drehen ...

Page 5: ... Drücken Sie im Stoppmodus PROGRAM 13 und dann erneut PLAY PAUSE 9 um die programmierte Wiedergabe wieder aufzunehmen 8 Im Stoppmodus können Sie nach Drücken von PROGRAM 13 mit B SKIP 10 oder F SKIP 11 die programmierten Tracknummern im Programmspeicher überprüfen 9 Zum Löschen der Programmierung öffnen Sie die CD Klappe oder schalten den CD Player mit OFF VOL 17 aus Karaoke Funktion Das Gerät bes...

Page 6: ... Wartungen stets an einen autorisierten Kundendienst ProBLEM MöGLICHE UrSACHE LöSUNGSvorSCHLAG Der Player funktioniert nicht CD verkehrt herum eingelegt CD verschmutzt oder beschädigt Die Laserlinse ist verschmutzt Die Klappe 4 des Players ist nicht geschlossen Erschöpfte Batterien Die CD richtig herum einlegen Ersetzen oder reinigen Sie die CD Reinigen Sie die die Laserlinse Schließen Sie die Kla...

Page 7: ...ber den normalen Haushaltsabfall entsorgt werden sonderm muss an einem Sammelpunkt für das Recycling von elektrischen und elektronischen Geräten abgegeben werden Das Symbol auf dem Produkt der Gebrauchsanleitung oder der Verpackung weist darauf hin Die Werkstoffe sind gemäß ihrer Kennzeichnung wiederverwertbar Mit der Wiederverwendung der stofflichen Verwertung oder anderen Formen der Verwertung v...

Page 8: ...apts to it and gives you the impression that the volume is lower OPERATING INSTRUCTIONS General Safety Instructions Before use please read these instructions carefully and keep them in a safe place for future reference When passing on the product to a third person make sure to include these instructions for use Manufacturer takes no responsibility for any damage caused by incorrect use Incorrect o...

Page 9: ...ever expose batteries to heat or fire Disposal of batteries Dispose of exhausted batteries according to the local laws and regulations For further information please contact your disposal authority Do not mix exhausted and new batteries and abnormal batteries with rechargeable ones Do not mix different battery types e g alkaline with zinc carbon Only use batteries of the same type Use only batteri...

Page 10: ... and resumes the normal playback of the CD 7 Press STOP 12 to stop the playback of the CD Selection of a specific track During the playback you can skip with B SKIP 10 or F SKIP 11 to the previous or next track 1 Select the track in the playback stop or pause mode with B SKIP 10 or F SKIP 11 and start the playback with PLAY PAUSE 9 2 With a short keystroke on F SKIP 11 skip to the next track or pr...

Page 11: ...aoke function The device is equipped with two coequal microphones 1 Place a CD on center spindle with the cover side faced up and close the CD door 4 2 Press PLAY PAUSE 9 to start the playback 3 Slide the ON OFF button 5 on the microphone to the ON position 4 Adjust the microphone volume by rotating the MIC VOL 8 knob to a suitable listening level 5 Now you can start singing into the microphone to...

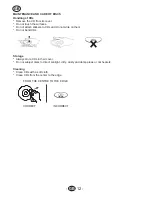
Page 12: ...not attach stickers to CDs and do not write on them Do not bend CDs Storage Always store CDs in their cover Do not subject discs to direct sunlight dirty dusty and damp areas or car heaters Cleaning Clean CDs with a soft cloth Clean CDs from the center to the edge FROM THE CENTRE TO THE EDGE CORRECT INCORRECT ...

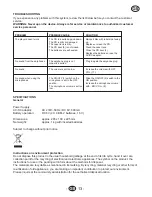
Page 13: ... position Increase the microphone volume with MIC VOL 8 No sound from the earphones The earphone plug is not properly inserted Plug in again the earphone plug SPECIFICATIONS General Power Supply AC DC adaptor AC 230V 50Hz DC 6V 600mA Battery operation DC 6V 4 X C UM 2 batteries 1 5V Dimensions approx 265 x 100 x 225 mm Net weight approx 1 kg with inserted batteries Subject to change without prior ...

Page 14: ...er Seite bzw selbst ausgeführten technischen Veränderungen am Gerät Die Garantieleistung verlängert oder erneuert nicht die Garantie von 4 Monaten Batteriewechsel sind von der Garantie ausdrücklich ausgenommen In der Garantiezeit senden Sie bitte das defekte Gerät frankiert an die angegebene Service Adresse Sie erhalten das reparierte oder ein neues Gerät kostenlos zurück Nach Ablauf der Garantiez...

Reviews: