Power-Up
Press the On/Off key to turn on the DH.
LCD Display
Overview of Link Testing and Requirements
The following section describes a typical setup for permanent link
testing for twisted copper cables only. For specific requirements
for channel, fiber, coax and other special cable testing, please
refer to the user manual.
A permanent link consists of up to 90 meters of horizontal
network cabling. The permanent link (shown above, from B to C)
is used to certify the horizontal network cable installation before
network connection and user hookup take place. The Permanent
Link Test excludes adapters, patchcords and jumpers.
LANTEK
Setup Procedure
The following procedure will show you step-by-step how to setup
test Preferences, specify Cable Type to test, setup Cable ID, Job
Naming and Selection. After completing the LANTEK Field
Calibration procedure, you are all set to starting testing CAT 6
using single button AUTOTEST on the Display or Remote Handsets.
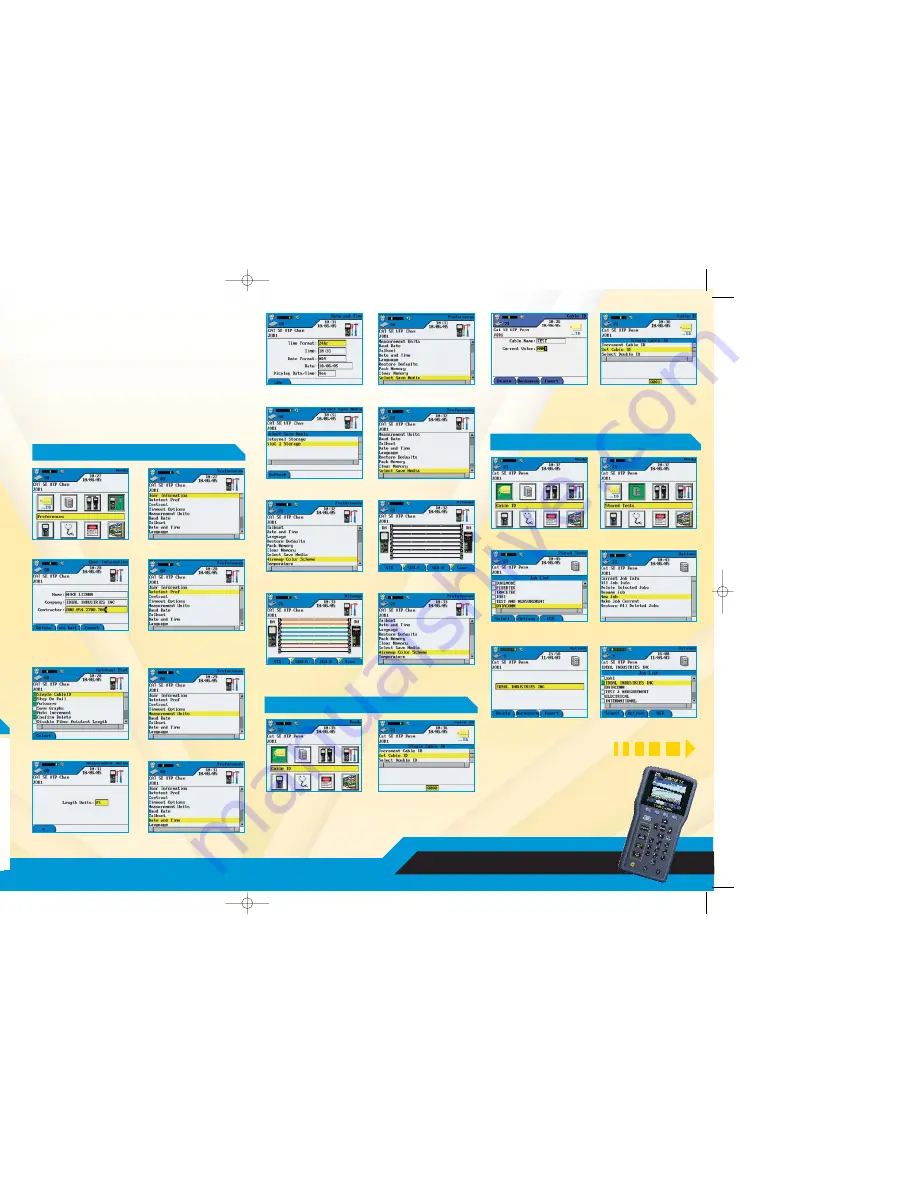
Section 1: Preference Setup
Section 2: Cable ID Setup
Section 3: Job Naming & Selection
Section 4: Cable Type Setup
Section 5: Field Calibration
Section 1:
PREFERENCES Setup
Section 2:
CABLE ID Setup
Section 3:
STORED Tests, Job Naming & Selection
1. Highlight Preferences icon,
press Enter.
2. Highlight User Information
and press Enter.
3. Enter appropriate information, it
will be reflected in the tests
reports, press Enter upon
completion.
4. Press down arrow to highlight
Autotest Pref, press Enter.
5. Make changes as required,
press Enter.
6. Highlight Measurement Units,
press Enter.
7. Press F1 to change to “m”, or
press Enter.
8. Highlight Date and Time,
press Enter.
9. Make changes then press Enter.
10. Highlight Select Save Media,
press Enter.
11. Highlight desired save media,
press Enter.
12. Display will revert to previous
screen, Slot 1 Storage selected.
13. Highlight Wiremap Color
Scheme, press Enter.
14. STD (Black & White) is default.
15. Press F2 for 568-A, or F3 for
568-B, press F4 to Save.
16. Display will revert to previous
screen, press Escape.
17. Press F1 or highlight the Cable
ID icon, press Enter.
18. Highlight Set Cable ID,
press Enter.
19. Enter cable name and Current
Value, use arrow buttons to go
between Cable Name &
Current Value, press Enter.
20. The display will revert to the
previous screen, Current Value
is updated, press Escape.
21. The display will return to the
Ready screen, press right arrow.
22. Stored Tests icon is highlighted,
press Enter.
23. Press F2 for Options.
24. Highlight New Job and
press Enter.
25. Enter Job Name as required,
press Enter.
26. Job list is updated, Current job
updated, press Escape.
LANTEK
®
LAN Cable Testers
Permanent Link Testing Configuration
1
2
4
3
6
7
8
9
10
5
11
12
13
14
15
16
1
Battery
2
Talk Set Indicator
3
Storage Device Indicator
4
Screen Title
5
Time and Date
6
Cable Setting
7
Active Job Title
8
Function Title
9
Cable ID Icon
10
Stored Test Icon
11
Field Calibration Icon
12
Preferences Icon
13
Instrument Information Icon
14
Analyze Icon
15
Fiber Optics Icon
16
Cable Type Icon
Soft Keys
Function Keys
Four function keys positioned directly below the
display below the display allow theuser to select a
soft key action on the Color Display
11326 Lantek Quick Ref.qxp:Layout 1 10/31/06 9:05 AM Page 2


